用 HTML5 Canvas 畫出圓角漸變進度條
編輯:HTML5詳解
進度條是少數「看起來簡單、做完卻很囉嗦」的元件。用 Canvas 手繪的好處是可以完全掌握圓角、漸層與陰影的每一個細節,不必被 table 或 div 的盒模型綁住。
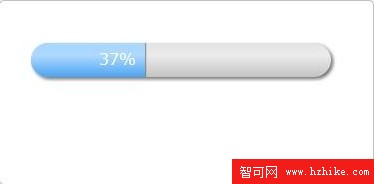
拆成三層來畫
一條像樣的進度條其實是三個圖層疊出來的:
底槽——灰色圓角矩形,加上一點偏移的陰影做出凹陷感,再疊一層由下往上的白色半透明漸層,模擬內部的反光。
進度——藍色漸層填充,寬度隨進度變化。麻煩之處在於兩端是圓角:進度很小(寬度小於圓角半徑)與進度接近滿格這兩種情況下,圓弧的起訖角要另外用反三角函數算出來,否則會出現缺口或溢出。
文字——把百分比寫在填充區塊的右端,並隨寬度變化調整位置;進度太短時則改靠左對齊,避免文字被裁掉。
基礎:畫一個圓角矩形
function roundRect(ctx, x, y, width, height, radius) {
  ctx.beginPath();
  ctx.moveTo(x + radius, y);
  ctx.lineTo(x + width - radius, y);
  ctx.arc(x + width - radius, y + radius, radius, -Math.PI / 2, Math.PI / 2, false);
  ctx.lineTo(x + radius, y + height);
  ctx.arc(x + radius, y + radius, radius, Math.PI / 2, 3 * Math.PI / 2, false);
  ctx.closePath();
  ctx.fill();
}
底槽:陰影加漸層
function progressLayerRect(ctx, x, y, width, height, radius) {
  ctx.save();

  // 先用陰影做出凹陷的深度感
  ctx.shadowOffsetX = 2;
  ctx.shadowOffsetY = 2;
  ctx.shadowBlur = 5;
  ctx.shadowColor = '#666';

  // 灰色底
  ctx.fillStyle = 'rgba(189,189,189,1)';
  roundRect(ctx, x, y, width, height, radius);

  // 疊上白色漸層當作高光
  ctx.shadowColor = 'rgba(0,0,0,0)';
  var lingrad = ctx.createLinearGradient(0, y + height, 0, 0);
  lingrad.addColorStop(0, 'rgba(255,255,255,0.1)');
  lingrad.addColorStop(0.4, 'rgba(255,255,255,0.7)');
  lingrad.addColorStop(1, 'rgba(255,255,255,0.4)');
  ctx.fillStyle = lingrad;
  roundRect(ctx, x, y, width, height, radius);

  ctx.restore();
}
進度:處理兩端的圓弧
function progressBarRect(ctx, x, y, width, height, radius, max) {
  var offset = 0;
  ctx.beginPath();

  if (width < radius) {
    // 進度還沒撐滿一個圓角
    offset = radius - Math.sqrt(Math.pow(radius, 2) - Math.pow(radius - width, 2));
    ctx.moveTo(x + width, y + offset);
    ctx.lineTo(x + width, y + height - offset);
    ctx.arc(x + radius, y + radius, radius,
            Math.PI - Math.acos((radius - width) / radius),
            Math.PI + Math.acos((radius - width) / radius), false);
  } else if (width + radius > max) {
    // 即將填滿,右端要貼齊外框的圓角
    offset = radius - Math.sqrt(Math.pow(radius, 2) - Math.pow(radius - (max - width), 2));
    ctx.moveTo(x + radius, y);
    ctx.lineTo(x + width, y);
    ctx.arc(x + max - radius, y + radius, radius, -Math.PI / 2,
            -Math.acos((radius - (max - width)) / radius), false);
    ctx.lineTo(x + width, y + height - offset);
    ctx.arc(x + max - radius, y + radius, radius,
            Math.acos((radius - (max - width)) / radius), Math.PI / 2, false);
    ctx.lineTo(x + radius, y + height);
    ctx.arc(x + radius, y + radius, radius, Math.PI / 2, 3 * Math.PI / 2, false);
  } else {
    // 一般情況
    ctx.moveTo(x + radius, y);
    ctx.lineTo(x + width, y);
    ctx.lineTo(x + width, y + height);
    ctx.lineTo(x + radius, y + height);
    ctx.arc(x + radius, y + radius, radius, Math.PI / 2, 3 * Math.PI / 2, false);
  }

  ctx.closePath();
  ctx.fill();

  // 進度條右緣加一道細陰影,讓邊界更立體
  if (width < max - 1) {
    ctx.save();
    ctx.shadowOffsetX = 1;
    ctx.shadowBlur = 1;
    ctx.shadowColor = '#666';
    if (width + radius > max) offset = offset + 1;
    ctx.fillRect(x + width, y + offset, 1, height - offset * 2);
    ctx.restore();
  }
}
文字:跟著寬度跑
function progressText(ctx, x, y, width, height, radius, max) {
  ctx.save();
  ctx.fillStyle = 'white';

  var text = Math.floor(width / max * 100) + '%';
  var textWidth = ctx.measureText(text).width;
  var textX = x + width - textWidth - radius / 2;

  if (width <= radius + textWidth) {
    textX = x + radius / 2;   // 太短時改靠左
  }

  ctx.fillText(text, textX, y + 22);
  ctx.restore();
}
驅動它動起來
var i = 0, res = 0, context = null;
var totalWidth = 300, totalHeight = 34;
var initialX = 20, initialY = 20;
var radius = totalHeight / 2;

window.onload = function () {
  var elem = document.getElementById('myCanvas');
  if (!elem || !elem.getContext) return;

  context = elem.getContext('2d');
  if (!context) return;

  context.font = '16px Verdana';

  // 進度條本身的藍色漸層
  var progressGradient = context.createLinearGradient(0, initialY + totalHeight, 0, 0);
  progressGradient.addColorStop(0, '#4DA4F3');
  progressGradient.addColorStop(0.4, '#ADD9FF');
  progressGradient.addColorStop(1, '#9ED1FF');
  context.fillStyle = progressGradient;

  res = setInterval(draw, 30);
};

function draw() {
  i += 1;
  context.clearRect(initialX - 5, initialY - 5, totalWidth + 15, totalHeight + 15);

  progressLayerRect(context, initialX, initialY, totalWidth, totalHeight, radius);
  progressBarRect(context, initialX, initialY, i, totalHeight, radius, totalWidth);
  progressText(context, initialX, initialY, i, totalHeight, radius, totalWidth);

  if (i >= totalWidth) clearInterval(res);
}
幾個實作心得
每次重繪前一定要 clearRect,而且範圍要比圖形本身再大幾像素,陰影才不會留下殘影。
用 setInterval 每 30 毫秒推進一像素是很樸素的做法,若要更順,可以改用 requestAnimationFrame 並以時間差推算進度,這樣即使 FPS 波動,動畫總時長仍然穩定。
最後,Canvas 畫的進度條對輔助技術是完全沉默的。實務上建議在 canvas 外層加上 role="progressbar" 與 aria-valuenow 等屬性,並同步更新,讓螢幕閱讀器也能念出「已完成 60%」。
- 上一篇文章: 用 Canvas 做一個會動的影片拼圖
- 下一篇文章: HTML5 Canvas 作圖基礎知識一次整理