TinyEditor:輕量簡潔的所見即所得 HTML 編輯器
編輯:HTML和Xhtml
前幾天曾介紹過一款國產的 XHTML 編輯器,今天要推薦的 TinyEditor,則是國外知名 Web 設計部落格 leigeber.com 剛發布的一款簡潔易用的所見即所得 HTML 編輯器。
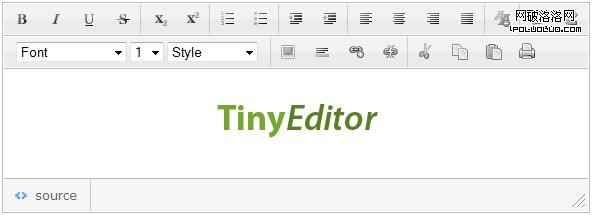
TinyEditor 的特點
- 以 JavaScript 撰寫,不依賴任何其他類別庫。
- 輕量級,需要載入的檔案僅約 8KB。
- 能處理大多數 HTML 格式化需求,且內建機制會盡量讓輸出的標記保持精簡。
- 工具列小圖示採用 CSS Sprite 技術,減少 HTTP 連線數。
- 在主流瀏覽器中測試通過。
- 可用於个人或商業專案,採用 Creative Commons 授權。
使用方式
1. 引入 TinyEditor 的 JS 與 CSS 檔案。
2. 在頁面中加入編輯器所需的標籤,其實就是一個 textarea:
<textarea id="input" style="width:400px; height:200px"></textarea>
注意 textarea 上定義的長寬,決定的就是編輯器的初始尺寸。
3. 透過腳本初始化編輯器並設定各項參數:
new TINY.editor.edit('editor',{
  id:'input',            //(必填)第二步中 textarea 的 id
  width:584,             //(選填)編輯器寬度
  height:175,            //(選填)編輯器高度
  cssclass:'te',         //(選填)編輯器的 class
  controlclass:'tecontrol', //(選填)工具按鈕的 class
  rowclass:'teheader',   //(選填)按鈕列的 class
  dividerclass:'tedivider', //(選填)按鈕間分隔線樣式
  controls:['bold', 'italic', 'underline', 'strikethrough', '|',
    'subscript', 'superscript', '|', 'orderedlist', 'unorderedlist', '|',
    'outdent', 'indent', '|', 'leftalign', 'centeralign', 'rightalign',
    'blockjustify', '|', 'unformat', '|', 'undo', 'redo', 'n',
    'font', 'size', 'style', '|', 'image', 'hr', 'link', 'unlink', '|',
    'cut', 'copy', 'paste', 'print'],  //(必填)工具按鈕,'|' 為分隔線,'n' 為換行
  footer:true,           //(選填)是否顯示編輯器底部
  fonts:['Verdana','Arial','Georgia','Trebuchet MS'], //(選填)可選字型
  xhtml:true,            //(選填)輸出 xhtml 還是 html 標記
  cssfile:'style.css',   //(選填)附加的外部 CSS
  content:'starting content', //(選填)編輯區初始內容
  css:'body{background-color:#ccc}', //(選填)編輯區樣式
  bodyid:'editor',       //(選填)編輯區 ID
  footerclass:'tefooter',//(選填)底部 class
  toggle:{text:'源代碼', activetext:'可視化', cssclass:'toggle'}, //(選填)原始碼切換
  resize:{cssclass:'resize'} //(選填)縮放控制項 class
});
可以說是高度可配置了,而且每個配置項的用途都寫得很清楚。
實際使用 TinyEditor 時有一點要特別注意:在送出編輯器內容之前,一定要先呼叫 instance.post() 函式,以確保編輯區中最新的可視化內容已被轉換成標記文字。
線上示例:https://sandbox.leigeber.com/tinyeditor/
下載:TinyEditor 源碼與示例檔案
本文來源:https://css9.net/javascript-wysiwyg-editor-tinyeditor/
- 上一篇文章: 表單設計實證:主要行為與次要行為的視覺差異該做多大
- 下一篇文章: 搞懂 ANSI、Unicode 與 UTF-8:網頁編碼背後的完整脈絡