非同步 JavaScript 與 XML(Ajax)是近年最受矚目的 Web 技術之一。本文示範如何完全以 PHP 搭配 Simple Ajax Toolkit(Sajax)做出一個簡單的線上相簿:先用傳統方式寫出可用的多頁版本,再用 Sajax 把它轉成流暢的單頁應用。
一、先做一個傳統相簿
相簿要讀取某個目錄的內容,以縮圖表格呈現;點擊縮圖後展開原圖。因為是傳統應用,每次點擊都是一次新的 HTTP 請求,參數放在 URL 上傳遞。
加上分頁器
使用者需要快速瀏覽大量照片,所以要有一個每次只顯示少量縮圖的表格,並配上導航。分頁器接受兩個參數:start 是按字母序起始的索引,step 是顯示張數。
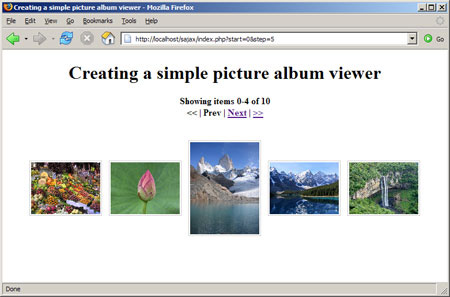
圖 1. 分頁器提供了一種瀏覽照片的方式
先準備至少 20 張 .jpg 圖片放進 /images,並在 /images/thumbnails 準備對應縮圖(本文假設兩者同名;若要自動產生縮圖,可使用 GD 套件)。
/*
 * 找出 /images 中的圖片清單並輸出縮圖表格
 */
function get_table($limit_start = 0, $limit_step = 5) {
    $images = get_image_list('images');

    // 此處產生上一頁/下一頁的導航(見下文)

    $output .= '<table class="image_table">';
    $columns = 5;
    foreach ($images as $index => $image) {
        if ($index < $limit_start) continue;                       // 從起始索引開始
        if ($index >= $limit_start + $limit_step) continue;         // 到結束索引為止

        if ($index - $limit_start % $columns == 0) {                // 開啟一列
            $output .= '<tr>';
        }

        $thumbnail = '<img src="thumbnails/' . $image . '" />';
        $output .= '<td>' . get_image_link($thumbnail, $index) . '</td>';

        if ($index - $limit_start % $columns == $columns - 1) {     // 關閉一列
            $output .= '</tr>';
        }
    }
    $output .= '</table>';

    return $nav . $output;
}
這個表很單純:從 $limit_start 開始遍歷圖片清單,每五張一行,到達 $limit_start + $limit_step 時結束迴圈。
由於表格是目錄列表的可視化呈現,還需要一個列出目錄中所有圖片的函式。下面的實作以索引陣列回傳結果:
function get_image_list($image_dir) {
    $d = dir($image_dir);
    $files = array();
    if (!$d) return null;

    while (false !== ($file = $d->read())) {
        // getimagesize 只在有效圖片時回傳 true
        if (@getimagesize($image_dir . '/' . $file)) {
            $files[] = $file;
        }
    }
    $d->close();
    return $files;
}
這裡有個關鍵前提:無論何時呼叫,回傳的陣列順序都必須一致。由於實作是靠目錄搜尋,必須確保目錄內容不變且依字母排序,否則分頁索引會錯位。
導航列
標準的首頁、上一頁、下一頁、尾頁四個連結:
// 附加導航
$output = '<h4>Showing items ' . $limit_start . '-' .
    min($limit_start + $limit_step - 1, count($images)) .
    ' of ' . count($images) . '<br />';

$prev_start = max(0, $limit_start - $limit_step);
if ($limit_start > 0) {
    $output .= get_table_link('<<', 0, $limit_step);
    $output .= ' | ' . get_table_link('Prev', $prev_start, $limit_step);
} else {
    $output .= '<< | Prev';
}

// 下一頁
$next_start = min($limit_start + $limit_step, count($images));
if ($limit_start + $limit_step < count($images)) {
    $output .= ' | ' . get_table_link('Next', $next_start, $limit_step);
    $output .= ' | ' . get_table_link('>>', (count($images) - $limit_step), $limit_step);
} else {
    $output .= ' | Next | >>';
}

$output .= '</h4>';
最後是兩個產生連結的函式。把「連結長什麼樣子」集中在這裡,的好處非常明顯——稍後整合 Sajax 時,只需要改這兩個函式:
function get_table_link($title, $start, $step) {
    $link = "index.php?start=$start&step=$step";
    return '<a href="' . $link . '">' . $title . '</a>';
}

function get_image_link($title, $index) {
    $link = "expand.php?index=$index";
    return '<a href="' . $link . '">' . $title . '</a>';
}
放大圖片
get_image_link() 會導向 expand.php,因此需先列出目錄取得對應檔名,再輸出 img 標籤:
function get_image($index) {
    $images = get_image_list('images');
    // 此處產生導航
    $output .= '<img src="images/' . $images[$index] . '" />';
    return $output;
}
導航邏輯與分頁器類似:「上一張」到 $index-1,「下一張」到 $index+1,「返回」回到分頁器:
$output .= '<h4>Viewing image ' . $index . ' of ' . count($images) . '<br />';

if ($index > 0) {
    $output .= get_image_link('<<', 0);
    $output .= ' | ' . get_image_link('Prev', $index - 1);
} else {
    $output .= '<< | Prev';
}

$output .= ' | ' . get_table_link('Up', $index, 5);

if ($index < count($images)) {
    $output .= ' | ' . get_image_link('Next', $index + 1);
    $output .= ' | ' . get_image_link('>>', count($images));
} else {
    $output .= ' | Next | >>';
}

$output .= '</h4>';
最後是包頁面用的 HTML 容器 expand.php:
<!DOCTYPE html PUBLIC "-//W3C//DTD XHTML 1.0 Strict//EN"
"https://www.w3.org/TR/2000/REC-xhtml1-20000126/DTD/xhtml1-strict.dtd">
<html xmlns="https://www.w3.org/1999/xhtml">
<head>
<title>Creating a simple picture album viewer</title>
<style type="text/css">
body { text-align: center }
table.image_table { margin: 0 auto 0 auto; width: 700px;
    padding: 10px; border: 1px solid #ccc; background: #eee; }
table.image_table td { padding: 5px }
table.image_table a { display: block; }
table.image_table img { display: block; width: 120px;
    padding: 2px; border: 1px solid #ccc; }
</style>
</head>
<body>
<h1>Creating a simple picture album viewer</h1>
<?php
$index = isset($_REQUEST['index']) ? $_REQUEST['index'] : 0;
echo get_image($index);
?>
</body>
</html>
至此相簿完成:使用者能瀏覽所有圖片、自由來回切換,甚至用書籤回到喜歡的那張。
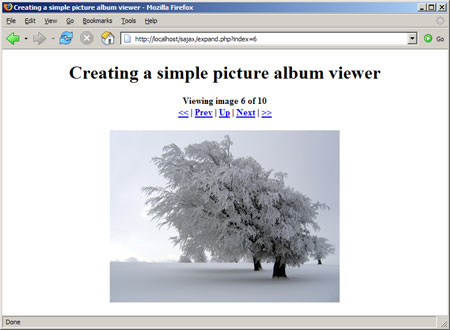
圖 2. 完成的相簿
二、加入 Sajax
相簿已有基本導航,接下來看看 Sajax 能在開發效率與使用者體驗上帶來什麼改變。以下假設你已具備 Ajax 基礎知識。
Sajax、Ajax 與傳統應用的差別
傳統模型下,兩個主要功能分屬兩個 PHP 檔,參數以 HTTP GET 傳遞,伺服器直接回傳整頁。
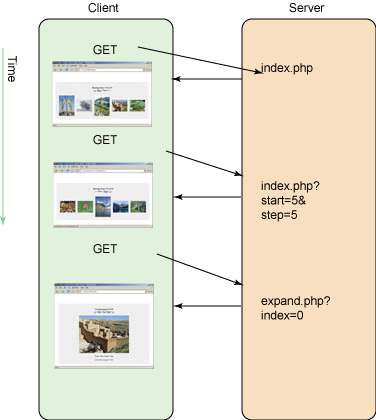
圖 3. 傳統 Web 應用程式中,三個請求調用了兩個頁面
Ajax 允許向伺服器發出非同步的輔助請求,並直接在網頁中顯示結果。不幸的是,即使最簡單的 Ajax 應用也要寫三個部分:發送請求的 JavaScript、回應的 PHP 腳本,以及處理回應的另一段 JavaScript;而且因為缺乏標準化,IE 與 Firefox、Safari 的實作還不相同。
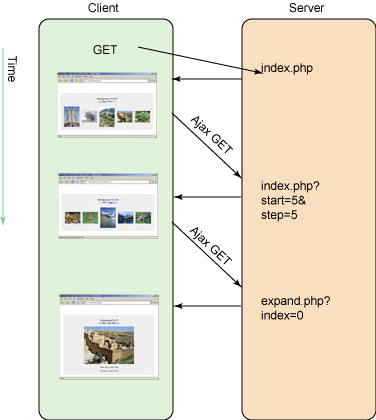
圖 4. Ajax 應用程式中,所有 HTTP 請求都自行處理
Sajax 建立在 Ajax 庫之上,用一個簡單的啟發式方法簡化了整件事:每個要給客戶端呼叫的 PHP 函式都由 Sajax「導出」。若有一個 foo_bar(),Sajax 會把它導出成 JavaScript 的 x_foo_bar();客戶端對 x_foo_bar() 的呼叫會自動轉發到伺服器上的 foo_bar(),輸出再交給另一個 JavaScript 函式處理。
<?php
require("Sajax.php");

function foo_bar($param) {
    return "You typed: $param";
}

$sajax_request_type = "GET";        // 使用 GET
sajax_init();                       // 準備 Sajax
sajax_export("foo_bar");            // foo_bar 可再由客戶端呼叫
sajax_handle_client_request();      // 攔截並處理所有 Sajax 請求
?>
<html>
<head>
<script language="javascript">
<? sajax_show_javascript(); ?>
</script>
</head>
<body>
<form onSubmit="x_foo_bar(this.input.value, alert); return false;">
<input type="text" name="input" />
</form>
</body>
</html>
開啟這個頁面,在輸入框打字後按 Enter,內容會在警示框中顯示。看似簡單的背後,x_foo_bar() 遠端呼叫了 foo_bar(),並把結果交給 JavaScript 內建的 alert()。每個 Sajax 導出函式的最後一個參數都是回應處理函式。
這個例子也說明了 Sajax 的另一個重要特性:不需要為每個函式準備獨立檔案,頁面實際上是呼叫自己,因此更容易追蹤。關鍵在 sajax_handle_client_request(),它攔截所有 Sajax 呼叫並自動處理。
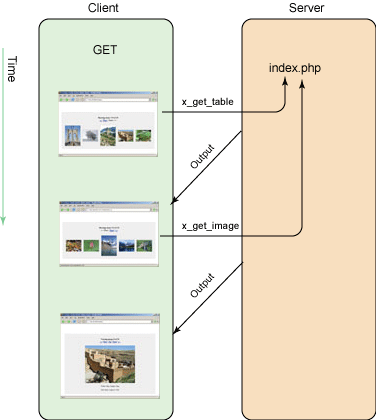
圖 5. 使用 Sajax 時,客戶端可透過單一頁面存取伺服器端多個函式
把 Sajax 接到相簿
相簿主要有 get_table() 與 get_image() 兩個函式,也就是要導出的全部。函式本身幾乎不必修改,只需改動產生的連結。
<?php
require("Sajax.php");

function get_image() { }        // 定義在後面
function get_thumbs_table() { } // 定義在後面

// 標準 Sajax 流程:使用 GET,導出兩個主要函式
$sajax_request_type = "GET";
sajax_init();
sajax_export("get_thumbs_table", "get_image");
sajax_handle_client_request();
?>
主體部分很簡單,用一個 div 當作顯示伺服器輸出的視窗:
<body>
<h1>Sajax photo album</h1>
<div id="window"></div>
</body>
由於所有輸出都導向同一個容器,回呼函式可以重複使用:
<head>
<title>Creating a Sajax photo album</title>
<style type="text/css">
body { text-align: center }
div#window { margin: 0 auto 0 auto; width: 700px;
    padding: 10px; border: 1px solid #ccc; background: #eee; }
table.image_table { margin: 0 auto 0 auto; }
table.image_table td { padding: 5px }
table.image_table a { display: block; }
table.image_table img { display: block; width: 120px;
    padding: 2px; border: 1px solid #ccc; }
img.full { display: block; margin: 0 auto 0 auto;
    width: 300px; border: 1px solid #000 }
</style>

<script language="javascript">
<? sajax_show_javascript(); ?>

// 直接輸出到 "window" div
function to_window(output) {
    document.getElementById("window").innerHTML = output;
}

window.onload = function () {
    x_get_thumbs_table(0, 5, to_window);
};
</script>
</head>
最後一步是把所有連結換成 Sajax 呼叫:href="index.php?start=0&step=5" 改成 onclick="x_get_table(0, 5, to_window)",href="expand.php?index=0" 改成 onclick="x_get_image(0, to_window)"。由於連結都集中在 get_image_link() 與 get_table_link() 兩個函式裡,轉換工作只落在這兩處。
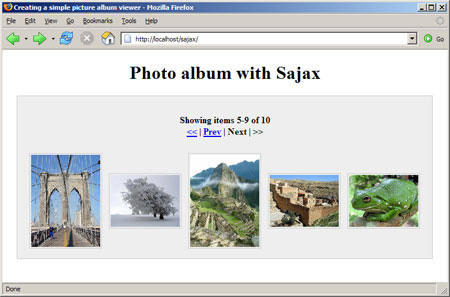
圖 6. 完成的 Sajax 相簿(縮圖)
轉換完成後,所有連結都變成對遠端 PHP 的 JavaScript 呼叫,結果由 to_window() 直接寫入頁面。整個應用只在一個檔案裡,其餘功能(get_table()、get_image() 等)可以搬到無法從 Web 直接存取的獨立程式庫。在多數 Ajax 應用中,每個請求都得由個別腳本處理,或至少寫一個龐大的分派程式,Sajax 把這層完全省掉了。
另一個好處是模組化程度提高:腳本不必知道自己在伺服器上的位置,因為所有連結最終都指向頁面自身,即使頁面搬了位置也不受影響,只要 JavaScript 與 PHP 函式保持在同一頁即可。
三、擴充相簿:加上後設資料
沒有上下文說明的相簿是不完整的——照片的來源、拍攝日期、地點都該有。我們把這些資訊集中到一個 XML 檔:根節點是 gallery,下含任意多個 photo,每個 photo 以 file 屬性對應圖片,內部則放 date、locale、comment 等描述。
<?xml version="1.0"?>
<gallery>
  <photo file="image01.jpg">
    <date>August 6, 2006</date>
    <locale>Los Angeles, CA</locale>
    <comment>Here's a photo of my favorite celebrity</comment>
  </photo>
  <photo file="image02.jpg">
    <date>August 7, 2006</date>
    <locale>San Francisco, CA</locale>
    <comment>In SF, we got to ride the street cars</comment>
  </photo>
  <photo file="image03.jpg">
    <date>August 8, 2006</date>
    <locale>Portland, OR</locale>
    <comment>Time to end our road trip!</comment>
  </photo>
</gallery>
解析方式不限,這裡用 PHP 5 內建的 SimpleXML:
function get_meta_data($file) {

    // 用 getimagesize 取得尺寸(核心函式,不需要 GD)
    list($width, $height) = @getimagesize("images/$file");
    $output = "<p>Width: {$width}px, Height: {$height}px</p>";

    $xml = simplexml_load_file("gallery.xml");

    foreach ($xml as $photo) {
        if ($photo['id'] == $file) {
            $output .= !empty($photo->date) ? "<p>Date taken: {$photo->date}</p>" : '';
            $output .= !empty($photo->locale) ? "<p>Location: {$photo->locale}</p>" : '';
            $output .= !empty($photo->comment) ? "<p>Comment: {$photo->comment}</p>" : '';
        }
    }
    return $output;
}
回到 get_image(),它手上已有 get_image_list() 產生的檔名清單,只要把檔名傳進去即可:
function get_image($index) {
    $images = get_image_list('images');
    // ...

    $output .= '<img src="images/' . $images[$index] . '" />';
    $output .= '<div id="meta_data">' . get_meta_data($images[$index]) . '</div>';
    return $output;
}
重新開啟頁面,就會看到伺服器端補上的後設資料。
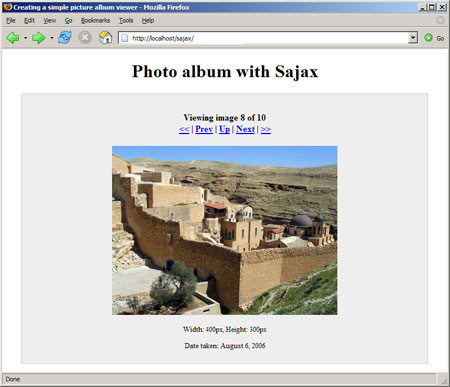
圖 7. 加入後設資料後的相簿
結語
Sajax 消除了客戶端與伺服器之間的障礙,讓開發者能做無縫的遠端函式呼叫,不必操心傳輸層與 GET/POST 的差異,可以把時間花在真正該花的地方:提供資料的 PHP 腳本,以及負責呈現與控制的 JavaScript。
在這個相簿裡,客戶端直接連到圖片資料來源;加上簡單的後設資料後,可以更清楚看到讓使用者直接存取伺服器資訊有多容易——完全不必碰協議細節。
和所有 Ajax 應用一樣,這個相簿有個致命弱點:沒有使用瀏覽器的「瀏覽歷史」,破壞了後退按鈕的功能。下一篇將透過實作歷史緩衝與狀態追蹤機制來解決這個問題。
補充:OpenAjax Alliance
2006 年 5 月 JavaOne 會議前,29 家公司的代表在 Adobe Systems 的會議室碰頭,試圖為 Ajax 的未來定調,這個小組後來定名為 OpenAjax Alliance。他們決定不把自己組織成正式的標準團體或開放源碼主導組織,形式暫時保持非正式,並約定每週召開一次電話會議。
聯盟主要關注三件事:透過提供互操作性降低採用 Ajax 的風險、堅持開放標準與開放源碼路線、保持 Web 的開放性。第一項任務就是找出建立並維持各工具間互操作性的方法。成員包含 IBM、Adobe Systems、Eclipse Foundation、Google、Laszlo Systems、Oracle、Red Hat 與 Zend Technologies 等三十一家技術公司。