原生 JavaScript 實作圖片按鈕左右切換
編輯:關於JavaScript
本文分享以純原生 JavaScript 打造圖片列表左右滾動切換的完整實作,程式碼簡潔、易於整合。
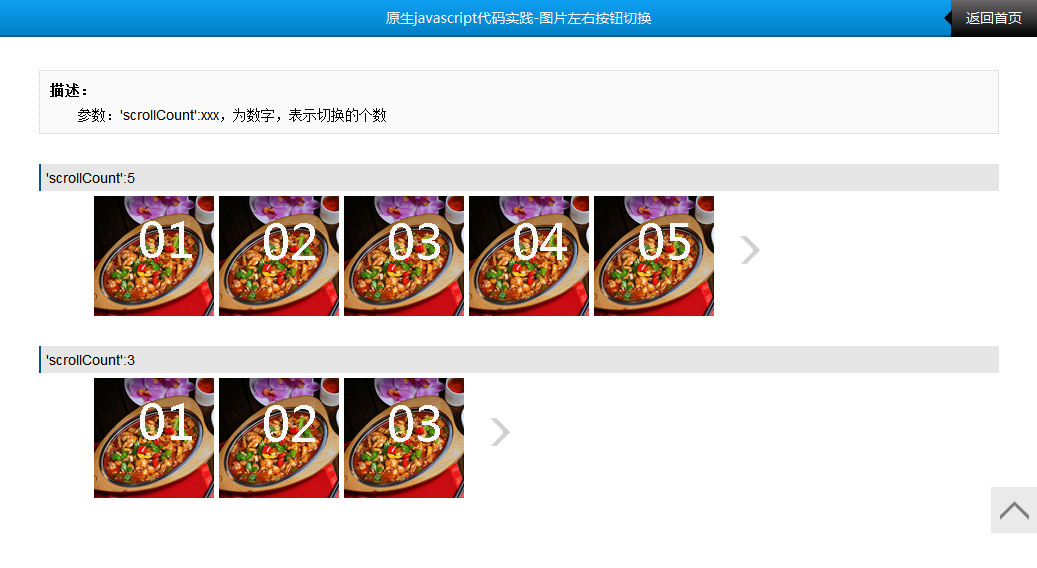
先來看看效果展示圖:
JavaScript 詳細程式碼
function LGY_picSwitch(option){
  this.oWrap = this.getId(option.wrapID); // 最外層元素
  this.olistWrap = this.getNodeByClassname(this.oWrap,'gy_picSwitch_listWrap')[0];
  this.oUl = this.olistWrap.getElementsByTagName('ul')[0];
  this.oBtnPrev = this.getNodeByClassname(this.oWrap,'gy_picSwitch_prev')[0];
  this.oBtnNext = this.getNodeByClassname(this.oWrap,'gy_picSwitch_next')[0];
  this.nLen = this.oUl.getElementsByTagName('li').length; // 圖片總數
  this.nScollCount = option.scrollCount; // 每次滾動數量
  this.nScollLen = Math.ceil(this.nLen/option.scrollCount); // 切換判斷的最大值
  this.nSwitchWidth = 0; // 每次切換移動距離,動態取得
  this.nIndex = 0; // 目前索引
  this.timer = null; // 切換計時器
  this.int();
}
LGY_picSwitch.prototype = {
  getId:function(id){ return document.getElementById(id); },
  getNodeByClassname:function(parent,classname){
    var classElements = new Array();
    var els = parent.getElementsByTagName('*');
    var elsLen = els.length;
    var pattern = new RegExp("(^|\\s)"+classname+"(\\s|$)");
    for (i = 0, j = 0; i < elsLen; i++) {
      if ( pattern.test(els[i].className) ) { classElements[j] = els[i]; j++; }
    }
    return classElements;
  },
  getCss:function(node,value){ return node.currentStyle ? node.currentStyle[value] : getComputedStyle(node,null)[value]; },
  setCss:function(node,val){ for(var v in val){ node.style.cssText += ';'+ v +':'+val[v]; } },
  moveFn:function(node,value,targetValue,callback){
    var _that = this;
    clearInterval(this.timer);
    this.timer = setInterval(function()
    {
      var val = parseFloat(_that.getCss(node,value));
      var speed = ( targetValue- val )/8;
      speed = speed>0 ? Math.ceil(speed):Math.floor(speed);
      if(speed ==0){ clearInterval(_that.timer); callback&&callback(); }
      else{ node.style[value] = ( val + speed ) +'px'; }
    },20);
  },
  picChange:function(){ this.moveFn(this.oUl,'marginLeft',-this.nIndex*this.nSwitchWidth); },
  cancelBubble:function(e){ e.stopPropagation ? e.stopPropagation():e.cancelBubble = true; },
  btnIsShow:function(){
    this.setCss(this.oBtnNext,{'display':'block'});
    this.setCss(this.oBtnPrev,{'display':'block'});
    if( this.nIndex == 0 ) this.setCss(this.oBtnPrev,{'display':'none'});
    if( this.nIndex ==(this.nScollLen-1) ) this.setCss(this.oBtnNext,{'display':'none'});
  },
  btnPrev:function(){
    var _that = this;
    this.oBtnPrev.onclick = function(e){
      var e = e || window.event;
      _that.cancelBubble(e);
      if(_that.nIndex != 0 ) { _that.nIndex--; _that.picChange(); _that.btnIsShow(); }
    }
  },
  btnNext:function(){
    var _that = this;
    this.oBtnNext.onclick = function(e){
      var e = e || window.event;
      _that.cancelBubble(e);
      if(_that.nIndex != (_that.nScollLen-1) ) { _that.nIndex++; _that.picChange(); _that.btnIsShow(); }
    }
  },
  int:function(){
    // 動態取得移動寬度
    var oLi = this.oUl.getElementsByTagName('li')[0],
        oLi_w = oLi.offsetWidth + parseInt(this.getCss(oLi,'marginLeft')) + parseInt(this.getCss(oLi,'marginRight'));
    this.nSwitchWidth = oLi_w*this.nScollCount;
    this.btnIsShow();
    this.btnPrev();
    this.btnNext();
  }
}
HTML 結構
HTML 結構必須符合以下格式:最外層的 ID 名稱可自行傳入(如下面的 gy_picSwitch02),但內部的結構與 class 名稱必須保持一致:
<div id="gy_picSwitch02">
  <span class="gy_picSwitch_prev"></span>
  <span class="gy_picSwitch_next"></span>
  <div class="gy_picSwitch_listWrap">
    <ul>
      <li><img src="images/pic01.jpg" alt=""></li>
      <li><img src="images/pic02.jpg" alt=""></li>
      <li><img src="images/pic03.jpg" alt=""></li>
      <li><img src="images/pic04.jpg" alt=""></li>
      <li><img src="images/pic05.jpg" alt=""></li>
      <li><img src="images/pic06.jpg" alt=""></li>
      <li><img src="images/pic07.jpg" alt=""></li>
      <li><img src="images/pic08.jpg" alt=""></li>
    </ul>
  </div>
</div>
參數說明與呼叫方式
參數:'wrapID':'xxxx' 為最外層的 ID 名稱;'scrollCount':5 為每次滾動的數量。
// 實例化
new LGY_picSwitch({'wrapID':'gy_picSwitch','scrollCount':5});
是不是很方便呢?使用方式簡單直觀,推薦給大家,希望對你的開發有所幫助。
- 上一篇文章: 原生 JavaScript 打造圖片彈窗燈箱交互效果
- 下一篇文章: 原生 JavaScript 實作圖片滾動延遲加載