嚴格來說,JavaScript 並不是一门傳統意義上的物件導向語言,它沒有提供類別式的繼承方式,而是採用「原型繼承」。本文將由原型與原型鏈談起,逐步帶你理解各種繼承實作及其取捨。
原型與原型鏈
在談原型繼承之前,得先理解原型與原型鏈,因為這是繼承的基礎。
在 JavaScript 中,每個函式都有一個 prototype 屬性指向它的原型,而由這個函式建立的物件也有一個 __proto__ 屬性指向同一個原型。由於函式的原型本身也是一個物件,它同樣有 __proto__ 指向自己的原型,如此逐層往上,直到 Object 的原型為止,便形成了原型鏈。下圖很好地說明了原型與原型鏈的關係。
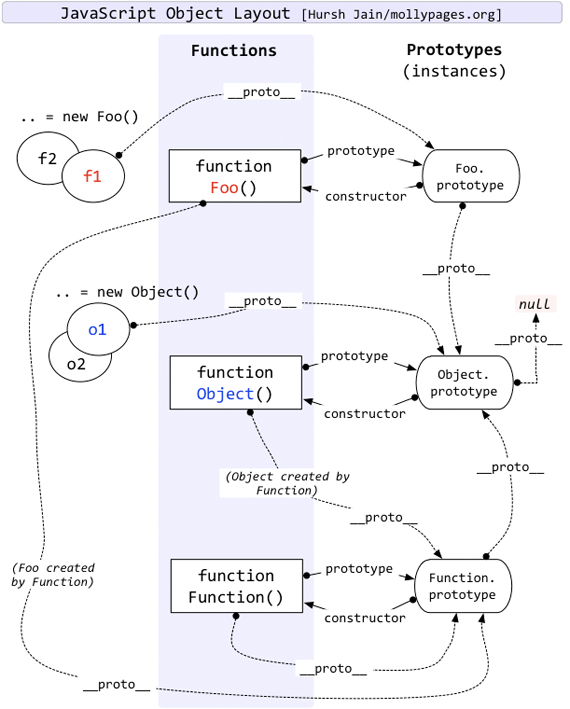
每個函式都是透過 Function 建立的物件,因此每個函式也有一個 __proto__ 指向 Function 的原型。這裡要特別強調:真正形成原型鏈的是每個物件的 __proto__ 屬性,而不是函式的 prototype 屬性,這一點非常重要。
基本模式
程式碼如下:
var Parent = function () {
this.name = 'parent';
};
Parent.prototype.getName = function () { return this.name; };
Parent.prototype.obj = { a: 1 };
var Child = function () {
this.name = 'child';
};
Child.prototype = new Parent();
var parent = new Parent();
var child = new Child();
console.log(parent.getName()); // parent
console.log(child.getName()); // child
這是最簡單的原型繼承做法,直接把父類的物件指派給子類建構函式的原型,子類物件便能存取父類及其 prototype 上的屬性。
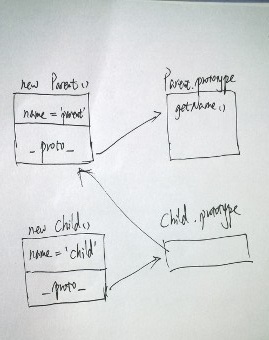
這種做法的優點是簡單直觀,缺點則是:若子類需要做與父類建構函式相同的初始化動作,就得在子類建構函式中再重複一次。
程式碼如下:
var Parent = function (name) { this.name = name || 'parent'; };
Parent.prototype.getName = function () { return this.name; };
Parent.prototype.obj = { a: 1 };
var Child = function (name) { this.name = name || 'child'; };
Child.prototype = new Parent();
var parent = new Parent('myParent');
var child = new Child('myChild');
console.log(parent.getName()); // myParent
console.log(child.getName()); // myChild
若初始化工作持續增加,這種方式就會顯得笨拙,於是有了以下的改良版本。
借用建構函式
程式碼如下:
var Parent = function (name) { this.name = name || 'parent'; };
Parent.prototype.getName = function () { return this.name; };
Parent.prototype.obj = { a: 1 };
var Child = function (name) { Parent.apply(this, arguments); };
Child.prototype = new Parent();
var parent = new Parent('myParent');
var child = new Child('myChild');
console.log(parent.getName()); // myParent
console.log(child.getName()); // myChild
這種方式在子類建構函式中透過 apply 呼叫父類建構函式,完成相同的初始化工作。但它仍有一個問題:父類建構函式被執行了兩次,一次在子類建構函式中,一次在指派子類原型時,顯得多餘。於是可再改良如下:
程式碼如下:
var Parent = function (name) { this.name = name || 'parent'; };
Parent.prototype.getName = function () { return this.name; };
Parent.prototype.obj = { a: 1 };
var Child = function (name) { Parent.apply(this, arguments); };
Child.prototype = Parent.prototype;
var parent = new Parent('myParent');
var child = new Child('myChild');
console.log(parent.getName()); // myParent
console.log(child.getName()); // myChild
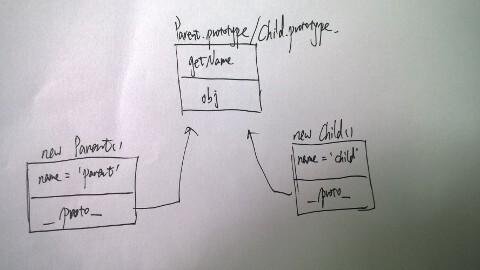
這樣父類建構函式只需執行一次,同時又能繼承父類原型上可重複使用的屬性,較符合原型的精神。原型圖如下:
臨時建構函式模式(聖杯模式)
上面改良後的版本仍有問題:它把父類原型直接指派給子類原型,導致修改子類原型時會連帶影響父類原型。為了解決這個問題,便有了臨時建構函式模式。
程式碼如下:
var Parent = function (name) { this.name = name || 'parent'; };
Parent.prototype.getName = function () { return this.name; };
Parent.prototype.obj = { a: 1 };
var Child = function (name) { Parent.apply(this, arguments); };
var F = new Function() {};
F.prototype = Parent.prototype;
Child.prototype = new F();
var parent = new Parent('myParent');
var child = new Child('myChild');
console.log(parent.getName()); // myParent
console.log(child.getName()); // myChild
原型圖如下:
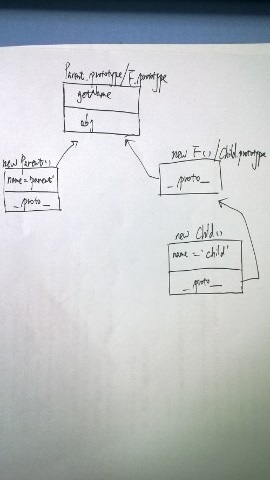
可以明顯看出,透過在父類原型與子類原型之間插入一個臨時建構函式 F,切斷了兩者的直接連結,因此修改子類原型時不會再影響到父類原型。
原型上參考型別的隱藏問題
《JavaScript 模式》一書談到聖杯模式便告一段落,但上述方法其實都藏著一個不易察覺的問題。注意我在 Parent 的 prototype 上放了一個 obj 物件字面量屬性,卻一直沒使用它。我們在聖杯模式的基礎上來看:
程式碼如下:
var Parent = function (name) { this.name = name || 'parent'; };
Parent.prototype.getName = function () { return this.name; };
Parent.prototype.obj = { a: 1 };
var Child = function (name) { Parent.apply(this, arguments); };
var F = new Function() {};
F.prototype = Parent.prototype;
Child.prototype = new F();
var parent = new Parent('myParent');
var child = new Child('myChild');
console.log(child.obj.a); // 1
console.log(parent.obj.a); // 1
child.obj.a = 2;
console.log(child.obj.a); // 2
console.log(parent.obj.a); // 2
可以看到,當我修改 child 的 obj.a 時,父類原型中的 obj.a 也跟著被改了,這就重演了共享原型的問題。原因是:存取 child.obj.a 時,會沿著原型鏈一路找到父類 prototype 上的 obj,然後對 obj.a 進行修改。
這裡的關鍵在於:當物件存取原型上的屬性時,該屬性對物件而言是「唯讀」的。也就是說,child 可以讀取 obj,卻無法改寫原型中 obj 的參考;因此 child.obj = ... 只會在自身建立一個 obj 屬性來覆蓋父類原型的 obj。但當 child 修改 obj.a 時,它先讀取了原型中 obj 的參考,此時 child.obj 與 Parent.prototype.obj 指向同一個物件,於是對 obj.a 的修改便影響到了父類原型。AngularJS 中關於 $scope 巢狀繼承的做法,正是模仿了 JavaScript 的原型繼承。
依此推論,只要子類物件存取到的原型與父類原型是同一個物件,就會出現上述問題。因此我們可以先把父類原型做一份深拷貝,再指派給子類原型,這樣子類修改原型屬性時便只是改動副本,不影響父類原型。實作如下:
var deepClone = function (source, target) {
source = source || {};
var toStr = Object.prototype.toString, arrStr = '[object array]';
for (var i in source) {
if (source.hasOwnProperty(i)) {
var item = source[i];
if (typeof item === 'object') {
target[i] = (toStr.apply(item).toLowerCase() === arrStr) ? [] : {};
deepClone(item, target[i]);
} else {
target[i] = item;
}
}
}
return target;
};
var Parent = function (name) { this.name = name || 'parent'; };
Parent.prototype.getName = function () { return this.name; };
Parent.prototype.obj = { a: '1' };
var Child = function (name) { Parent.apply(this, arguments); };
Child.prototype = deepClone(Parent.prototype);
var child = new Child('child');
var parent = new Parent('parent');
console.log(child.obj.a); // 1
console.log(parent.obj.a); // 1
child.obj.a = '2';
console.log(child.obj.a); // 2
console.log(parent.obj.a); // 1
綜合上述所有考量,JavaScript 繼承的具體實作如下(此處僅考慮 Child 與 Parent 皆為函式的情況):
var extend = function (Parent, Child) {
Child = Child || function () {};
if (Parent === undefined) return Child;
// 借用父類建構函式
Child = function () { Parent.apply(this, arguments); };
// 透過深拷貝繼承父類原型
Child.prototype = deepClone(Parent.prototype);
// 重置 constructor 屬性
Child.prototype.constructor = Child;
};
總結
說了這麼多,其實 JavaScript 的繼承相當靈活多樣,並沒有一種絕對最好的方法,需要依不同需求選擇不同方式。最重要的是理解其背後的原理,也就是原型與原型鏈的運作機制。只要掌握了這些,實作各種繼承便能游刃有餘。
- 上一篇文章: 使用 JS 與正規表達式為關鍵詞自動加上連結
- 下一篇文章: 利用 script 標籤的 src 屬性實作跨域與類 Ajax 效果