這是一個相當完整的實作:讓 table 的每一行、每一列都能用滑鼠拖曳調整高寬,並且正確處理 rowspan 與 colspan 造成的合併儲存格。相容於 IE6、7、8 與 Firefox。
效果預覽:
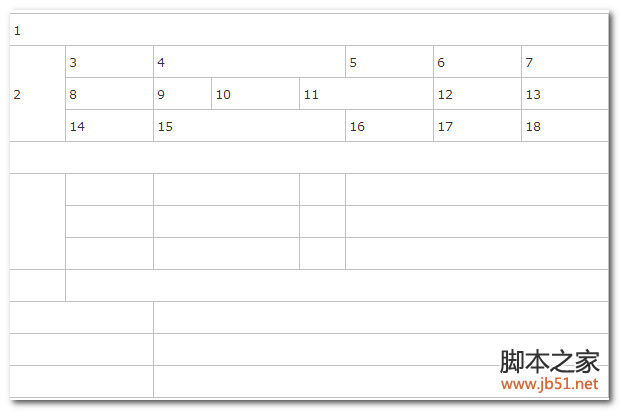
CSS
幾個關鍵設定:body 上用 -moz-user-select:none 與 cursor:default 避免拖曳時選到文字;.splitx 是橫向分隔線(調整列高),.splity 是縱向分隔線(調整欄寬),兩者都用 filter:Alpha(opacity=10) 搭配 opacity 做成幾乎透明但可被滑鼠抓到的細條。
body{margin:0px;padding:0px;-moz-user-select:none;cursor:default;}

.tabEditDiv{position:absolute;width:15px;height:15px;cursor:pointer;}
.seltab{position:absolute;width:15px;height:15px;cursor:pointer;background:url(images/seltab.gif) no-repeat;}
.splitx{overflow:hidden;position:absolute;height:3px;cursor:row-resize;background:red !important;
        filter:Alpha(opacity=10);-moz-opacity:0.1;opacity: 0.1; }
.splity{overflow:hidden;position:absolute;width:3px;cursor:col-resize;background:red !important;
        filter:Alpha(opacity=10);-moz-opacity:0.1;opacity: 0.1;}
#tabletitle{font-weight:bold;font-size:18px;height:30px;width:800px;margin:0 auto;
            text-align:center;font-family:宋體;line-height:30px;}
#tabletitle input{width:100%;border:0px;height:28px;line-height:30px;text-align:center;
                  font-weight:bold;font-size:18px;font-family:宋體;}
.finelinetable{border-right:1px solid #000;border-top:1px solid #000;border-collapse:collapse;
               font-size:13px;width:800px;margin:0 auto;}
.finelinetable td{border-left:1px solid #000;border-bottom:1px solid #000;height:25px;}
HTML
表格刻意混用了 rowspan="3"、colspan="8"、colspan="3" 等多種合併,用來驗證程式是否能正確對應視覺位置與實際索引的差異。
<body>
<div id="tabletitle">表格標題</div>
<table id="mainTable" class="finelinetable">
<tr>
<td colspan="8">1</td>
</tr>
<tr>
<td rowspan="3">2</td>
<td>3</td>
<td colspan="3">4</td>
<td>5</td>
<td>6</td>
<td>7</td>
</tr>
<tr>
<td>8</td>
<td>9</td>
<td>10</td>
<td colspan="2">11</td>
<td>12</td>
<td>13</td>
</tr>
<tr>
<td>14</td>
<td colspan="3">15</td>
<td>16</td>
<td>17</td>
<td>18</td>
</tr>
<tr>
<td colspan="8"> </td>
</tr>
<tr>
<td rowspan="3"> </td>
<td> </td>
<td colspan="2"> </td>
<td> </td>
<td colspan="3"> </td>
</tr>
<tr>
<td> </td>
<td colspan="2"> </td>
<td> </td>
<td colspan="3"> </td>
</tr>
<tr>
<td style="height: 25px"> </td>
<td colspan="2" style="height: 25px"> </td>
<td style="height: 25px"> </td>
<td colspan="3" style="height: 25px"> </td>
</tr>
<tr>
<td> </td>
<td colspan="7"> </td>
</tr>
<tr>
<td colspan="2"> </td>
<td colspan="6"> </td>
</tr>
<tr>
<td colspan="2"> </td>
<td colspan="6"> </td>
</tr>
<tr>
<td colspan="2"> </td>
<td colspan="6"> </td>
</tr>
</table>
</body>
JavaScript
程式開頭先準備四個工具函式,這部分幾乎每個老派前端專案都會有一份:
// 取得物件,$("objectId") 等同於 document.getElementById("objectId")
if (typeof $ != "function") { var $ = function (ids) { return document.getElementById(ids) }; }

// 取得座標(累加到 parentNode 的最後節點)。示例:absPos(object).x
function absPos(_node, parentNode) {
    var x = y = 0;
    var node = _node;
    do {
        if (parentNode && node == parentNode) { break; }
        x += node.offsetLeft;
        y += node.offsetTop;
    } while (node = node.offsetParent);
    node = _node;
    return { 'x': x, 'y': y };
}

// 跨瀏覽器事件綁定
function addEvent(object, event, func) {
    if (object.addEventListener) {
        object.addEventListener(event, func, false);   // W3C 方法,false 表示冒泡階段
        return true;
    } else if (object.attachEvent) {                   // MSIE 方法
        object['e' + event + func] = func;
        object[event + func] = function () { object['e' + event + func](window.event); };
        object.attachEvent('on' + event, object[event + func]);
        return true;
    }
    return false;
}

// 判斷是否為元素內部子節點觸發的 mouseover / mouseout
// 示例:e = e || event; if (isMouseLeaveOrEnter(e, obj)) {}
function isMouseLeaveOrEnter(e, handler) {
    if (e.type != 'mouseout' && e.type != 'mouseover') return false;
    var reltg = e.relatedTarget ? e.relatedTarget : e.type == 'mouseout' ? e.toElement : e.fromElement;
    while (reltg && reltg != handler) reltg = reltg.parentNode;
    return (reltg != handler);
}
接著是主體邏輯。全域狀態包含表格參照、覆蓋在表格上的編輯層 tabEditDiv、被合併遮住的儲存格清單 cellHide,以及拖曳模式與參數:
var table = $("mainTable");
var tabEditDiv;      // 覆蓋在 table 上的 DIV
var cellHide = [];   // 補充 rowspan、colspan 遮住的格子
var moveMode = "";   // 滑鼠移動模式
var moveArgs = [];   // 移動模式參數

document.onselectstart = function () { return false; };              // 禁止選取文字
addEvent(window, "resize", function () { loadTable(); });            // 視窗縮放時重算
loadTable:建立編輯層與全選按鈕
在表格左上角外放一個 div 作為承載所有分隔線的容器,並在預留位置放一個全選鈕。點擊全選鈕會切換表格的 selected 屬性並變更背景色,同時把按鈕本身撐大到整個表格的尺寸:
function loadTable() {
    var tabPos = absPos(table);
    if (!tabEditDiv) {
        tabEditDiv = document.createElement("div");
        document.body.appendChild(tabEditDiv);
    }
    tabEditDiv.style.cssText = "left:" + (tabPos.x - 15) + "px;top:" + (tabPos.y - 15) + "px;";
    tabEditDiv.className = "tabEditDiv";

    if (!seltab) {
        var seltab = document.createElement("div");
        seltab.style.cssText = "width:15px;height:15px;left:" + (tabPos.x - 15) + "px;top:" + (tabPos.y - 15) + "px;";
        seltab.className = "seltab";
        seltab.onclick = function () {
            if (table.getAttribute("selected") == "1") {
                table.removeAttribute("selected");
                table.style.background = "";
                this.style.width = "15px";
                this.style.height = "15px";
            } else {
                table.setAttribute("selected", "1");
                table.style.background = "#B6CAEB";
                this.style.width = (table.clientWidth + 15) + "px";
                this.style.height = (table.clientHeight + 15) + "px";
            }
        };
        document.body.appendChild(seltab);
    }
    loadTableEdit();
}
loadTable();
表格標題支援雙擊就地編輯,換成 input,Enter 或失焦即提交:
$("tabletitle").ondblclick = function () {
    if (this.getElementsByTagName("input").length > 0) { return; }
    this.innerHTML = "<input type='text' value='" + (this.innerHTML == "表格標題" ? "" : this.innerHTML) + "' />";
    var input = this.getElementsByTagName("input")[0];
    var _this = this;
    input.focus();
    input.onblur = function () { _this.innerHTML = this.value; }
    input.onkeydown = function (e) {
        var key = window.event ? window.event.keyCode : e.which;
        if (key == 13) this.blur();
    };
}
loadTableEdit:為每個邊界放一條可拖曳的分隔線
這是全篇最關鍵的一段。它雙重迴圈掃過每個儲存格,用 absPos 算出位置,在儲存格底邊放一條 .splitx(調整列高)、在儲存格左邊放一條 .splity(調整欄寬)。之所以用 id 記錄座標(如 splitx_120)並檢查是否已存在,是為了避免同一條邊界被重複建立。
按下分隔線時,程式要先把「視覺上的第幾條線」換算成「資料結構中的第幾列/欄」,這就是 index 屬性在做的事——它扣除前面所有被合併遮住的格子數量,並快取在元素上避免每次重算:
function loadTableEdit() {
    var tabPos = absPos(table);
    tabEditDiv.innerHTML = "";
    var cellcount = 0;
    var isadd = cellHide.length == 0;

    for (var i = 0; i < table.rows.length; i++) {
        for (var j = 0; j < table.rows[i].cells.length; j++) {
            var pos = absPos(table.rows[i].cells[j], table);

            // 可調整高度的橫線
            if (!$("splitx_" + (pos.y + table.rows[i].cells[j].clientHeight))) {
                var split = document.createElement("div");
                split.id = "splitx_" + (pos.y + table.rows[i].cells[j].clientHeight);
                split.className = "splitx";
                split.style.cssText = "width:" + table.clientWidth + "px;left:15px;top:" +
                                      (pos.y + table.rows[i].cells[j].clientHeight - 1 + 15) + "px";
                split.onmousedown = function () {
                    var index = this.getAttribute("index");
                    if (index == null) {
                        index = 0;
                        var divs = tabEditDiv.getElementsByTagName("div");
                        var left = parseInt(this.id.split("_")[1]);
                        for (var k = 0; k < divs.length; k++) {
                            if (divs[k].id.indexOf("splitx_") < 0) continue;
                            if (parseInt(divs[k].id.split("_")[1]) < left) index++;
                        }
                        this.setAttribute("index", index);
                    } else {
                        index = parseInt(index);
                    }
                    moveMode = "cellHeight";
                    moveArgs[moveArgs.length] = index;
                }
                tabEditDiv.appendChild(split);
            }

            // 可調整寬度的縱線(第一欄不需要)
            if (j > 0) {
                if (!$("splity_" + pos.x)) {
                    var split = document.createElement("div");
                    split.id = "splity_" + pos.x;
                    split.className = "splity";
                    split.style.cssText = "height:" + table.clientHeight + "px;top:15px;left:" +
                                          (pos.x - 2 + 15) + "px";
                    split.onmousedown = function () {
                        var index = this.getAttribute("index");
                        if (index == null) {
                            index = 0;
                            var divs = tabEditDiv.getElementsByTagName("div");
                            var left = parseInt(this.id.split("_")[1]);
                            for (var k = 0; k < divs.length; k++) {
                                if (divs[k].id.indexOf("splity_") < 0) continue;
                                if (parseInt(divs[k].id.split("_")[1]) < left) index++;
                            }
                            this.setAttribute("index", index);
                        } else {
                            index = parseInt(index);
                        }
                        moveMode = "cellWidth";
                        moveArgs[moveArgs.length] = index;
                    }
                    tabEditDiv.appendChild(split);
                }
            }

            if (isadd) { loadHide(); }
            table.rows[i].cells[j].onmousedown = function () { }
        }
    }
}
loadHide:算出被合併遮住的格子
這段先處理 rowspan:某格跨 n 列,則往下的 n−1 列對應位置都被遮住。再處理 colspan:某格跨 m 欄,右邊的 m−1 欄被遮住,但這裡要額外補上同一列中先前其他儲存格造成的 colspan 位移量(yc),否則索引會算錯:
function loadHide() {
    cellHide = [];
    var tempHide = [];

    for (var i = 0; i < table.rows.length; i++) {
        for (var j = 0; j < table.rows[i].cells.length; j++) {
            for (var k = 1; k < table.rows[i].cells[j].rowSpan; k++) {
                cellHide[cellHide.length] = [i + k, j];
                tempHide[tempHide.length] = [i + k, j];
            }
        }
    }

    for (var i = 0; i < table.rows.length; i++) {
        for (var j = 0; j < table.rows[i].cells.length; j++) {
            for (var k = 1; k < table.rows[i].cells[j].colSpan; k++) {
                var yc = 0;
                for (var l = 0; l < tempHide.length; l++) {
                    if (tempHide[l][0] == i && tempHide[l][1] < j) { yc++; }
                }
                for (var l = 0; l < j; l++) {
                    if (table.rows[i].cells[l].colSpan > 1) { yc += table.rows[i].cells[l].colSpan - 1; }
                }
                cellHide[cellHide.length] = [i, j + k + yc];
            }
        }
    }
}
拖曳時的實際縮放
調整寬度時,要對每一列都做一次索引換算(因為不同列的合併狀態不同,同一條視覺線對應的實際索引可能不一樣),並跳過本身有 colspan 的儲存格:
addEvent(document, "mousemove", function (e) {
    e = e || window.event;
    if (moveMode == "cellWidth") {
        var temp = moveArgs[0];
        for (var i = 0; i < table.rows.length; i++) {
            var index = temp;
            for (var j = 0; j < cellHide.length; j++) {
                if (i == cellHide[j][0] && temp >= cellHide[j][1]) { index--; }
            }
            if (!table.rows[i].cells[index] || index < 0 || table.rows[i].cells[index].colSpan > 1) { continue; }
            if (e.clientX > absPos(table.rows[i].cells[index]).x)
                table.rows[i].cells[index].style.width = e.clientX - absPos(table.rows[i].cells[index]).x + "px";
        }
        loadTableEdit();
    } else if (moveMode == "cellHeight") {
        var index = moveArgs[0];
        for (var i = 0; i < table.rows[index].cells.length; i++) {
            if (table.rows[index].cells[i].rowSpan > 1) { continue; }
            if (e.clientY > absPos(table.rows[index].cells[i]).y)
                table.rows[index].cells[i].style.height = e.clientY - absPos(table.rows[index].cells[i]).y + "px";
        }
        loadTableEdit();
    }
});

addEvent(document, "mouseup", function (e) {
    moveMode = ""; moveArgs = [];
});

addEvent(document, "mouseout", function (e) {
    e = e || event;
    if (!isMouseLeaveOrEnter(e, this)) { return; }
    moveMode = ""; moveArgs = [];
});
這份程式值得學的三件事
第一是視覺索引與資料索引的轉換。合併儲存格讓「畫面上看起來的第 3 欄」和「cells[2]」不再等號,所有座標運算都必須先做這層翻譯,這也是全篇複雜度的來源。
第二是用透明元素擴大抓取範圍。分隔線本身只有 3px 寬,滑鼠很難瞄準,因此以接近全透明的紅底搭配 row-resize / col-resize 游標提示,兼顧可用性與視覺乾淨。
第三是事件委派的概念雛形。程式中大量使用全域 document 上的 mousemove / mouseup,而不是綁在每條分隔線上,這正是後來演變成事件委派的思路。
若要拿這份程式做為基礎,有幾處建議更新:attachEvent 與 currentStyle 等 IE 專屬分支可以移除;拖曳時每次都呼叫 loadTableEdit() 重建全部 DOM,效能不佳,改為只更新被拖動的那條線會順很多;另外 table.rows[i].cells 是集合而非純陣列,用 Array.prototype.forEach.call 或轉成真陣列會更好讀。而如果只是要讓使用者調整表格欄寬,HTML 原生已有 <col> 搭配 resize 的處理方式,或直接用 CSS Grid 會省下大量程式碼。
- 上一篇文章: 兩款快速分享按鈕:讓訪客一鍵分享到社群
- 下一篇文章: JavaScript 控制 div 顯示與隱藏的最小範例
相關文章
-
用純 DOM 打造圖片拼貼特效:createElement 與絕對定位的組合技 用 CSS+JS 在文章每段後面加上帶連結的隱藏文字 用 JavaScript 讓 DIV 可編輯:createElement 動態掛載輸入框的做法 HTML5 新增元素如何相容舊版瀏覽器 打造可拖曳的 JavaScript 彈出輸入視窗 點擊輸入框彈出視窗挑選資料:原生 JS 選擇器實作 JavaScript 設定 readOnly 屬性的陷阱:大小寫決定成败 純原生 JavaScript 打造動態表格:新增、刪除、全選與自動排序 JS 動態建立節點的標準做法:createElement 與 appendChild 實戰 用 createElement 動態新增 select 的 option