用 JavaScript 讓 DIV 沿圓形軌跡排列與運動(二)
編輯:關於JavaScript
一、原理分析
1. 怎麼讓元素動起來?
本質上就是不斷改變元素的 left 與 top。
2. 怎麼讓它沿著圓周動?
上一篇談圓形排列時已經推導過:要讓元素落在圓周上,關鍵是角度(弧度)。
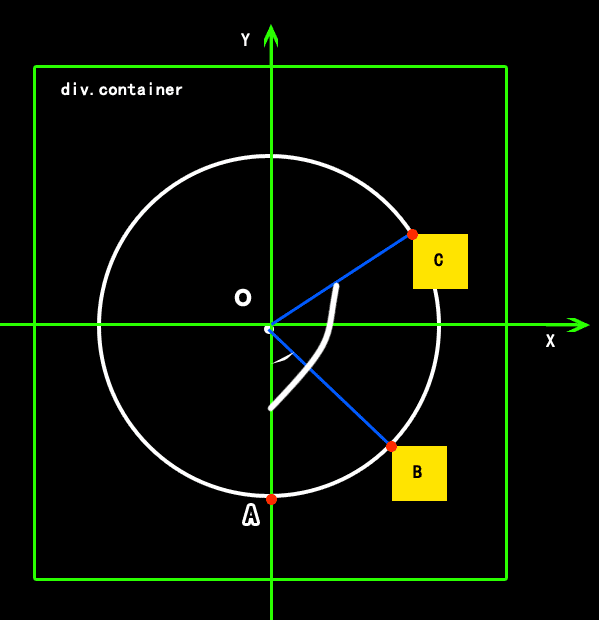
B、C 兩個元素的定位公式完全相同,只是索引值不同:
B 的 left = Math.sin(ahd * Bindex) * radius + dotLeft;
B 的 top  = Math.cos(ahd * Bindex) * radius + dotTop;

C 的 left = Math.sin(ahd * Cindex) * radius + dotLeft;
C 的 top  = Math.cos(ahd * Cindex) * radius + dotTop;
索引值不同 → 角度不同 → 正弦與餘弦值不同 → 座標不同,但結果都落在同一個圓周上,不會跑離軌道。
那麼,如果想讓 B 移動到 C 的位置呢?只要讓 B 使用的角度等於 C 的角度,再套同一組公式即可。兩者相差的就是圖中 BOC 這個圓心角。
結論:改變角度(弧度)就能讓元素沿圓周移動。
二、怎麼看起來像在運動
答案只有一個字:速度。速度就是單位時間內移動的距離,速度 = 距離 / 時間。
如果一次就把角度加上一大截,看起來就是瞬間移動;每次只加一點點,就能看到 B 慢慢靠近 C。
時間:JS 裡用 setInterval(移動, 1000),每隔 1000 毫秒執行一次移動。
速度:設 speed = 5,代表每 1000 毫秒圓心角變化 5 度。由於 Math.sin 只接受弧度,記得換算:speed * Math.PI / 180。
function 移動() {
  speed++;
  var left = Math.sin(ahd * Bindex + speed) * radius + dotLeft;
  var top  = Math.cos(ahd * Bindex + speed) * radius + dotTop;
}
三、完整程式碼
$(function () {
    var dotLeft = ($(".container").width()  - $(".dot").width())  / 2;   // 圓心橫座標
    var dotTop  = ($(".container").height() - $(".dot").height()) / 2;   // 圓心縱座標
    var radius  = 200;                                  // 半徑
    var avd = 360 / $(".box").length;                   // 每個元素佔的角度
    var ahd = avd * Math.PI / 180;                      // 換成弧度
    var speed = 2;                                      // 運動速度

    $(".dot").css({ "left": dotLeft, "top": dotTop });

    // 先做靜態的圓形排列
    $(".box").each(function (index) {
        $(this).css({
            "left": Math.sin(ahd * index) * radius + dotLeft,
            "top":  Math.cos(ahd * index) * radius + dotTop
        });
    });

    // 再讓它轉起來
    var fun_animat = function () {
        speed = speed < 360 ? speed : 2;    // 繞一圈後歸零
        speed += 2;
        var ainhd = speed * Math.PI / 180;  // 本輪的運動弧度

        $(".box").each(function (index) {
            $(this).css({
                "left": Math.sin(ahd * index + ainhd) * radius + dotLeft,
                "top":  Math.cos(ahd * index + ainhd) * radius + dotTop
            });
        });
    };

    setInterval(fun_animat, 100);
})
也可以反過來想:每 100 毫秒在圓周上取一個座標點,把這個點的 left 與 top 指派給要移動的元素,效果一樣。
有興趣的話可以搭配《基於 javascript 實現按圓形排列 DIV 元素(一)》與(三)一起看。
- 上一篇文章: 詳解 JavaScript 陣列的 reduce 方法
- 下一篇文章: 微信公眾平台開發教程(六):取得帶參數的個性化二維碼