純 JS 圖片本地預覽外掛:不上傳也能先看效果
編輯:關於JavaScript
表單上傳圖片時,使用者往往希望選完檔案就能先看到縮圖,確認無誤再按送出。這個需求不必依賴任何後端,也不用 Flash,幾十行原生 JavaScript 就能搞定。
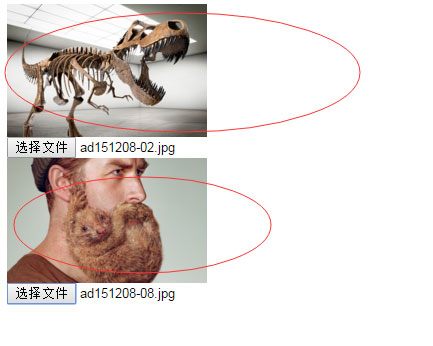
支援多組預覽
只要多 new 幾個物件,同一頁就能同時有多個獨立的預覽區,彼此不互相干擾。
HTML 結構
重點是:包著 img 的外層 div 必須給 id,因為舊版 IE 需要靠它來套用 AlphaImageLoader 填滿效果。
<!DOCTYPE html PUBLIC "-//W3C//DTD XHTML 1.0 Transitional//EN" "https://www.w3.org/TR/xhtml1/DTD/xhtml1-transitional.dtd">
<html xmlns="https://www.w3.org/1999/xhtml">
<head>
<title>uploadPreview 演示</title>
<script src="uploadPreview.js" type="text/javascript"></script>
<script>
window.onload = function () {
  new uploadPreview({ UpBtn: "up_img", DivShow: "imgdiv", ImgShow: "imgShow" });
  new uploadPreview({ UpBtn: "up_img2", DivShow: "imgdiv2", ImgShow: "imgShow2" });
}
</script>
</head>
<body>
<div id="imgdiv"><img id="imgShow" width="200"/></div>
<input type="file" id="up_img" />
<div id="imgdiv2"><img id="imgShow2" width="200" /></div>
<input type="file" id="up_img2" />
</body>
</html>
外掛主體 uploadPreview.js
/*
 * 圖片上傳本地預覽外掛,相容 IE / Chrome / Firefox
 * 使用方式:
 *   <div id="imgdiv"><img id="imgShow" width="120" height="120" /></div>
 *   <input type="file" id="up_img" />
 *   new uploadPreview({ UpBtn: "up_img", DivShow: "imgdiv", ImgShow: "imgShow" });
 * 參數:
 *   UpBtn   選擇檔案的 input id
 *   DivShow 外層 div id
 *   ImgShow 預覽用 img id
 *   Width / Height 預覽尺寸
 *   ImgType 允許的副檔名陣列
 *   callback 選檔後的回呼
 */
var uploadPreview = function(setting) {
  var _self = this;

  _self.IsNull = function(value) {
    if (typeof (value) == "function") { return false; }
    if (value == undefined || value == null || value == "" || value.length == 0) { return true; }
    return false;
  };

  // 預設設定
  _self.DefautlSetting = {
    UpBtn: "", DivShow: "", ImgShow: "",
    Width: 100, Height: 100,
    ImgType: ["gif", "jpeg", "jpg", "bmp", "png"],
    ErrMsg: "選擇文件錯誤,圖片類型必須是(gif,jpeg,jpg,bmp,png)中的一種",
    callback: function() { }
  };

  // 合併使用者設定
  _self.Setting = {
    UpBtn: _self.IsNull(setting.UpBtn) ? _self.DefautlSetting.UpBtn : setting.UpBtn,
    DivShow: _self.IsNull(setting.DivShow) ? _self.DefautlSetting.DivShow : setting.DivShow,
    ImgShow: _self.IsNull(setting.ImgShow) ? _self.DefautlSetting.ImgShow : setting.ImgShow,
    Width: _self.IsNull(setting.Width) ? _self.DefautlSetting.Width : setting.Width,
    Height: _self.IsNull(setting.Height) ? _self.DefautlSetting.Height : setting.Height,
    ImgType: _self.IsNull(setting.ImgType) ? _self.DefautlSetting.ImgType : setting.ImgType,
    ErrMsg: _self.IsNull(setting.ErrMsg) ? _self.DefautlSetting.ErrMsg : setting.ErrMsg,
    callback: _self.IsNull(setting.callback) ? _self.DefautlSetting.callback : setting.callback
  };

  // 取得本機檔案的暫存 URL
  _self.getObjectURL = function(file) {
    var url = null;
    if (window.createObjectURL != undefined) {
      url = window.createObjectURL(file);
    } else if (window.URL != undefined) {
      url = window.URL.createObjectURL(file);
    } else if (window.webkitURL != undefined) {
      url = window.webkitURL.createObjectURL(file);
    }
    return url;
  };

  // 綁定 change 事件
  _self.Bind = function() {
    document.getElementById(_self.Setting.UpBtn).onchange = function() {
      if (this.value) {
        // 副檔名校驗
        if (!RegExp("\.(" + _self.Setting.ImgType.join("|") + ")$", "i").test(this.value.toLowerCase())) {
          alert(_self.Setting.ErrMsg);
          this.value = "";
          return false;
        }
        if (navigator.userAgent.indexOf("MSIE") > -1) {
          try {
            document.getElementById(_self.Setting.ImgShow).src = _self.getObjectURL(this.files[0]);
          } catch (e) {
            // 舊版 IE 走 AlphaImageLoader
            var div = document.getElementById(_self.Setting.DivShow);
            this.select();
            top.parent.document.body.focus();
            var src = document.selection.createRange().text;
            document.selection.empty();
            document.getElementById(_self.Setting.ImgShow).style.display = "none";
            div.style.filter = "progid:DXImageTransform.Microsoft.AlphaImageLoader(sizingMethod=scale)";
            div.style.width = _self.Setting.Width + "px";
            div.style.height = _self.Setting.Height + "px";
            div.filters.item("DXImageTransform.Microsoft.AlphaImageLoader").src = src;
          }
        } else {
          document.getElementById(_self.Setting.ImgShow).src = _self.getObjectURL(this.files[0]);
        }
        _self.Setting.callback();
      }
    };
  };

  _self.Bind();
}
幾個實務提醒
- 用
createObjectURL產生的暫存網址,在元件不再需要時應呼叫URL.revokeObjectURL()釋放,否則連續選擇大量圖片會累積記憶體。 - 副檔名校驗只能擋下手滑選錯檔,真正的型別判斷建議搭配
file.type(MIME),並在後端再驗一次。 - 舊版 IE 的
document.selection分支在當今已無維護價值,新專案可直接移除,只保留createObjectURL路徑即可。 - 若要顯示「未選圖片」的佔位圖,可在 callback 中先檢查
this.files.length。
這個外掛的價值在於概念清晰:取得本機暫存 URL → 指定給 img 的 src → 完成預覽。理解之後,不論用不用框架都能自行改寫成 React 或 Vue 的版本。
- 上一篇文章: 微信 JS-SDK 自訂分享內容實作教學(好友/朋友圈)
- 下一篇文章: 微信小程序頂部選項卡(TabBar)頁面切換實作