前陣子做微信端頁面時遇到一個以前沒碰過的設計:驗證碼要用幾條黑色橫線當提示,輸入或聚焦到哪一格,那一格的橫線就消失。剛開始我把它擱著先寫別的頁面,等到其他都完成,還是得回頭處理。後來請教了公司的行動端研發同事,從他那裡得到靈感,最終把效果做了出來。
效果預覽
尚未輸入時,六條橫線排排站:
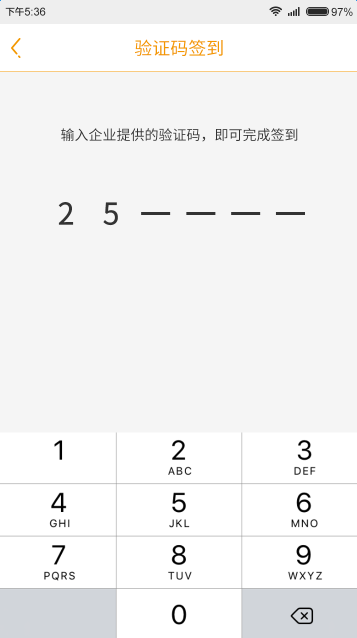
聚焦到某一格,對應的橫線消失:

輸入完成後:

第一步:HTML 結構
關鍵在於兩層重疊:pass-line 負責畫六條橫線,passInput 以絕對定位蓋在上面放六個單字符輸入框。
 <div class="main-out">
<p class="identifying-title">輸入企業提供的驗證碼,即可完成簽到</p>
 <!-- 黑色橫線框 -->
 <div class="pass-box">
 <div class="pass-line">
 <div class="line-box"><span class="line line-one"></span></div>
 <div class="line-box"><span class="line line-two"></span></div>
 <div class="line-box"><span class="line line-three"></span></div>
 <div class="line-box"><span class="line line-four"></span></div>
 <div class="line-box"><span class="line line-five"></span></div>
 <div class="line-box"><span class="line line-six"></span></div>
 </div>
 <!-- 輸入驗證碼框給一個絕對定位 -->
 <div class="passInput" id="on">
 <input type="text" class="inputCont inputCont-one" maxlength="1" />
 <input type="text" class="inputCont inputCont-two" maxlength="1"/>
 <input type="text" class="inputCont inputCont-three" maxlength="1"/>
 <input type="text" class="inputCont inputCont-four" maxlength="1"/>
 <input type="text" class="inputCont inputCont-five" maxlength="1"/>
 <input type="text" class="inputCont inputCont-six" maxlength="1"/>
 </div>
 </div>
</div>
第二步:樣式
 .identifying-title{
 width: 100%;
 margin-top: 100px;
 font-size: 14px;
 color:#333;
 text-align: center;
}
.pass-box{
 position: relative;
 width: 240px;
 height: 40px;
 margin: 50px auto 0;
}
.pass-line{ margin:0 auto; width:100%; height:100%; }
.line-box{ float: left; width: 40px; height: 40px; }
.line{
 display: block;
 width: 25px;
 height:3px;
 margin:18px auto 0;
 background: #000;
}
.passInput{
 position: absolute;
 width:240px;
 height:40px;
 left: 0;
 top: 0;
}
.inputCont{
 float: left;
 width: 25px;
 height:40px;
 margin:0 7.5px;
 z-index: 2;
 font-size:30px;
 color:#333;
 line-height: 40px;
 text-align: center;
 background: none;
}
這裡有兩個尺寸上的細節值得注意:外層 .pass-box 寬 240px,分成六格每格 40px;而輸入框本身寬 25px、左右各留 7.5px margin,25 + 7.5×2 剛好等於 40px,所以輸入框才會精準對齊每一條橫線。另外 background: none 讓輸入框透明,底部的橫線才能透出來;z-index: 2 則確保輸入框在橫線之上,點得到。
第三步:JavaScript 行為
 <script type="text/javascript" src="js/jquery-2.1.4.min.js"></script>
<script>
$(function(){
 // 控制輸入框只能輸入一位並且是數字
 $(".inputCont-one").focus();
 $(".line-one").hide()
 onload = function(){
 var txts = on.getElementsByTagName("input");
 for(var i = 0; i<txts.length;i++){
 var t = txts[i];
 t.index = i;
 t.setAttribute("readonly", true);
 t.onkeyup=function(){
 if(this.value=this.value.replace(/\D/g,'')) {
 var next = this.index + 1;
 if(next > txts.length - 1) return;
 txts[next].removeAttribute("readonly");
 txts[next].focus();
 }else{
 $(this).focus();
 }
 }
 }
 txts[0].removeAttribute("readonly");
 }
 // 輸入框獲得焦點的時候後面的橫線消失
 $(".inputCont-one").focus(function(){ $(".line-one").hide() })
 $(".inputCont-two").focus(function(){ $(".line-two").hide() })
 $(".inputCont-three").focus(function(){ $(".line-three").hide() })
 $(".inputCont-four").focus(function(){ $(".line-four").hide() })
 $(".inputCont-six").focus(function(){ $(".line-six").hide() })
 $(".inputCont-five").focus(function(){ $(".line-five").hide() })
})
</script>
幾個可以改進的地方
這個版本有幾處值得優化。readonly 的做法:把後面的格子設為 readonly 再逐一解鎖,能強制使用者由左至右填寫,但也讓「回頭修改中間某格」變得困難,實務上可能反而不友善;更簡潔的替代是全部可輸入,只用 focus 事件切換橫線顯示。橫線隱藏寫了六次:既然每個 focus 都要對應一條線,用一個迴圈加上 index 對應會乾淨很多,也不必擔心日後增減格子。onload = function(){} 這行其實沒有被正確呼叫(它只是建立了一個全域變數),應該直接呼叫該函式或改用 window.onload。另外 if(this.value=this.value.replace(...)) 是assignment 而非比較,雖然這裡剛好能運作,但原意應該是先把結果存回去再判斷是否為空,寫清楚會避免日後誤解。
- 上一篇文章: Vue 漸進式過渡效果實作
- 下一篇文章: 真正實用的 JS 上傳檔案大小驗證法