JCrop + ajaxUpload:打造完整的頭像裁切上傳功能
編輯:關於JavaScript
做過會員中心的開發者應該都熟悉這個需求:使用者上傳一張照片,可以在畫面上拖曳框選出想要的部分,預覽即時更新,最後只把裁切後的區域送到後端。這篇文章用 Jcrop 負責框選、ajaxUpload 負責傳輸,把整個流程串起來。
先看一下最終效果:
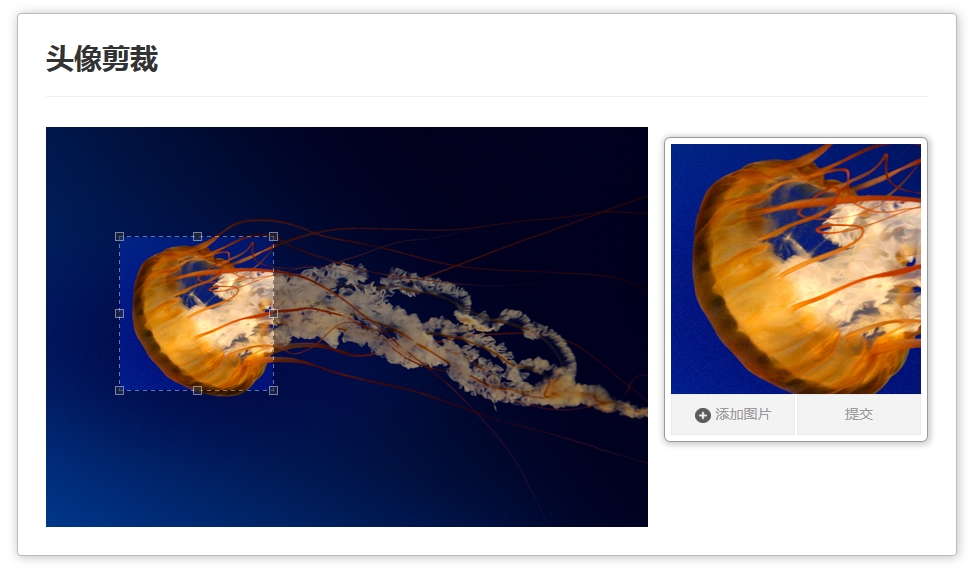
前端頁面
畫面上需要一張待裁切的目標圖、一個預覽窗格,以及「選擇圖片」與「提交」兩個動作。以下範例中的使用者 uuid 直接寫死為 test,實作時替換成實際的登入者識別即可。
<%@ page language="java" contentType="text/html; charset=UTF-8" pageEncoding="UTF-8"%>
<!DOCTYPE>
<html lang="en">
<head>
<title>用戶頭像剪裁</title>
<meta http-equiv="Content-type" content="text/html;charset=UTF-8" />
<link rel="stylesheet" href="resources/Jcrop/css/jquery.Jcrop.css">
<link rel="stylesheet" href="resources/css/photo.css">
<script src="resources/js/jquery.min.js"></script>
<script src="resources/Jcrop/js/jquery.Jcrop.js"></script>
<script src="resources/js/ajaxfileupload.js"></script>
</head>
<body>
<div class="container">
<div class="row">
<div class="span12">
<div class="jc-demo-box">
<div class="page-header"><h1>頭像剪裁</h1></div>
<img src="resources/img/test.jpg" id="target" />
<div id="preview-pane">
<div class="preview-container">
<img src="resources/img/test.jpg" class="jcrop-preview"/>
</div>
<div style='float:left;display:inline;'>
<a class='btn_addPic' href="javascript:void(0);">
<span><EM>+</EM>添加圖片</span>
<input id="upload_image" type="file" name="upimage" accept="image/*" class="filePrew"/>
</a>
</div>
<div style='float:right;display:inline;'>
<a class='btn_addPic' href="javascript:void(0);" onclick='submit()'><span>提交</span></a>
</div>
</div>
</div>
</div>
</div>
</div>
</body>
接著是驅動整個互動的腳本。這裡有幾個重點值得留意:
- 用
getBounds()取得圖片的真實寬高(boundx、boundy),因為預覽縮放必須以原始尺寸為基準。 - 用 HTML5 的
URL.createObjectURL()把使用者剛選的本地檔案變成可顯示的暫存網址,做到「選完立刻回顯」。 - 把
x / y / w / h以及頁面圖片的寬高一起送到後端,後端才能換算成原圖座標。
var global_api = "";
var boundx = ""; // 頁面圖片寬度
var boundy = ""; // 頁面圖片高度
var tag = false;

$(function () {
  var jcrop_api,
      $preview = $('#preview-pane'),
      $pcnt = $('#preview-pane .preview-container'),
      $pimg = $('#preview-pane .preview-container img'),
      xsize = $pcnt.width(),
      ysize = $pcnt.height();

  $('#target').Jcrop({
    onChange: updatePreview,
    onSelect: updatePreview,
    aspectRatio: xsize / ysize
  }, function () {
    var bounds = this.getBounds();
    boundx = bounds[0];
    boundy = bounds[1];
    jcrop_api = this;
    $preview.appendTo(jcrop_api.ui.holder);
  });

  function updatePreview(c) {
    if (parseInt(c.w) > 0) global_api = c;
    var rx = xsize / c.w;
    var ry = ysize / c.h;
    $pimg.css({
      width: Math.round(rx * boundx) + 'px',
      height: Math.round(ry * boundy) + 'px',
      marginLeft: '-' + Math.round(rx * c.x) + 'px',
      marginTop: '-' + Math.round(ry * c.y) + 'px'
    });
  }

  // 選擇本地圖片後即時回顯
  $('#upload_image').change(function (event) {
    var files = event.target.files, file;
    if (files && files.length > 0) {
      file = files[0];
      var URL = window.URL || window.webkitURL;
      var imgURL = URL.createObjectURL(file);
      $('.jcrop-holder img').attr('src', imgURL);
      $('.preview-container img').attr('src', imgURL);
      tag = true;
    }
  });
});

function submit() {
  if (tag && global_api != "") {
    ajaxFileUpload();
  } else {
    alert('請先選擇一張圖片並框選範圍');
  }
}

function ajaxFileUpload() {
  $.ajaxFileUpload({
    url: 'uploadphoto',
    secureuri: false,
    fileElementId: 'upload_image',
    dataType: 'json',
    data: {
      x: global_api.x, y: global_api.y,
      w: global_api.w, h: global_api.h,
      pw: boundx, ph: boundy,
      unid: 'test'
    },
    success: function (data) {
      alert(data.result ? '成功' : '失敗');
      window.location.reload();
    }
  });
}
後端接收與裁切
後端要做的事很單純:取出前端傳來的座標與頁面圖片尺寸,呼叫裁切工具取得 byte 陣列,再寫回使用者資料。
@ResponseBody
@RequestMapping("uploadphoto")
public Map<String, Object> uploadPhoto(
        @RequestParam("upimage") MultipartFile imageFile,
        HttpServletRequest request,
        HttpServletResponse response) throws Exception {

  Map<String, Object> result = new HashMap<String, Object>();
  boolean tag = false;
  String unid = request.getParameter("unid");
  String x = request.getParameter("x");
  String y = request.getParameter("y");
  String h = request.getParameter("h");
  String w = request.getParameter("w");
  // 頁面實際圖片寬高
  String pheight = request.getParameter("ph");
  String pweight = request.getParameter("pw");

  int imageX = Integer.parseInt(x);
  int imageY = Integer.parseInt(y);
  int imageH = Integer.parseInt(h);
  int imageW = Integer.parseInt(w);
  int srcH = Integer.parseInt(pheight);
  int srcW = Integer.parseInt(pweight);

  try {
    if (imageFile != null) {
      if (FileUploadUtil.allowUpload(imageFile.getContentType())) {
        byte[] b = ImageCut.imgCut(imageFile.getInputStream(),
                                   imageX, imageY, imageW, imageH, srcW, srcH);
        if (b != null) {
          User user = userService.selectByPrimaryKey(unid);
          user.setPhoto(b);
          tag = (userService.updateByPrimaryKeySelective(user) == 1) ? true : tag;
        }
      }
    }
  } catch (Exception e) {
    e.printStackTrace();
  }
  result.put("result", tag);
  return result;
}
圖片裁切工具類
核心使用了 AWT 的 CropImageFilter:先把原圖縮放到頁面上顯示的尺寸,再用同一組座標去裁切,這樣就能得到與預覽完全一致的结果。
package com.ssm.demo.utils;

import java.awt.Graphics;
import java.awt.Image;
import java.awt.Toolkit;
import java.awt.image.BufferedImage;
import java.awt.image.CropImageFilter;
import java.awt.image.FilteredImageSource;
import java.awt.image.ImageFilter;
import java.io.ByteArrayOutputStream;
import java.io.InputStream;
import javax.imageio.ImageIO;

public class ImageCut {
  /**
   * 截取圖片
   * @param input      原圖輸入流
   * @param x          截取時的 x 座標
   * @param y          截取時的 y 座標
   * @param desWidth   截取的寬度
   * @param desHeight  截取的高度
   * @param srcWidth   頁面圖片的寬度
   * @param srcHeight  頁面圖片的高度
   */
  public static byte[] imgCut(InputStream input, int x, int y,
                              int desWidth, int desHeight,
                              int srcWidth, int srcHeight) {
    try {
      Image img;
      ImageFilter cropFilter;
      BufferedImage bi = ImageIO.read(input);
      if (srcWidth >= desWidth && srcHeight >= desHeight) {
        Image image = bi.getScaledInstance(srcWidth, srcHeight, Image.SCALE_DEFAULT);
        cropFilter = new CropImageFilter(x, y, desWidth, desHeight);
        img = Toolkit.getDefaultToolkit()
                       .createImage(new FilteredImageSource(image.getSource(), cropFilter));
        BufferedImage tag = new BufferedImage(desWidth, desHeight, BufferedImage.TYPE_INT_RGB);
        Graphics g = tag.getGraphics();
        g.drawImage(img, 0, 0, null);
        g.dispose();
        ByteArrayOutputStream out = new ByteArrayOutputStream();
        ImageIO.write(tag, "JPEG", out);
        return out.toByteArray();
      }
    } catch (Exception e) {
      e.printStackTrace();
    }
    return null;
  }
}
整套流程走完,使用者體驗到的就是「選圖 → 拖框 → 即時預覽 → 送出」,而後端拿到的已經是裁好的成品。實作時別忘了加上檔案大小與副檔名的伺服端驗證,避免任意檔案被寫入伺服器。
- 上一篇文章: JavaScript 如何優雅地實作「只執行一次」的函數
- 下一篇文章: 用原生 JavaScript 為元素動態加上多個 class