artDialog + plupload:打造帶佇列管理與進度的多檔案上傳
編輯:關於JavaScript
關於 Plupload
Plupload 由 TinyMCE 的開發團隊打造,提供了一個高度可用的上傳方案。它分為核心 API 與 jQuery 上傳佇列元件兩部分,你可以直接拿现成的用,也可以只取核心 API 自行定製介面。
效果預覽
包含上傳面板與檔案佇列列表:
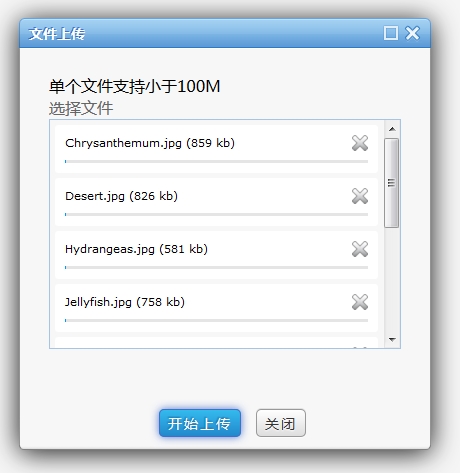
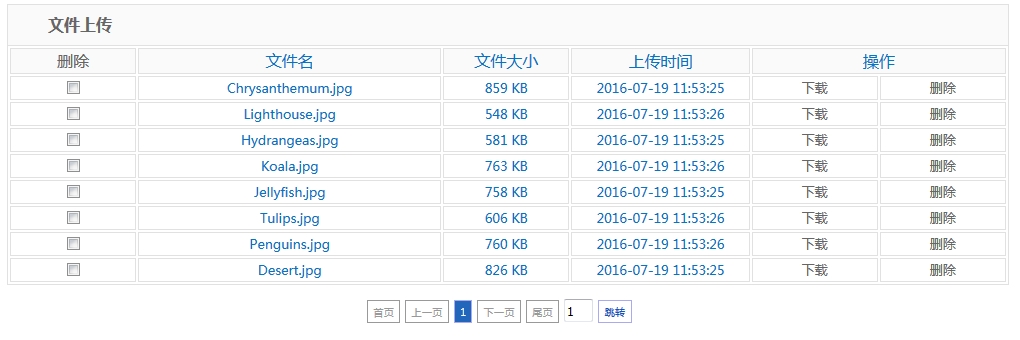
技術組合
後端採用 Spring + SpringMVC + MyBatis + Maven + MySQL,上傳走表單,下載則用串流輸出。分頁的部分另文說明。
需要準備的資源
plupload、artDialog,還有一份封裝過的初始化腳本 upload.js,以及 jQuery。
前端:引入資源
<link rel="stylesheet" href="resources/css/plupload.css" type="text/css">
<script src="resources/js/jquery.min.js"></script>
<script src="resources/upload/plupload.full.min.js"></script>
<script src="resources/artDialog4.1.7/artDialog.source.js?skin=blue"></script>
<script src="resources/js/upload.js"></script>
前端:呼叫方式
封裝後只需要一行 _plupload(綁定的 uuid, 上傳路徑)。這裡的 uuid 用來把檔案與某個業務實體關聯起來——例如直接傳入目前使用者的 id,之後就能依使用者查詢他上傳過的所有檔案。
$(function () {
  $('#uploadBtn').click(function () {
    popUpDialog();
  });
  _plupload('test', '${pageContext.request.contextPath}/uploadfile');
});
頁面上只需要一個觸發按鈕與一個隱藏的彈窗容器:
<a id="uploadBtn" class="optionbtn inline" href="#">文件上傳</a>

<!-- 觸發彈出框 -->
<div id="uploadContent" style="display: none; height: 300px;
     overflow-x: hidden; overflow-y: auto;">
  <div id="choosefile">
    <span>單個文件支持小於 100M</span><br />
    <a id="uploadify" href="javascript:void(0);">選擇文件</a>
  </div>
  <div id="uploadfileQueue" style="border: 1px solid #a7c5e2;
       height: 228px; width: 350px;"></div>
</div>
後端:接收與儲存
為了看清楚每個步驟,這裡刻意不抽方法,實際專案中建議整理成服務層呼叫。
/**
 * 檔案上傳請求位址
 */
@RequestMapping("uploadfile")
public void upload(HttpServletRequest request, HttpServletResponse response) {
  MultipartHttpServletRequest multipartRequest =
      (MultipartHttpServletRequest) request; // 二進位上傳
  CommonsMultipartFile file =
      (CommonsMultipartFile) multipartRequest.getFile("file");

  String unid = UUID.randomUUID().toString().replace("-", ""); // 檔案主鍵
  String originalFilename = file.getOriginalFilename();         // 原始檔名含副檔名
  String flieSize = String.valueOf(file.getSize());             // 檔案大小
  String path = null;                                          // 儲存路徑
  String punid = request.getParameter("punid");                // 關聯的業務 id

  if (file != null) {
    try {
      String basePath = request.getSession().getServletContext()
                              .getRealPath("/uploadfile");
      String subPath = new SimpleDateFormat("/yyyy/MM/dd/").format(new Date());
      path = basePath + subPath + unid + File.separator + originalFilename;

      File dir = new File(path);
      if (!dir.exists()) { dir.mkdirs(); } // 資料夾不存在則建立
      file.transferTo(dir);
    } catch (Exception e) {
      e.printStackTrace();
    }
  }

  // 把位元組數轉成人類可讀的單位
  long kb = 1024, mb = kb * 1024, gb = mb * 1024;
  long size = Long.parseLong(flieSize);
  if (size >= gb) {
    flieSize = String.format("%.1f GB", (float) size / gb);
  } else if (size >= mb) {
    float f = (float) size / mb;
    flieSize = String.format(f > 100 ? "%.0f MB" : "%.1f MB", f);
  } else if (size >= kb) {
    float f = (float) size / kb;
    flieSize = String.format(f > 100 ? "%.0f KB" : "%.1f KB", f);
  } else {
    flieSize = String.format("%d B", size);
  }

  // 寫入檔案資訊
  FileUpload fileUpload = new FileUpload();
  fileUpload.setUnid(unid);
  fileUpload.setOriginalFilename(originalFilename);
  fileUpload.setFlieSize(flieSize);
  fileUpload.setPath(path);
  fileUpload.setPunid(punid);
  fileUpload.setFlieTime(
      new SimpleDateFormat("yyyy-MM-dd HH:mm:ss").format(new Date()));
  fileUploadService.insert(fileUpload);
}
後端:下載
下載走串流,先從資料庫撈出路徑,再把檔案內容逐段寫入 response。
@RequestMapping("downloadfile")
public void downLoadfile(HttpServletRequest request, HttpServletResponse response) {
  String unid = request.getParameter("unid");
  FileUpload fileUpload = fileUploadService.selectByPrimaryKey(unid);
  if (fileUpload != null) {
    try {
      String filename = new String(
          fileUpload.getOriginalFilename().getBytes("GBK"), "ISO-8859-1");
      String path = fileUpload.getPath();
      response.setCharacterEncoding("utf-8");
      response.setContentType("application/octet-stream");
      response.setHeader("Content-Disposition", "attachment;fileName=" + filename);
      response.setHeader("Content-Length", fileUpload.getFlieSize());

      InputStream inputStream = new FileInputStream(new File(path));
      OutputStream os = response.getOutputStream();
      byte[] b = new byte[2048];
      int length;
      while ((length = inputStream.read(b)) > 0) {
        os.write(b, 0, length);
      }
      os.close();
      inputStream.close();
    } catch (FileNotFoundException e) {
      e.printStackTrace();
    } catch (IOException e) {
      e.printStackTrace();
    }
  }
}
後端:刪除
@ResponseBody
@RequestMapping("delfile")
public Map<String, Object> delfile(HttpServletRequest request,
                                   HttpServletResponse response) {
  String unid = request.getParameter("unid");
  FileUpload fileUpload = fileUploadService.selectByPrimaryKey(unid);

  boolean flag = false;
  File file = new File(fileUpload.getPath());
  if (file.exists()) { flag = file.delete(); } // 先刪實體檔案

  int result = fileUploadService.deleteByPrimaryKey(unid); // 再刪資料
  if (result > 0) { flag = true; }

  Map<String, Object> map = new HashMap<String, Object>();
  map.put("result", flag);
  return map;
}
這套組合的優點是彈窗與佇列都由 artDialog 與 plupload 負責,後端只需專注在檔案落地與資料記錄。上線前建議補上三件事:檔案副檔名與 MIME 的伺服器端白名單驗證、儲存路徑不要暴露給前端(下載一律透過 controller 驗證權限後再輸出),以及定期清理沒有業務關聯的孤兒檔案。
相關文章
-
artDialog 圖片、標題與關閉按鈕不顯示的排查方式 20 多個實用的 jQuery 檔案上傳插件與教學整理 artDialog 4.1.5 Dreamweaver 代碼提示/補全插件(附下載) 為 artDialog 5.02 擴展 ajax get 能力:遠程加載對話框內容 artDialog 雙擊誤關視窗的修正做法 兩個實用 jQuery 外掛:jQuery File Upload 與 artDialog artDialog:體積輕巧、相容性極佳的 JavaScript 對話框元件 改造 ajaxFileUpload.js 使其支援多檔案上傳 jQuery validate、artDialog 與 jQuery Form 的彈出表單實作 ArtDialog 雙擊遮罩誤觸關閉?一行判斷就能解決
熱門推薦