任何涉及使用者編輯資料後儲存的頁面,都離不開資料合法性檢查。這裡有個常被忽略的重點:前端校驗與後端校驗的目標不同。前端是為了使用者體驗——早點告訴他哪裡填錯,不必等送出後才被打回;後端是為了資料正確性——前端的一切都能被竄改,真正的防線必須在伺服器。
兩者並非二選一,而是都得有。
插件如何整合驗證
在需要驗證的欄位配置中加上 required: true,渲染 label 時會自動在前面產生一個星號標記,提示該欄位會被校驗。
實際驗證能力來自 jQuery Validation,具體用法請參考其官方 API。
完整範例
頁面原始碼:https://github.com/xiexingen/Bootstrap-SmartForm/blob/master/demo/form5-Validation.html
<!DOCTYPE html>
<html lang="en">
<head>
<meta charset="UTF-8">
<title>表單驗證</title>
<meta name="viewport" content="width=device-width, initial-scale=1">
<link rel="stylesheet" href="../css/bootstrap.css">
<link rel="stylesheet" href="../css/site.css">
<script src="../lib/jquery.js"></script>
<script src="../lib/jquery.validate.js"></script>
<script src="../lib/bootstrap.js"></script>
<script src="../scripts/global.js"></script>
<script src="../scripts/plugin.js"></script>
</head>
<body>
<div class="panel panel-default">
  <div class="panel-heading">
    <label>帶驗證的智能表單</label>
    <div class="pull-right">
      <button id="btnSubmit" class="btn btn-primary btn-xs">提交表單</button>
    </div>
  </div>
  <div class="panel-body">
    <form action="#" id="formContainer" class="form form-horizontal"></form>
  </div>
</div>>

<script>
$(function () {
  var eles = [
    [
      { label: { text: '自定義用戶名:' },
        ele: { type: 'text', name: 'UserName', title: '用戶名:', required: true } },
      { ele: { type: 'radio', name: 'sex', title: '性別:',
               items: [{ text: '男', value: 1 }, { text: '女', value: 2 }] } },
      { ele: { type: 'checkbox', name: 'plant', title: '使用平台:',
               items: [{ text: 'APP', value: 'app' }, { text: 'web', value: 'web' }] } }
    ],
    [
      { ele: { type: 'select', name: 'province', title: '省份:', withNull: true,
               items: [{ text: '廣東', value: 'GD' }, { text: '湖南', value: 'HN' }] } },
      { ele: { pre: { text: '<input type="radio">' },
               type: 'text', name: 'displayName', title: '顯示名稱:' } },
      { ele: { type: 'search', title: '產品', id: 'ProductName', required: true } }
    ],
    [
      { ele: { type: 'datetime', name: 'FromeDate', title: '有效期:' } },
      { ele: { type: 'datetime', name: 'ToDate', title: '~' } }
    ]
  ];

  // 隱藏欄位:編輯時後端用於識別記錄
  var hides = [{ id: 'primaryKey' }];

  var bsForm = new BSForm({
    eles: eles,
    hides: hides,
    autoLayout: '1,3'
  }).Render('formContainer', function (bf) {
    var model = {
      primaryKey: 1, UserName: 'xxg', sex: 1, plant: ['app', 'web'],
      province: 'GD', displayName: 'TEST', ProductName: '筆記本',
      FromeDate: '2015-06-10', ToDate: '2015-08-08'
    };
    bf.InitFormData(model);
  });

  // 使用自定義的驗證樣式
  global.Fn.setDefaultValidator();

  // 定義驗證規則
  $("#formContainer").validate({
    rules: {
      UserName:    { required: true, minlength: 3, maxlength: 10 },
      ProductName: { required: true }
    },
    messages: {
      UserName: {
        required: "請輸入用戶名",
        minlength: "用戶名至少 3 個字",
        maxlength: "用戶名最多 10 個字"
      }
    }
  });

  $("#btnSubmit").bind('click', function () {
    if (!$("#formContainer").valid()) {
      alert("驗證沒通過!");
    } else {
      var postData = bsForm.GetFormData();
      alert("獲取到的表單數據為:" + JSON.stringify(postData));
    }
  });
});
</script>
</body>
</html>
程式碼中的兩個關鍵環節
一、global.Fn.setDefaultValidator()。這個自訂方法定義在 global.js 中,負責套用統一的驗證樣式與提示位置,讓提示框與 Bootstrap 的視覺風格一致。同一個檔案還集中了表單序列化、日期格式化、陣列判斷、訊息提示、彈窗、插件初始化、檔案下載與表單儲存等工具方法。
二、驗證規則的宣告時機。表單是動態渲染的,因此 validate() 必須在 Render() 完成之後呼叫,否則表單元素還不存在,規則會綁定失敗。這是動態表單整合驗證外掛時最常見的錯誤。
驗證規則的實務配置
範例中為 UserName 設了必填與長度限制。把值清空後送出,就能看到提示:
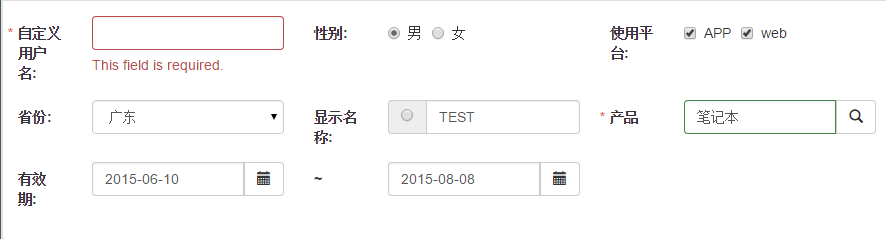
除了範例中的規則,常用的還有:
rules: {
  email:    { email: true, required: true },
  phone:    { digits: true, minlength: 10, maxlength: 10 },
  startDate:{ required: true },
  endDate:  { required: true, minDate: '#startDate' }   // 跨欄位規則
}
跨欄位規則是表單驗證中最實用的一類,例如結束日期不能早於開始日期、確認密碼必須與密碼一致。這類規則若只靠配置 JSON 無法表達,必須在程式碼中補上,正好印證了上一篇提到的「配置與程式碼分工」原則。
別忘了伺服器端
再次強調:所有前端驗證都只是使用者體驗優化。送出後,伺服器必須用同一套規則再驗一次。實務上建議把驗證規則集中維護(例如以共用的 schema 檔描述),讓前後端讀同一份定義,避免兩邊規則不同步而產生「前端擋住但後端會收」或反之的尷尬情況。
- 上一篇文章: Bootstrap 智能表單實戰:表單配置 JSON 結構詳解
- 下一篇文章: Bootstrap 智能表單實戰:編輯頁的數據綁定與回填
相關文章
-
jQuery 表單驗證實戰:從必填標記到即時提醒的完整流程 不靠插件:用原生 jQuery 手寫一個表單驗證 jquery.validate.js 遇到多個相同 name 欄位該怎麼處理 jQuery Validate 表單驗證實作:格式檢查與重名校驗 JavaScript即時表單驗證:input與propertychange雙寫法 用純 jQuery 做一個前端驗證碼:產生、點擊刷新與比對 用 jQuery 為 textarea 加上字數限制與即時剩餘字數提示 jQuery Validation 插件完全指南:規則、提示、美化與遠程校驗 Bootstrap 表單創建實例詳解 用JavaScript實作圖形驗證碼功能