用 Canvas 畫一個小人:順手封裝自己的绘图工具函式庫
編輯:關於JavaScript
直接呼叫 context.fillRect() 畫圖当然可以,但每個地方都要先取 context、設定 fillStyle、然後 save/restore,寫久了會相當煩躁。與其如此,不如先花幾分鐘封裝一層薄薄的工具函式,之後畫任何東西都是一行搞定。本文就用「畫一個小人」當練習題。
先看成果:
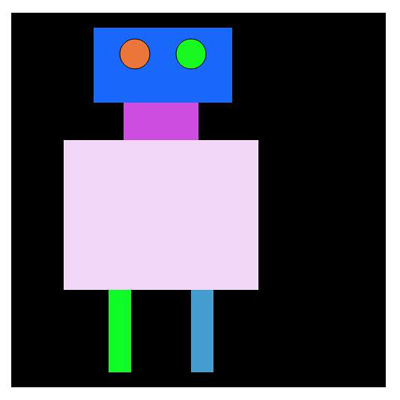
index.html:用幾個矩形和圓圈拼出人形
這個小人很簡單:一個方方的軀幹、一塊肩膀、一個大底座、兩隻長腿,再加上兩個圓當關節或眼睛。每個部件都隨機取色,所以每次重整理都會換一套配色。
<!DOCTYPE html> <html> <head> <meta http-equiv="Content-type" content="text/html;charset=UTF-8" /> <title>canvas中的縮放</title> <style type="text/css"> #canvas { background:black; margin-top:100px; margin-left:200px; } </style> </head> <body> <canvas id="canvas" width="500px" height="500px" ></canvas> </body> <script type="text/javascript" src="canvas.js"></script> <script type="text/javascript"> cache = {}; var offsetX = 50, offsetY = 20; cache.context = dyl.createContext('canvas'); dyl.rect(dyl.createColor(), 60 + offsetX, 0 + offsetY, 185, 100); dyl.rect(dyl.createColor(), 100 + offsetX, 100 + offsetY, 100, 50); dyl.rect(dyl.createColor(), 20 + offsetX, 150 + offsetY, 260, 200); dyl.rect(dyl.createColor(), 80 + offsetX, 350 + offsetY, 30, 110); dyl.rect(dyl.createColor(), 190 + offsetX, 350 + offsetY, 30, 110); dyl.circle(dyl.createColor(), 115 + offsetX, 55, 20); dyl.circle(dyl.createColor(), 190 + offsetX, 55, 20); </script> </html>
canvas.js:把常用動作包成 dyl 命名空間
這個小函式庫提供 createContext(取得並快取 2D context)、createColor(隨機 rgb 色)、rect(填色矩形)、circle(填色加描邊的圓)、addImg(繪製圖片,傳字串時會自動建立 Image 物件並等 onload)、scale(縮放)以及成對的 save/restore。
(function() { var dyl = {cache: {}}; dyl.setContext = function(context) { dyl.cache._context = context; return context; } dyl.getDom = function(id) { return document.getElementById(id); } dyl._getContext = function() { return dyl.cache._context; } dyl.save = function() { var context = dyl._getContext(); context ? context.save() : void(0); } dyl.restore = function() { var context = dyl._getContext(); context ? context.restore() : void(0); } dyl.createContext = function(canvasID) { var canvas = this.getDom(canvasID); if(!canvas) { return null; } return dyl.setContext(canvas.getContext("2d")); } dyl.createColor = function() { var color = "rgb("; color += Math.round(Math.random()*255); color += ","; color += Math.round(Math.random()*255); color += ","; color += Math.round(Math.random()*255); color += ")"; return color; }; dyl.addImg = function(img, x, y) { var context = dyl._getContext(); if(!img || !context) { return; } if(typeof img === "string") { var oImg = new Image(); oImg.src = img; oImg.onload = function() { context.drawImage(oImg, x, y); } return; } context.drawImage(img, x, y); }; dyl.rect = function(color, x, y, width, height) { var context = dyl._getContext(); if(!context) { return; } context.fillStyle = color; context.fillRect(x, y, width, height); }; dyl.circle = function(color, x, y, r) { var context = dyl._getContext(); context.save(); context.fillStyle = color; context.beginPath(); context.arc(x, y, r, 0, 2*Math.PI); context.fill(); context.stroke(); }; dyl.scale = function(x, y) { var context = dyl._getContext(); if(!context) { return; } x = x ? x : 1; y = y ? y : 1; context.scale(x, y); }; if(!window.dyl) { window.dyl = dyl; } })();
這種「先包一層再開始畫」的習慣,在專案裡回收很快:之後不管要畫圖表、畫角色還是畫粒子,呼叫端都保持乾淨,要換底層實作也只改一個檔案。此外 offsetX/offsetY 這類全域偏移量也很好用——想整體平移畫面時,不必逐行改座標,只要調這兩個變數。更多 Canvas 特效靈感可參考本站《JavaScript動畫特效與技巧匯總》。
- 上一篇文章: Canvas 圓中圓繪製實作:用旋轉與極座標堆出同心花環
- 下一篇文章: Canvas 透明度實作:讓色彩斑斕的方陣漸次暈染開來