前言
先說明一下,這並不是一篇手把手教學,記事本應用本身是網路上流傳已久的老案例,但對於理解 Vuex 幫助很大。我的目標是探索 Vuex 2.0,並用 Vuejs 2.0 + Vuex 2.0 重寫這個應用,過程中最大的攔路虎,是運用 vue-cli 建置時遇到的一連串問題。正是這些問題,逼著我把 Vue 與 Vuex 摸得更透。
我對框架的學習斷斷續續。最早接觸的是 React,難免有些先入為主,也確實更偏愛 React,特別是在應用構建這一塊。之所以斷斷續續,是因為自己的 JS 基礎偏弱,剛開始只是比著葫蘆畫瓢,東西做得出來,可背後的概念始終雲裡霧裡。於是我暫時放下框架,回頭補 JS 基礎。事实证明,底子打牢之後,再回頭學框架簡直一日千里。學 webgl 和 three.js 也是同樣的道理,沒有 webgl 打底,three.js 只會停留在皮毛階段。
過去半年我參加了不少面試,幾乎每場都會被問到框架的使用經驗,只是很多公司屬於盲目跟風,甚至把「會用框架」當成一件很厲害的事。我學過框架,但既沒有深入鑽研、也沒有拿得出手的專案,面對面試官的不屑,我心裡明白這樣的判斷標準太過膚淺。當然,也有不少公司的面試還是以基礎為主。我想強調的是:學習能力與解決問題的能力,永遠比框架本身更重要。
開始動手
言歸正傳。這個記事本案例,直接搜尋 vue notes 就能找到,是一篇英文教程,如今看到的中文版本多是翻譯而來。在 Vue 資料匱乏的年代,這類文章彌足珍貴。它本質上是 todoMVC 的一個變體。當初我覺得這個例子很好,想跟著做一遍,結果一拖就是半年,這幾天終於抽空敲完。學習貴在舉一反三——如果照著教學裝 NPM 套件,預設安裝的都是最新版,跑起來反而會報錯。那麼要改用 Vuex 2,該怎麼寫呢?
以下是 notes-vuex-app 的源檔案目錄:
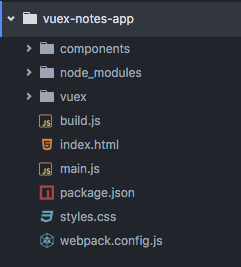
在動手改寫之前,我思考過:能不能不改變原本的目錄結構與配置位置,用最生硬的方式、單純做語法層面的替換?答案是可行的,否則也不會有這篇文章。過程中的坑非常多,但也正因如此,我對 Vue 與 Vuex 有了更深的理解。最大的難題出在 webpack 的建置上,如果用 webpack 2.0+,坑會更多。最終我選擇了 vue-cli 提供的兩個 webpack 模板:webpack-simple 與 webpack。我先用 webpack-simple,它的結構和原 app 大致吻合,目錄如下:
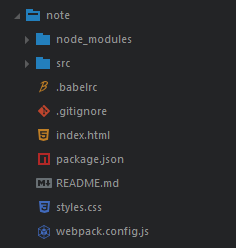
用 vue-cli 產生基本目錄後,接著安裝 vuex2。
main.js 的小調整
原本的 main.js 寫法如下,但執行會出錯,問題出在 Vue 2 根實例的渲染方式有了變化:
import Vue from 'vue' import store from './vuex/store' import App from './components/App.vue' new Vue({ store, // 注入到所有子組件 el: 'body', components: { App } })
修正後:
import Vue from 'vue' import store from './vuex/store' import App from './components/App.vue' new Vue({ store, // inject store to all children el: '#app', template: '<App/>', components: { App } })
或者
import Vue from 'vue' import store from './vuex/store' import App from './components/App.vue' new Vue({ store, // inject store to all children el: '#app', render: h => h(App) })
Vuex 2 的變化
這次改寫的痛點主要集中在 Vuex 2 的變化上,這些改動確實讓人一時頭暈,我也曾無數次抓耳撓腮。不過對照官方範例,還是可以看出一些端倪。
首先是 action.js,只需牢記一點:所有 dispatch 都要改成 commit。
export const addNote = ({ commit }) => { commit('ADD_NOTE') } export const editNote = ({ commit }, e) => { commit('EDIT_NOTE', e.target.value) } export const deleteNote = ({ commit }) => { commit('DELETE_NOTE') } export const updateActiveNote = ({ commit }, note) => { commit('SET_ACTIVE_NOTE', note) } export const toggleFavorite = ({ commit }) => { commit('TOGGLE_FAVORITE') }
store.js 的變化也不大,但有幾個地方要留意:
import Vue from 'vue' import Vuex from 'vuex' import * as actions from './actions' Vue.use(Vuex) const state = { notes: [], activeNote: {} } const mutations = { ADD_NOTE (state) { const newNote = { text: 'New note', favorite: false } state.notes.push(newNote) state.activeNote = newNote }, EDIT_NOTE (state, text) { state.activeNote.text = text }, DELETE_NOTE (state) { state.notes.splice(state.notes.indexOf(state.activeNote),1) state.activeNote = state.notes[0] || {} }, TOGGLE_FAVORITE (state) { state.activeNote.favorite = !state.activeNote.favorite }, SET_ACTIVE_NOTE (state, note) { state.activeNote = note } } const getters = { notes: state => state.notes, activeNote: state => state.activeNote, activeNoteText: state => state.activeNote.text } export default new Vuex.Store({ state, mutations, actions, getters })
原範例並沒有把 getters 寫進 store.js,而是直接在元件裡定義。為了更清晰,我仿照官方範例將它獨立出來,日後在元件中呼叫更方便;同時也引入了 action.js,作為 actions 物件傳給 Vuex.Store(),這算是 Vuex 的標準寫法,對後續在元件中呼叫很有利。
特別要注意 DELETE_NOTE (state){} 這個方法:原範例用了 Vue 1 提供的 remove 方法,但 Vue 2 把它移除了。仔細想想就能理解,這個函式的作用就是刪除 notes 陣列裡的元素,改用原生的 splice 即可。只要 JS 基礎扎實,這裡不難理解。相比原範例,我還加上了刪除後的狀態處理判斷。
我過去一直不太懂 flux 的概念,感覺像是新鮮玩意,卻說不清它的目的。換成 Vuex 也一樣有點糊塗,但改完這個範例後,基本算是開竅了。這些東西本身並不玄妙——想想看,如果不用框架、自己手寫一個 todoMVC 會怎麼做?大概也是這套思路:定義一個 notes 陣列和一個 activeNote 變數,再寫一些改變狀態的方法。面試時我遇過一個情況,面試官反覆追問「為什麼要用框架,jQuery 不也能做嗎?」話是沒錯,用原始方法確實做得到,只是程式碼結構會變得冗餘凌亂,缺少那種小而美的質感。框架與設計模式把程式碼整合封裝,讓 CURD 應用寫起來更省心。我對 Vuex 的理解是:它就是一個物件,封裝了與狀態相關的方法與屬性;而所謂狀態,就是點擊、按鍵等操作之後的種種變化。
在元件中使用 Vuex
先看看 Toolbar.vue 這個元件,修改後的程式碼如下:
<template> <div id="toolbar"> <i @click="addNote" class="glyphicon glyphicon-plus"></i> <i @click="toggleFavorite" class="glyphicon glyphicon-star" :class="{starred: activeNote.favorite}"></i> <i @click="deleteNote" class="glyphicon glyphicon-remove"></i> </div> </template> <script> import { mapGetters, mapActions } from 'vuex' export default { computed: mapGetters([ 'activeNote' ]), methods: { ...mapActions([ 'addNote', 'deleteNote', 'toggleFavorite' ]) } } </script>
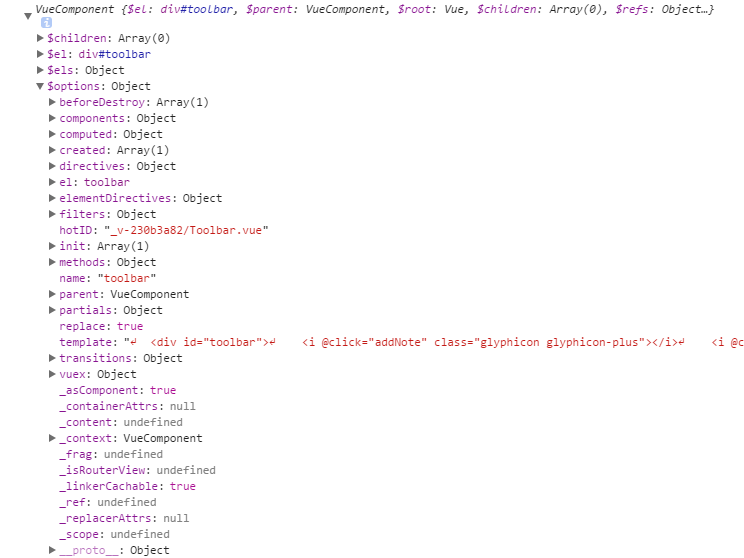
和原範例一比,差異一目了然。我在 console 印出 Vue 實例折騰了很久,才大致搞懂其中奧妙。Vuex 1 在元件中使用時,會直接把 getters 與 actions 掛到 vuex 這個屬性上,並沒有提供 mapGetters、mapActions 之類的方法;而 Vuex 2 則是透過 mapGetters、mapActions 等方法,把 actions 掛到 Vue 實例上。說到底,兩者都是把 actions 的方法掛到實例上,只是方式不同。從這個角度談 Vue 實例,Vue 2 的變化就在屬性上:Vue 1 中 methods 裡的方法可以在實例的 $options 屬性中查到,Vue 2 則可直接在第一層屬性找到,或到 $options 下的原型方法 __proto__ 裡尋找。Vue 1 能看到的 vuex 屬性,到了 Vue 2 已被移除。其他差異,大家可以自行對比,這種方式最能深入理解 Vue 的設計思想。
下圖是 Vue 1 實例的截圖:
用 ES5 實作展開運算符
假設其他元件都改好了,正當我們滿心歡喜地執行時,又報錯了。問題出在展開運算符 ... 上,webpack-simple 這個模板無法解析 ES6 的 ...。為此我又折騰良久,想改 webpack 的配置文件,但改動實在太大。最後我妥協了,決定拋開展開運算符,手寫這個方法。當然,若改用 webpack 模板就沒這個問題,這部分留到最後再說。
手寫之前,先看看 mapActions。對於 mapGetters 與 mapActions 這兩個函式,最簡單的理解方式就是翻 Vuex 原始碼——它們最終回傳的都是一個物件,也就是依需求取出 store.js 裡 actions 物件的某些方法,再用展開運算符把回傳的物件攤開、掛到 Vue 實例上。舉例來說(以下只是展開運算符的用法之一,更多用法可參考其他文章):
var obj = { a: 1, b: 2, } var methods = { ...obj } // console.log(methods) { a: 1, b: 2 }
搞懂展開運算符的用法後就好辦了。為了省事,我直接用 Babel 官網的在線解析器,看看展開運算符的 ES5 寫法。
// ES5 實現擴展運算符... var _extends = Object.assign || function(target) { for (var i = 1; i < arguments.length; i++) { var source = arguments[i]; for (var key in source) { if (Object.prototype.hasOwnProperty.call(source, key)) { target[key] = source[key]; } } } return target; };
完整的 Toolbar.vue 元件程式碼如下:
<template> <div id="toolbar"> <i @click="addNote" class="glyphicon glyphicon-plus"></i> <i @click="toggleFavorite" class="glyphicon glyphicon-star" :class="{starred: activeNote.favorite}"></i> <i @click="deleteNote" class="glyphicon glyphicon-remove"></i> <i @click="_test" class="glyphicon glyphicon-remove"></i> </div> </template> <script> import { mapGetters, mapActions } from 'vuex' // ES5 實現擴展運算符... var _extends = Object.assign || function(target) { for (var i = 1; i < arguments.length; i++) { var source = arguments[i]; for (var key in source) { if (Object.prototype.hasOwnProperty.call(source, key)) { target[key] = source[key]; } } } return target; }; var actions = mapActions([ 'addNote', 'deleteNote', 'toggleFavorite' ]); var methodsObj = _extends({},actions) export default { computed: mapGetters([ 'activeNote' ]), methods:methodsObj } </script>
另外兩個子元件做法類似,相信到此你已經掌握我的思路,具體程式碼如下:
NotesList.vue
<template> <div id="notes-list"> <div id="list-header"> <h2>Notes | coligo</h2> <div class="btn-group btn-group-justified" role="group"> <!-- All Notes button --> <div class="btn-group" role="group"> <button type="button" class="btn btn-default" @click="show = 'all'" :class="{active: show === 'all'}"> All Notes </button> </div> <!-- Favorites Button --> <div class="btn-group" role="group"> <button type="button" class="btn btn-default" @click="show = 'favorites'" :class="{active: show === 'favorites'}"> Favorites </button> </div> </div> </div> <!-- render notes in a list --> <div class="container"> <div class="list-group"> <a v-for="note in filteredNotes" class="list-group-item" href="#" rel="external nofollow" :class="{active: activeNote === note}" @click="updateActiveNote(note)"> <h4 class="list-group-item-heading"> {{note.text.trim().substring(0, 30)}} </h4> </a> </div> </div> </div> </template> <script> import { mapGetters, mapActions } from 'vuex' // ES5 實現擴展運算符... var _extends = Object.assign || function(target) { for (var i = 1; i < arguments.length; i++) { var source = arguments[i]; for (var key in source) { if (Object.prototype.hasOwnProperty.call(source, key)) { target[key] = source[key]; } } } return target; }; var getters = mapGetters([ 'activeNote' ]); var filters = { filteredNotes: function () { if (this.show === 'all'){ return this.$store.state.notes } else if (this.show === 'favorites') { return this.$store.state.notes.filter(note => note.favorite) } } } var actions = mapActions(['updateActiveNote']) var computedObj = _extends({},getters,filters); var methodsObj = _extends({},actions); export default { data () { return { show: 'all' } }, computed:computedObj, methods:methodsObj } </script>
Editor.vue
<template> <div id="note-editor"> <textarea :value="activeNoteText" @input="editNote" class="form-control"> </textarea> </div> </template> <script> import { mapGetters, mapActions } from 'vuex' export default { computed:mapGetters(['activeNoteText']), methods:mapActions(['editNote']) } </script>
Webpack 模板
直接用 vue-cli 的 webpack 模板會輕鬆許多,它能直接解析展開運算符,程式碼也更簡潔。這裡就不多贅述,附上 GitHub 位址,有不懂的地方可以參考:https://github.com/nzbin/notes-app-vuejs2-vuex2
總結
終於寫完這篇文章,感慨頗多。這個例子很典型,學的人不少,我未必是第一個重寫它的人,只是把我的心得分享出來。順帶一提,為了重寫範例並逐一解決這些小問題,我們往往得動用大量資源:GitHub、CodePen、Stack Overflow、npm 官網、Babel 官網、Vuejs 官網、Vuex 官網、部落格等等。回頭再想,Vue 到底是什麼?就是一個物件,一個聚合了大量屬性與方法的物件。這或許正是強調物件導向重要性的最佳註腳,jQuery、React 乃至其他框架皆然。一旦遇到問題,在 console 印出 Vue 實例、反覆檢視它的屬性,往往能帶來意想不到的幫助。
最後放個預告:下一篇我想聊聊物件導向的 CSS,分析幾個優秀的 UI 框架,我相信每個人都能寫出屬於自己的 CSS 框架。
- 上一篇文章: 用 AngularJS 動手做一個互動式工資計算器
- 下一篇文章: 把 jQuery 序列化後的表單值轉成 JSON 物件