JS 可拖曳浮動視窗:createdialog 逐行拆解
編輯:關於JavaScript
點一下連結,畫面上浮出一個可以拖著跑、可以關掉的視窗,這種「彈出式對話框」在後台管理介面裡非常實用。這個範例最大的特色是整個視窗都用 createElement 動態組裝,寫成一個可重複呼叫的 createdialog() 函式,並把拖曳邏輯完整封裝在裡面。
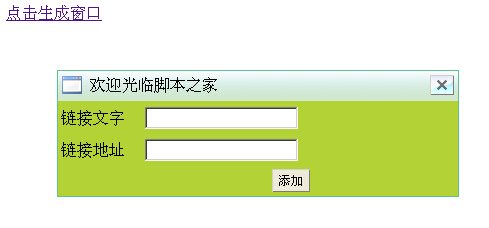
參數約定
width / height:視窗尺寸,注意內容區實際高度是 height − 30,因為標題列佔掉 30px。
bodycontent:要放進視窗的 DOM 節點。
title:標題文字。
removeable:是否允許拖曳,布林值。
視窗的 id 被刻意設成 223238909 這種怪值,目的是降低與頁面上其他元素撞 id 的機率。實務上更好的做法是用 const 閉包或 class 保存參照,完全不依賴全域 id。
完整程式碼
<html>
<head>
<title>Js彈出浮動窗口,支持鼠標拖動和關閉</title>
<meta http-equiv="Content-Type" content="text/html; charset=utf-8" />
<script type="text/javascript">
function createdialog(width,height,bodycontent,title,removeable){
  if(document.getElementById("www_jb51_net")==null){
    /* 建立視窗的組成元素 */
    var dialog        = document.createElement("div");
    var dialogtitlebar= document.createElement("div");
    var dialogbody    = document.createElement("div");
    var dialogtitleimg= document.createElement("span");
    var dialogtitle   = document.createElement("span");
    var dialogclose   = document.createElement("span");
    var closeaction   = document.createElement("button");

    dialog.id = "223238909";

    /* 組裝標題列 */
    dialogtitle.innerHTML = title;
    dialogtitlebar.appendChild(dialogtitleimg);
    dialogtitlebar.appendChild(dialogtitle);
    dialogtitlebar.appendChild(dialogclose);
    dialogclose.appendChild(closeaction);

    /* 組裝內容區 */
    if(bodycontent!=null){
      bodycontent.style.display = "block";
      dialogbody.appendChild(bodycontent);
    }

    /* 組裝成完整視窗 */
    dialog.appendChild(dialogtitlebar);
    dialog.appendChild(dialogbody);

    /* 計算置中位置並設定樣式 */
    var templeft,temptop,tempheight
    var dialogcssText,dialogbodycssText;
    templeft   = (document.body.clientWidth-width)/2;
    temptop    = (document.body.clientHeight-height)/2;
    tempheight = height-30;
    dialogcssText= "position:absolute;background:#65c294;padding:1px;border:4px;"
                 + "top:"+temptop+"px;left:"+templeft+"px;"
                 + "height:"+height+"px;width:"+width+"px;";
    dialogbodycssText = "width:100%;background:#ffffff;height:" + tempheight + "px;";
    dialog.style.cssText = dialogcssText;
    dialogtitlebar.style.cssText = "height:30px;width:100%;background:url(images/titlebar.png) repeat;cursor:move;";
    dialogbody.style.cssText = dialogbodycssText;
    dialogtitleimg.style.cssText = "float:left;height:20px;width:20px;background:url(images/40.gif);display:block;margin:4px;line-height:20px;";
    dialogtitle.style.cssText = "font-size:16px;float:left;display:block;margin:4px;line-height:20px;";
    dialogclose.style.cssText = "float:right;display:block;margin:4px;line-height:20px;";
    closeaction.style.cssText = "height:20px;width:24px;border-width:1px;background-image:url(images/close.png);cursor:pointer;";

    /* 關閉按鈕 */
    closeaction.onclick = function(){
      dialog.parentNode.removeChild(dialog);
    };

    /* 拖曳邏輯 */
    if(removeable == true){
      var ismousedown = false;
      var dialogleft,dialogtop;
      var downX,downY;
      dialogleft = parseInt(dialog.style.left);
      dialogtop  = parseInt(dialog.style.top);
      dialogtitlebar.onmousedown = function(e){
        ismousedown = true;
        downX = e.clientX;
        downY = e.clientY;
      }
      document.onmousemove = function(e){
        if(ismousedown){
          dialog.style.top  = e.clientY - downY + dialogtop + "px";
          dialog.style.left = e.clientX - downX + dialogleft + "px";
        }
      }
      /* 放開滑鼠時重新計算目前位置 */
      document.onmouseup = function(){
        dialogleft = parseInt(dialog.style.left);
        dialogtop  = parseInt(dialog.style.top);
        ismousedown = false;
      }
    }
    return dialog;
  }
}
</script>
<style>
table{background:#b2d235;}
button{font-size:12px;height:23;background:#ece9d8;border-width:1;}
#linkurl,#linkname,#savelink{width:100px;}
</style>
</head>
<body>
<!-- 顯示窗口的地方 -->
<div id="here"></div><a id="clickhere" href="#">點擊生成窗口</a>

<!-- 要嵌入到窗口的內容 -->
<div id="login" style="display:none;">
<form action="#" method="post" onSubmit="return false;">
<table width="400" height="95">
<tr>
 <td width="78">鏈接文字</td>
 <td width="168"><input name="link.name" type="text"/></td>
 <td width="138" id="linktext"></td>
</tr>
<tr>
 <td>鏈接地址</td>
 <td><input name="link.url" type="text"/></td>
 <td id="linkurl"></td>
</tr>
<tr>
 <td></td>
 <td><button type="submit" style="float:right;">添加</button></td>
 <td id="savelink"></td>
</tr>
</table>
</form>
</div>

<script type="text/javascript">
var here     = document.getElementById("here");
var login    = document.getElementById("login");
var clickhere= document.getElementById("clickhere");
clickhere.onclick = function(){
  here.appendChild(createdialog(400,95+30,login,"歡迎光臨",true));
}
</script>
</body>
</html>
拖曳的三個狀態
拖曳之所以能運作,靠的是三個變數的接力:downX/downY 記下按下滑鼠那一刻的游標位置,dialogleft/dialogtop 記下視窗當時的位置,兩者相加再減去游標目前位置,就得到新的 left/top。放開滑鼠時必須更新 dialogleft/dialogtop,否則下一次拖曳會跳位。這段邏輯在網路上被反覆抄寫,理解它之後幾乎所有拖曳需求都能自己寫。
範例還有兩處可以補強:一是拖曳時沒有邊界限制,視窗可以被拖出畫面外;二是 document.onmousemove 直接覆寫,如果頁面上有其他元件也用全域 mousemove,就會互相干擾。改用 addEventListener 並在 mouseup 時移除監聽,是比較穩妥的做法。
作者註明在 Firefox 與 Chrome 下效果最佳,IE8 可能有小問題。以上就是這個可拖曳浮動視窗的完整解析。
- 上一篇文章: JS 浮動提示框:跟著鼠標跑的 title 提示氣泡
- 下一篇文章: JavaScript 淡入淡出:opacity 漸變的簡潔實作