電商商品頁幾乎一定會有放大鏡:滑鼠移進主圖,右側浮現局部放大檢視,下方縮圖可切換不同角度。這個效果看起來複雜,拆開來其實只有三件事——一個可拖動的選取框、一張依比例放大的圖、以及兩者之間的比例換算。
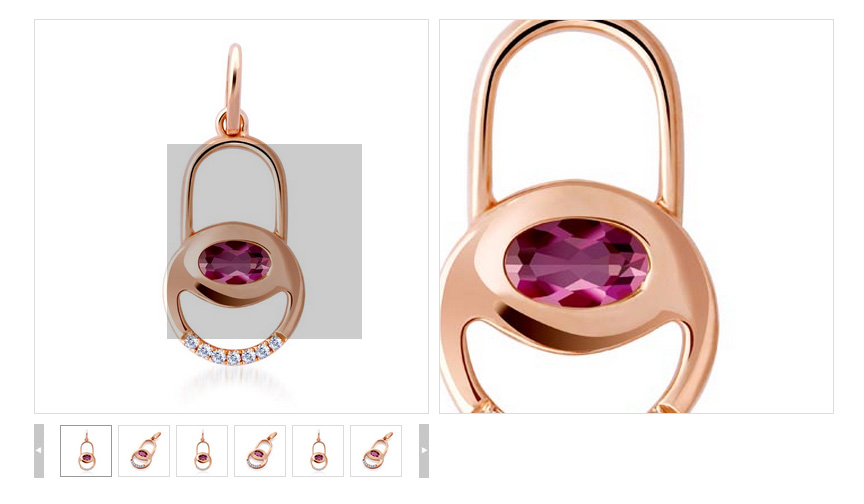
版面結構
DOM 分為三大塊:.zoom 是主圖容器,內含半透明的移動方塊 .move;.littleImg 是縮圖列,含左右滾動按鈕;.zoomDetail 是放大檢視區,內放一張尺寸較大的圖,靠負的 margin 位移來呈現「放大後跟著滑鼠跑」的效果。
CSS 樣式
/* 放大鏡 */
.ZoomMain { margin:100px; width:395px; height:460px; float:left; position:relative; }
.ZoomMain .zoom { height:393px; width:393px; position:relative; border:1px solid #dcdddd; }
.ZoomMain .zoom .move {
  position:absolute; left:0; top:0; display:none;
  width:195px; height:195px;
  background:#000; opacity:0.2; filter:Alpha(Opacity=20);
}
.ZoomMain .zoomDetail {
  display:none; border:1px solid #DCDDDD;
  width:393px; height:393px;
  position:absolute; right:-405px; top:0px; overflow:hidden;
}
.littleImg { margin-top:10px; height:54px; overflow:hidden; position:relative; }
.littleImg span { position:absolute; display:block; width:10px; height:55px; background:#999; cursor:pointer; }
.littleImg span em { display:none; width:10px; height:55px; }
.littleImg span.btnL { left:0; background:url(oohdear/images/cssPos/UltimatePageCssPos.gif) no-repeat left top; }
.littleImg span.btnL em { background:url(oohdear/images/cssPos/UltimatePageCssPos.gif) no-repeat left -57px; }
.littleImg span.btnR { right:0; background:url(oohdear/images/cssPos/UltimatePageCssPos.gif) no-repeat -10px top; }
.littleImg span.btnR em { background:url(oohdear/images/cssPos/UltimatePageCssPos.gif) no-repeat -10px -57px; }
.littleImg span.hover em { display:block; }
.littleImg .slideMain { width:343px; height:55px; margin-left:26px; overflow:hidden; position:relative; }
.littleImg .slideMain ul { position:absolute; left:0; width:355px; padding-top:1px; }
.littleImg .slideMain ul li {
  float:left; margin-right:6px; cursor:pointer;
  width:50px; height:50px; border:1px solid #dbdbdb;
}
.littleImg .slideMain ul li.selected { border-color:#999; }
.littleImg .slideMain ul li img { float:left; width:50px; height:50px; }
/* 放大鏡 end */
放大區的 overflow:hidden 是關鍵,它把超出視窗的大圖裁掉,只露出對應滑鼠位置的那一小塊。而 .move 的半透明黑底讓使用者清楚看到「目前放大的是哪個區域」。
HTML 結構
<div class="ZoomMain">
  <div class="zoom">
    <span class="move"></span>
    <img width="393" height="390" src="1347000569971.jpg" />
  </div>
  <div class="littleImg">
    <span class="btnL"><em></em></span>
    <span class="btnR"><em></em></span>
    <div class="slideMain">
      <ul class="clearfix">
        <li class="selected">
          <img width="50" height="50" src="1347000569971.jpg"
               medium-img="1347000569971.jpg" large-img="1347000569971.jpg" />
        </li>
        <li>
          <img width="50" height="50" src="1347000590691.jpg"
               medium-img="1347000590691.jpg" large-img="1347000590691.jpg" />
        </li>
        <!-- 其餘縮圖依此類推 -->
      </ul>
    </div>
  </div>
  <div class="zoomDetail">
    <img width="701" height="701" src="1347000569971.jpg" />
  </div>
</div>
每張縮圖用自訂屬性 medium-img 與 large-img 分別記錄「中圖」與「大圖」的路徑。這樣切換時只要改 src 就好,不必事前載入所有圖片,也讓同一組縮圖能對應不同解析度的資源。
核心 JavaScript
/**
 * @開發:楊永
 * @功能:實現細節放大、圖片對應切換,並可自由定義 CSS 樣式以適配各種版面
 * @說明:基於 jQuery 的放大鏡插件,可依設計稿調整布局
 */
(function(){
  function Zoom(object){
    this.zoomArea    = $(".zoom", object);        // 觸發放大的區域
    this.moveArea    = $(".move", object);        // 可移動的選取方塊
    this.zoomDetail  = $(".zoomDetail", object);  // 放大檢視區
    this.zoomDetailImg = $("img", this.zoomDetail);

    this.zoomAreaWidth  = this.zoomArea.width();
    this.moveAreaWidth  = this.moveArea.width();
    this.zoomAreaHeight = this.zoomArea.height();
    this.moveAreaHeight = this.moveArea.height();
    this.zoomDetailWidth  = this.zoomDetail.width();
    this.zoomDetailHeight = this.zoomDetail.height();
    this.zoomAreaOffset = this.zoomArea.offset();
    this.moveBili = null;   // 移動比例

    var _this_ = this;
    this.zoomArea.mousemove(function(e){
      _this_.move(e.pageX, e.pageY);
    }).mouseover(function(){
      _this_.moveArea.show();
      _this_.zoomDetail.show();
    }).mouseout(function(){
      _this_.moveArea.hide();
      _this_.zoomDetail.hide();
    });

    this.calculate();   // 先算出比例

    // 縮圖部分的處理
    this.l = 0;
    this.scrollObj = $(".slideMain ul", object);
    this.lis = this.scrollObj.children();
    this.btnR = $(".btnR", object);
    this.btnL = $(".btnL", object);

    this.lis.click(function(){
      _this_.changeImgSrc(this);
    });

    if (this.lis.length > 6) {   // 縮圖過多時才啟用滾動
      this.s = this.lis.length - 6;
      this.scrollObj.width(60 * this.lis.length + "px");
      this.btnL.click(function(){ _this_.scrollRight(); })
             .mouseover(function(){ $(this).addClass("hover"); })
             .mouseout(function(){ $(this).removeClass("hover"); });
      this.btnR.click(function(){ _this_.scrollLeft(); })
             .mouseover(function(){ $(this).addClass("hover"); })
             .mouseout(function(){ $(this).removeClass("hover"); });
    }
  }

  Zoom.prototype = {
    scrollLeft: function(){
      if (Math.abs(this.l) == this.s) return;
      this.l--;
      this.scrollObj.animate({ left: this.l * 58 + "px" }, "fast");
    },
    scrollRight: function(){
      if (this.l == 0) return;
      this.l++;
      this.scrollObj.animate({ left: this.l * 58 + "px" }, "fast");
    },
    changeImgSrc: function(o){
      $(o).addClass("selected").siblings().removeClass("selected");
      var src = $(o).find("img").attr("medium-img");
      this.zoomArea.find("img").attr("src", src);
      this.zoomDetailImg.attr("src", src);
    },
    move: function(x, y){
      this.XY = this.mousePosAndSetPos(x, y);
      this.moveArea.css({
        left: this.XY.offsetX + "px",
        top:  this.XY.offsetY + "px"
      });
      this.zoomDetailImg.css({
        marginLeft: -this.XY.offsetX * this.moveBili + "px",
        marginTop:  -this.XY.offsetY * this.moveBili + "px"
      });
    },
    mousePosAndSetPos: function(x, y){
      // 換算成相對於放大區域的座標,並以方塊中心對齊滑鼠
      x = x - this.zoomAreaOffset.left - this.moveArea.width()  / 2;
      y = y - this.zoomAreaOffset.top  - this.moveArea.height() / 2;
      // 邊界夾制,避免方塊跑出可视範圍
      x = x < 0 ? 0 : x;
      y = y < 0 ? 0 : y;
      x = x > (this.zoomAreaWidth  - this.moveAreaWidth)  ? this.zoomAreaWidth  - this.moveAreaWidth  : x;
      y = y > (this.zoomAreaHeight - this.moveAreaHeight) ? this.zoomAreaHeight - this.moveAreaHeight : y;
      return { offsetX: x, offsetY: y };
    },
    calculate: function(){
      // 依「選取框大小」與「放大區大小」推算大圖應有的尺寸
      var widthBili  = (this.zoomAreaWidth  * this.zoomDetailWidth)  / this.moveAreaWidth;
      var heightBili = (this.zoomAreaHeight * this.zoomDetailHeight) / this.moveAreaHeight;
      this.zoomDetailImg.css({ width: widthBili + "px", height: heightBili + "px" });
      // 移動比例 = 大圖超出部分 ÷ 選取框可移動距離
      this.moveBili = (widthBili - this.zoomDetailWidth) / (this.zoomAreaWidth - this.moveAreaWidth);
    }
  };

  var zoom = new Zoom($(".ZoomMain").eq(0));
})();
比例計算背後的道理
整個效果能不能「對得上」,全看 calculate() 這段。放大倍率其實是 放大區寬度 ÷ 選取框寬度;把這個倍率乘上主圖寬度,就得到大圖應該被渲染成多寬(也就是 widthBili)。接著,選取框每移動 1 像素,大圖就必須反向移動 moveBili 像素,兩者才能永遠對齊同一個位置。
因為是「依容器實際尺寸反推」,所以只要改 CSS 的寬高,放大倍率會自動跟著改變,不必手動調整 JS 裡的魔法數字——這是這份實作最值得沿用的一點。
使用與調整建議
若要支援多組放大鏡,把最後的 new Zoom(...) 改成 $(".ZoomMain").each(function(){ new Zoom(this); }) 即可。另外,縮圖滾動的間距 58px 是寫死的(圖片 50px + 邊框與間距),換尺寸時記得同步修改。若圖片很多,建議為大圖加上「載入後才顯示」的判斷,避免切換瞬間出現空白閃爍。
- 上一篇文章: 用 jQuery validate 實作註冊表單驗證的完整範例
- 下一篇文章: jQuery 打造不限層級的橫向展開選單