jQuery 星級評分插件:同一頁面可重複使用多組
編輯:JQuery特效代碼
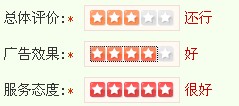
效果預覽
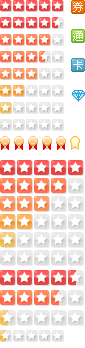
CSS 所需的星級背景圖:
HTML 結構
每一組評分就是一段 .xing,內含 ul 與五個 li,透過不同的 ul id 區分組別:
<div class="xing">
  <span style="float: left">總體評價:<font color="#CC3300" size="-1">*</font></span>
  <div class="rating-wrap">
    <ul id="xing1">
      <li><a href="javascript:;" data-rate-value="10" data-hint="很差" title="很差" class="one-star"></a></li>
      <li><a href="javascript:;" data-rate-value="20" data-hint="差" title="差" class="two-stars"></a></li>
      <li><a href="javascript:;" data-rate-value="30" data-hint="還行" title="還行" class="three-stars"></a></li>
      <li><a href="javascript:;" data-rate-value="40" data-hint="好" title="好" class="four-stars"></a></li>
      <li><a href="javascript:;" data-rate-value="50" data-hint="很好" title="很好" class="five-stars"></a></li>
    </ul>
  </div>
  <span class="xing1">點擊星星開始打分</span>
</div>

<div class="xing">
  <span style="float: left">廣告效果:<font color="#CC3300" size="-1">*</font></span>
  <div class="rating-wrap">
    <ul id="xing2">
      ... 同樣五個 li ...
    </ul>
  </div>
  <span class="xing2">點擊星星開始打分</span>
</div>
JavaScript
<script type="text/javascript" src="js/jQuery_1.42.js"></script>
<script type="text/javascript">
$(function () {
    $(".rating-wrap a").mouseover(function () {
        $(this).parent().siblings().find("a").removeClass("active-star");
        $(this).addClass("active-star");
        $("." + $(this).parent().parent().attr("id")).html($(this).attr("data-hint"));
    }).mouseleave(function () {
        var selectID = $(this).parent().parent().attr("id") + "select";
        $(this).removeClass("active-star");
        if ($("#" + selectID).length == 0) {
            // 尚未點選,回復提示文字
            $("." + $(this).parent().parent().attr("id")).removeClass("active-hint").html("點擊星星開始打分");
        } else {
            // 已有選定值,還原成該值
            $("." + $(this).parent().parent().attr("id")).html($("#" + selectID).attr("data-hint"));
            $("#" + selectID).addClass("active-star");
        }
    }).click(function () {
        $(this).addClass("active-star").attr('id', $(this).parent().parent().attr("id") + "select");
        $(this).parent().siblings().find("a").attr("id", "");
        $("." + $(this).parent().parent().attr("id")).html($(this).attr("data-hint")).addClass("active-hint");
    });
});
</script>
CSS
.rating-wrap ul, .rating-wrap a:hover, .rating-wrap .active-star {
    background-image: url(xing_bg.png);   /* 星級背景圖 */
    background-repeat: no-repeat;
}
.rating-wrap {
    background: #FFF9F1; border: 1px solid #EFE0D7;
    display: inline-block; float: left;
    height: 20px; margin-right: 5px; padding: 4px 0 0 5px;
    position: relative; top: -2px; width: 89px; z-index: 0;
}
.rating-wrap ul { background-position: 0 -250px; height: 16px; position: relative; width: 85px; z-index: 10; }
.rating-wrap li { display: inline; }
.rating-wrap a { display: block; height: 16px; left: 0; position: absolute; top: 0; }
.rating-wrap .five-stars  { background-position: 0 -160px; width: 84px; z-index: 10; }
.rating-wrap .four-stars  { background-position: 0 -178px; width: 68px; z-index: 20; }
.rating-wrap .three-stars { background-position: 0 -196px; width: 51px; z-index: 30; }
.rating-wrap .two-stars   { background-position: 0 -214px; width: 34px; z-index: 40; }
.rating-wrap .one-star    { background-position: 0 -232px; width: 17px; z-index: 50; }
.active-hint { color: #CC0000; }
設計思路
整個效果靠「精靈圖+z-index 疊層」完成:五顆星各自是不同寬度的重疊區塊,z-index 越大越上層,滑到不同位置就露出不同長度的星星。點選後會在元素上寫入一個 id + "select" 的標記,滑鼠移開時再依這個標記決定要還原成提示文字還是保留已選分數,因此同一頁放幾組都不會互相干擾。CSS 是從實際專案拆出來的,只貼了主要部分,可依自身設計稿調整。