突發奇想寫的 jQuery 提示框插件:用 canvas 畫出會自動縮放的 tip
編輯:JQuery特效代碼
一、基本構想
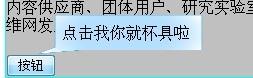
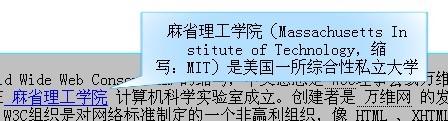
這個外掛(polaTip)用 canvas 直接繪製提示框的外觀,而不是拿圖片去拼。好處很直接:提示框可以隨內容自動變大變小,放大後邊框與漸層依然銳利,不會出現鋸齒或模糊。
整體做法是用一個 <p> 承載元素的 title 文字,先量出這個 p 的寬高,再把 canvas 尺寸對齊它,最後靠絕對定位把提示框擺到目標元素上方。真正的難點在定位與自動換行。
過程中還踩到一個坑:不指定 font-size 時,Firefox 能讀出預設值,Chrome 卻讀不到,這在計算換行位置時會直接出錯,所以外掛裡乾脆把 fontSize 寫死成 16。
二、外掛主體
(function ($) {
    $.fn.polaTip = function () {
        var tips = {};   // 每個匹配元素各自保存 title 節點等資訊
        // canvas 是共用的一塊畫布
        var tip = $("<canvas style='position:absolute;top:0px;left:0;z-index:50001;
                    width:100px;height:100px;font-family:Verdana'></canvas>");
        var div = $("<div style='position:absolute;z-index:50000'>").append(tip);
        div.appendTo("body");
        var cxt = tip[0].getContext("2d");

        this.each(function () {
            var $that = $(this);
            var offset = $that.offset();
            var setleft = offset.left, settop = offset.top;   // 相對頁面的位置
            var theTip = {};
            var title = $("<p style='margin:0;text-align:center;z-index:50002;
                            font-size:16px;position:absolute;'></p>");
            theTip.title = title;

            var fontSize = 16;
            title.css("opacity", 0);
            div.append(title);

            var titleString = $that.attr("title");
            var titleStringLength = titleString.length;
            $that.attr("title", "");          // 清空原生 title,避免雙重提示
            title.text(titleString);
            theTip.titleWidth = title.width();
            theTip.that = $that;

            // 有 id 用 id 當 key,沒有就塞一個隨機 class 當 key
            if (this.id) { tips[this.id] = theTip; }
            else { $that.addClass(Math.random() + ""); tips[$that.attr("class")] = theTip; }

            // 文字太長就換行
            if (theTip.titleWidth > 250 || titleStringLength > (250 / fontSize)) {
                var rowLength = Math.sqrt(titleStringLength * (5 / 1)) * fontSize;
                toBreakWord((rowLength * 1.3) / fontSize, theTip.title[0]);
                theTip.title.css("width", rowLength);
            } else {
                theTip.title.css({ "width": titleStringLength * fontSize + 10 });
            }

            $that.hover(function () {
                var theTip = this.id ? tips[this.id] : tips[this.className];
                var title = theTip.title;

                // 依內容算寬高
                var height = title.height() * 1.1 + 20;
                var width = title.width() * 1.1 + 20;
                title.css({ top: title.height() * 0.1 * 0.5 + 10 + "px",
                            left: width * 0.1 + 2 + "px" });
                tip.css({ height: height + "px", width: width + "px" });

                // 線性漸層當描邊
                var lingrad = cxt.createLinearGradient(0, 0, 0, 150);
                lingrad.addColorStop(0, '#00ABEB');
                lingrad.addColorStop(0.5, 'rgba(10, 150, 255, 0.9)');
                cxt.strokeStyle = lingrad;

                // 放射漸層當填色
                var radgrad = cxt.createRadialGradient(150, 75, 10, 150, 75, 150);
                radgrad.addColorStop(0, 'rgba(10, 150, 255, 0.3)');
                radgrad.addColorStop(0.5, 'rgba(10, 150, 255, 0.3)');
                radgrad.addColorStop(1, 'rgba(256,256,256,0.5)');

                cxt.lineJoin = "round";
                cxt.lineWidth = 2;
                cxt.clearRect(0, 0, 300, 150);   // canvas 共用,必須先清乾淨

                // 畫出帶尾巴的 tip 輪廓
                cxt.beginPath();
                cxt.moveTo(30.5, 5.5);
                cxt.lineTo(285.5, 5.5);
                cxt.lineTo(285.5, 135.5);
                cxt.lineTo(75.5, 135.5);
                cxt.lineTo(2.5, 148.5);
                cxt.lineTo(30.5, 125.5);
                cxt.lineTo(30.5, 5.5);
                cxt.stroke();

                cxt.fillStyle = "#fff";
                cxt.fill();
                cxt.fillStyle = radgrad;
                cxt.fill();

                // 只顯示目前這一個的文字,其餘隱藏
                for (var flagtip in tips) {
                    flagtip = tips[flagtip];
                    if (flagtip == theTip) { flagtip.title.css("opacity", 1); }
                    else { if (flagtip.title.css) { flagtip.title.css("opacity", 0); } }
                }

                div.css({ left: setleft + $that.width() + "px",
                          top: settop - 2 * tip.height() + "px",
                          opacity: 0, height: height, width: width });
                div.stop();
                div.animate({ top: settop - tip.height() + "px", opacity: 1 }, 500);
            }, function () {
                div.stop();
                div.animate({ top: settop - 2 * tip.height() + "px", opacity: 0 }, 1000);
            });
        });
    };
})(jQuery);

$(function () {
    $("div p").children().add("#Button1").polaTip();
});
三、斷詞換行函式
function toBreakWord(intLen, obj) {
    var strContent = obj.innerHTML;
    var strTemp = "";
    while (strContent.length > intLen) {
        strTemp += strContent.substr(0, intLen) + "<br>";
        strContent = strContent.substr(intLen, strContent.length);
    }
    strTemp += strContent;
    obj.innerHTML = strTemp;
}
四、使用說明
只要在頁面上引入 jQuery,把上面兩段腳本放進 <head>,然後對想加提示的元素呼叫一次即可:
$("div p").children().add("#Button1").polaTip();
幾個要注意的地方:
- 外掛會把元素原本的
title屬性清空,改由 canvas 呈現,所以原本的瀏覽器預設提示會消失。 - 只支援有 canvas 的瀏覽器。作者刻意沒有引入
excanvas.js去救 IE,因為那支檔案體積太大,只為了畫提示框並不划算。 - 同一時間只顯示一個提示框,canvas 為共用實例,每次繪製前都會
clearRect。
- 上一篇文章: 無縫高度自適應滾動列表:jQuery 版與純 JavaScript 版實作對照
- 下一篇文章: jQuery $.ajax 讀取 XML 只在 Chrome/Safari 失效?問題出在 appendTo