網頁是為螢幕而生的,列印與輸出往往只是事後才補上的功能。若想把大量 HTML 內容穩定地變成排版講究的 PDF,最可靠的路線不是「用瀏覽器列印成 PDF」,而是先把 HTML 轉成 XSL-FO(Formatting Objects,格式化物件),再交給 FO 引擎輸出 PDF。本文示範如何以 XSLT 樣式表逐一處理 45 個最常見的 HTML 元素,把它們對應到 XSL-FO 詞彙中的格式化物件。範例採用 Java 平台的 Xalan 作為 XSLT 處理器、Apache XML 專案下的 FOP 作為 FO 引擎,但絕大多數技巧換到其他工具組上同樣成立。
整體流程與工具準備
整條流水線其實只有兩個階段:先由 XSLT 把 HTML 改寫成 FO 文件,再由 FO 引擎把 FO 文件排版成 PDF。中間產物是純 XML,因此每一步都可以單獨檢查、單獨除錯,這也是這條路線比「一鍵轉檔」友善得多的地方。
第一步,呼叫 Xalan 套用樣式表:
> java org.apache.xalan.xslt.Process -in everything.html -xsl xhtml-to-xslfo.xsl -out everything.fo這行指令請寫在同一行輸入(此處為版面需求才折行)。它的意思是:讀入 everything.html,依 xhtml-to-xslfo.xsl 的規則轉換,結果寫入 everything.fo。想確認樣式表產出了什麼,直接打開 everything.fo 閱讀即可。
第二步,把 FO 文件交給 FOP 產生 PDF:
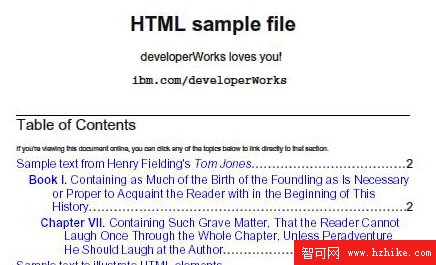
> java org.apache.fop.apps.Fop everything.fo everything.pdf以下是轉出的 PDF 畫面:
樣式表的通用骨架
本文中介紹的幾乎每一個模板都會出現同一行:
<xsl:apply-templates select="*|text()"/>它要求處理器取出目前元素底下的所有文字與子元素,繼續往下轉換。這種遞迴式寫法的好處是:不論 HTML 標籤如何互相嵌套,內容都不會被漏掉。
想直接對照實測,可以下載 x-xslfo2app-samples.zip,裡面的 everything.html 涵蓋本文討論的所有元素,xhtml-to-xslfo.xsl 則收錄本文引用的全部模板以及姊妹篇中介紹的進階技巧。
哪些元素沒有被收錄
基於幾個多半合理的理由,本文並未涵蓋全部 HTML 元素。最主要的原因是:它們在 PDF 裡根本沒有對應意義;其次是部分標籤已被 W3C 標示為不建議使用(deprecated)。如果你認為某個元素在紙本或 PDF 情境下確實有用,歡迎透過文末的回饋表單提出,我會評估納入。
元素轉換對照
以下依字母序排列,每個小節包含元素說明、對應的格式化物件,以及完成轉換的 XSLT 模板。部分示例中的數值(字級、間距、縮排)是為配合本系列 PDF 的版面而挑選的,你可以自由替換成符合自己需求的樣式。
<a name="..."> 命名錨點
像 <a name="xyz" /> 這樣的命名錨點,通常轉成帶 id 的 <fo:block>:
<fo:block id="xyz"/>看似簡單,實作時卻藏著陷阱。本系列樣式會在 <h1> 之前插入水平線與分頁符,於是遇到下面這種寫法就會出問題:
<a name="xslt"/>
<!-- A page break will be inserted here -->
<h1>Using XSLT style sheets</h1>
一旦 <h1> 從新一頁開始,指向這個錨點的連結就會把讀者帶到上一頁的末尾,這不是我們想要的結果。解法是讓處理器先看看錨點後面緊接的元素是不是 <h1>:如果是,就跳過這個錨點,交給 <h1> 的模板一併處理。
<xsl:template match="a">
  <xsl:choose>
    <xsl:when test="@name">
      <xsl:if test="not(name(following-sibling::*[1]) = 'h1')">
        <fo:block line-height="0pt" space-after="0pt"
                  font-size="0pt" id="{@name}"/>
      </xsl:if>
    </xsl:when>
following-sibling 軸確保樣式表檢查的是緊跟在命名錨點之後的那個元素;若它的名稱不是 h1,才產生帶 id 的空 <fo:block>。另外特別把 line-height、font-size、space-after 都設為零,免得這個不可見的錨點白白吃掉垂直空間。
<a href="#..."> 文件內部連結
指向同一份文件內某個位置的連結,轉成 <fo:basic-link>,並用 internal-destination 屬性承接目標 id。例如:
For more information, see <a href="#chapter1">Chapter 1</a>.對應的 XSL-FO 標記為:
For more information, see
<fo:basic-link color="blue" internal-destination="chapter1">
  Chapter 1
</fo:basic-link>.
判斷方式很直接:若 href 以井號(#)開頭,就用 substring() 去掉井號後剩下的部分作為 internal-destination。收尾時再補上 <fo:page-number-citation>,讓 PDF 裡的連結能顯示頁碼。
<a href="..."> 外部 URI 連結
指向外部資源的連結改用 external-destination 屬性:
<a href="https://www.ibm.com/developerworks/">
  IBM's developerWorks Web site
</a>
<fo:basic-link color="blue"
external-destination="https://www.ibm.com/developerworks/">
IBM's developerWorks Web site
</fo:basic-link>把三種 <a> 情境整合起來,完整的模板如下:
<xsl:template match="a">
  <xsl:choose>
    <xsl:when test="@name">
      <xsl:if test="not(name(following-sibling::*[1]) = 'h1')">
        <fo:block line-height="0pt" space-after="0pt"
                  font-size="0pt" id="{@name}"/>
      </xsl:if>
    </xsl:when>
    <xsl:when test="@href">
      <fo:basic-link color="blue">
        <xsl:choose>
          <xsl:when test="starts-with(@href, '#')">
            <xsl:attribute name="internal-destination">
              <xsl:value-of select="substring(@href, 2)"/>
            </xsl:attribute>
          </xsl:when>
          <xsl:otherwise>
            <xsl:attribute name="external-destination">
              <xsl:value-of select="@href"/>
            </xsl:attribute>
          </xsl:otherwise>
        </xsl:choose>
        <xsl:apply-templates select="*|text()"/>
      </fo:basic-link>
      <xsl:if test="starts-with(@href, '#')">
        <xsl:text> on page </xsl:text>
        <fo:page-number-citation ref-id="{substring(@href, 2)}"/>
      </xsl:if>
    </xsl:when>
  </xsl:choose>
</xsl:template>
有了 page-number-citation,PDF 中的連結文字會長得像這樣:「For more information, see Chapter 1 on page 73.」
<address> 地址
這個元素使用頻率不高,但可以用來標示聯絡資訊,例如:
<address>
  Mrs. Mary Backstayge
  <br />
  283 First Avenue
  <br />
  Skunk Haven, MA 02718
</address>
注意範例用 <br> 標示換行,轉換後每一行各自成為一個區塊:
<fo:block>Mrs. Mary Backstayge<fo:block> </fo:block>
283 First Avenue<fo:block> </fo:block>
Skunk Haven, MA 02718</fo:block>
模板本身非常單純,把 <address> 換成 <fo:block> 再遞迴處理內容即可:
<xsl:template match="address">
  <fo:block>
    <xsl:apply-templates select="*|text()"/>
  </fo:block>
</xsl:template>
<b> 粗體
粗體只需轉成帶 font-weight="bold" 的 <fo:inline>:
<p>Jackdaws <b>love</b> my big sphinx of quartz.</p><fo:block>
Jackdaws <fo:inline font-weight="bold">love</fo:inline>
my big sphinx of quartz.
</fo:block>這裡有個必須牢記的基本觀念:<fo:block> 一定會換行,<fo:inline> 不會。行內強調一律用 inline 處理。
<xsl:template match="b">
  <fo:inline font-weight="bold">
    <xsl:apply-templates select="*|text()"/>
  </fo:inline>
</xsl:template>
select="*|text()" 會同時選取文字與子元素。所以即使標記是 <b><i>love</i></b>,粗體與斜體的組合也能正確處理。
<big> 放大字級
<big> 讓被包住的文字比周圍稍大一些。FOP 目前支援以百分比指定 font-size,因此可以用 120% 來表達:
<xsl:template match="big">
  <fo:inline font-size="120%">
    <xsl:apply-templates select="*|text()"/>
  </fo:inline>
</xsl:template>
採相對值的好處是:多層嵌套的 <big> 會逐層放大,行為與瀏覽器一致。轉出的結果如下:
<fo:block>Jackdaws
<fo:inline font-size="120%">love</fo:inline> my big
sphinx of quartz.</fo:block>
這個模板当然可以依需要改造,例如再加粗、改色,或換成更大的比例。
<blockquote> 引文區塊
本示例把引文處理成左右各縮排 1.5 公分、維持單倍行距的段落,靠的是 <fo:block> 的 start-indent 與 end-indent:
<fo:block start-indent="1.5cm" end-indent="1.5cm">
  When in the Course of human events, it becomes necessary for one people
  to dissolve the political bands which have connected them with another,
  ...
</fo:block>
<xsl:template match="blockquote">
<fo:block start-indent="1.5cm" end-indent="1.5cm">
<xsl:apply-templates select="*|text()"/>
</fo:block>
</xsl:template>想改成更深的縮排或加上左右邊界線,只要調整這兩個屬性即可。
<body> 文件主體
XSL-FO 中與 <body> 對應的是 <fo:flow flow-name="xsl-region-body">。為了讓 HTML 結構與樣式表保持對稱,這裡明確處理 body,並在 flow 中依序放進六個部分:
1. 文件標題(來自 <head> 的 title 元素)
2. 一句招呼語
3. 網站 URL
4. 目錄
5. 文件主體內容
6. 一個標記「最後一頁」的 id
<xsl:template match="body">
  <fo:flow flow-name="xsl-region-body">
    <!-- Item 1 -->
    <xsl:apply-templates select="/html/head/title"/>
    <!-- Item 2 -->
    <fo:block space-after="12pt" line-height="17pt"
              font-size="14pt" text-align="center">
      developerWorks loves you!
    </fo:block>
    <!-- Item 3 -->
    <fo:block space-after="24pt" line-height="17pt"
              font-size="14pt" text-align="center"
              font-weight="bold" font-family="monospace">
      ibm.com/developerWorks
    </fo:block>
    <!-- Item 4 -->
    <xsl:call-template name="toc"/>
    <!-- Item 5 -->
    <xsl:apply-templates select="*|text()"/>
    <!-- Item 6 -->
    <fo:block id="TheVeryLastPage" font-size="0pt"
              line-height="0pt" space-after="0pt"/>
  </fo:flow>
</xsl:template>
想加上獨立封面頁、或讓同一份 XML 輸出多種版面,改這個模板就是了。
<br> 換行
既然 <fo:block> 本身就會換行,處理 <br> 只要在 block 中再嵌一個空 block:
<p>My mistress' eyes are nothing like the sun,
<br/>Coral is far more red than her lips red.
<br/>If snow be white, why then her breasts be dun,
<br/>If hairs be wires, black wires grow on her head.
...</p>
<fo:block>
My mistress' eyes are nothing like the sun,
<fo:block> </fo:block>
Coral is far more red than her lips red.
<fo:block> </fo:block>
If snow be white, why then her breasts be dun,
<fo:block> </fo:block>
If hairs be wires, black wires grow on her head.
</fo:block><xsl:template match="br">
<fo:block> </fo:block>
</xsl:template><caption> 表格標題
HTML 的 <caption> 對應 <fo:table-caption>。FOP 當時尚未支援 <fo:table-caption> 與 <fo:table-and-caption>,這裡仍一併說明,因為規格上才是正確做法。結構必須是:
<fo:table-and-caption>
  <fo:table-caption> ... </fo:table-caption>
  <fo:table> ... </fo:table>
</fo:table-and-caption>
麻煩的是 HTML 裡的 caption 位置很隨意,可能根本不存在,也可能不是表格的第一個子元素。因此 <table> 的模板要負責把 caption 撈出來:
<xsl:template match="table">
  <fo:table-and-caption>
    <xsl:choose>
      <xsl:when test=".//caption">
        <xsl:apply-templates select=".//caption[1]"/>
      </xsl:when>
      <xsl:when test="preceding-sibling::caption">
        <xsl:apply-templates select="preceding-sibling::caption"/>
      </xsl:when>
    </xsl:choose>
    <fo:table>
      <xsl:apply-templates select="*[not(name()='caption')]"/>
    </fo:table>
  </fo:table-and-caption>
</xsl:template>
邏輯是:先看表格內有沒有 caption,有就取第一個(其餘忽略);沒有則回頭看表格前面是否緊鄰一個 caption。最後處理表格本體時,再用 not(name()='caption') 把 caption 排除,避免重複輸出。
<center> 置中
置中就是 <fo:block> 加上 text-align="center":
<center>
  Table of Contents
</center>
<fo:block text-align="center">
Table of Contents
</fo:block><xsl:template match="center">
<fo:block text-align="center">
<xsl:apply-templates select="*|text()"/>
</fo:block>
</xsl:template><cite> 引用作品名
引用標題預設以斜體呈現。這裡多做一層細節:若 <cite> 出現在 <i> 裡面,就改用正常字體,讓它從周圍的斜體中「跳出來」。
<p>
  When she was little, my daughter loved it when I read
  <cite>Goodnight Moon</cite> to her.
  <i>But <cite>Harold and the Purple Crayon</cite>
  was her favorite.</i>
</p>
<fo:block>
When she was little, my daughter loved it when I read
<fo:inline font-style="italic">Goodnight Moon</fo:inline> to her.
<fo:inline font-style="italic">But
<fo:inline font-style="normal">Harold and the Purple Crayon</fo:inline>
was her favorite.
</fo:inline>
</fo:block><xsl:template match="cite">
<xsl:choose>
<xsl:when test="parent::i">
<fo:inline font-style="normal">
<xsl:apply-templates select="*|text()"/>
</fo:inline>
</xsl:when>
<xsl:otherwise>
<fo:inline font-style="italic">
<xsl:apply-templates select="*|text()"/>
</fo:inline>
</xsl:otherwise>
</xsl:choose>
</xsl:template>只要判斷父元素,<cite> 與 <i> 的各種嵌套組合都能得到合理結果。
<code> 程式碼片段
行內程式碼要用等寬字體,一樣靠 <fo:inline>:
<p>If you're a Java programmer, an easy way to break a string apart
is with the <code>java.util.StringTokenizer</code> class.</p>
<fo:block>If you're a Java programmer, an easy way to
break a string apart is with the
<fo:inline font-family="monospace">java.util.StringTokenizer</fo:inline>
class.</fo:block><xsl:template match="code">
<fo:inline font-family="monospace">
<xsl:apply-templates select="*|text()"/>
</fo:inline>
</xsl:template><dl>、<dt>、<dd> 定義清單
定義清單雖然不如有序、無序清單常見,但在說明術語或參數選項時非常好用:
<p>There are four valid values for the
<code>text-align</code> parameter:</p>
<dl>
  <dt>start</dt>
  <dd>The text is aligned at the start of the paragraph.</dd>
  <dt>middle</dt>
  <dd>The text is aligned at the middle of the paragraph.</dd>
  <dt>end</dt>
  <dd>The text is aligned at the end of the paragraph.</dd>
  <dt>justify</dt>
  <dd>The text is aligned at both the start and end.</dd>
</dl>典型的排版是:術語(<dt>)以粗體單獨一行,定義(<dd>)縮排顯示在下一行。
<xsl:template match="dl">
  <xsl:apply-templates select="*"/>
</xsl:template>

<xsl:template match="dt">
  <fo:block font-weight="bold" space-after="2pt"
            keep-with-next="always">
    <xsl:apply-templates select="*|text()"/>
  </fo:block>
</xsl:template>

<xsl:template match="dd">
  <fo:block start-indent="1cm">
    <xsl:attribute name="space-after">
      <xsl:choose>
        <xsl:when test="name(following::*[1]) = 'dd'">
          <xsl:text>3pt</xsl:text>
        </xsl:when>
        <xsl:otherwise>
          <xsl:text>12pt</xsl:text>
        </xsl:otherwise>
      </xsl:choose>
    </xsl:attribute>
    <xsl:apply-templates select="*|text()"/>
  </fo:block>
</xsl:template>
<dd> 的模板會看下一個元素是否也是 <dd>:如果是,代表同一術語有多條定義,只留 3 點間距;否則留 12 點,與下一組術語拉開距離。另外,keep-with-next 用來避免術語與定義被分頁切散,但當時的 FOP 對它的支援並不完整。
<em> 強調
多數瀏覽器以斜體顯示強調,因此直接對應 font-style="italic":
<p>You <em>must</em> disconnect the power supply before
you open the product housing.</p>
<fo:block>
You <fo:inline font-style="italic">must</fo:inline> disconnect
the power supply before you open the product housing.
</fo:block><xsl:template match="em">
<fo:inline font-style="italic">
<xsl:apply-templates select="*|text()"/>
</fo:inline>
</xsl:template><font> 的 color、face、size
這個早已不建議使用的標籤有三個屬性值得逐一對照。color 對應 color,可用十六進位 RGB 值,或 XSL-FO 規範定義的 16 種顏色名稱:aqua、black、blue、fuchsia、gray、green、lime、maroon、navy、olive、purple、red、silver、teal、white、yellow。若未提供 color,預設為 black:
<xsl:variable name="color">
  <xsl:choose>
    <xsl:when test="@color">
      <xsl:value-of select="@color"/>
    </xsl:when>
    <xsl:otherwise>
      <xsl:text>black</xsl:text>
    </xsl:otherwise>
  </xsl:choose>
</xsl:variable>
face 對應 font-family,但 FOP 可用的字體有限,實用值大致是 serif、sans-serif、monospace,以及 Courier、Helvetica、Times 家族與 Symbol。缺省值設為 sans-serif:
<xsl:variable name="face">
  <xsl:choose>
    <xsl:when test="@face">
      <xsl:value-of select="@face"/>
    </xsl:when>
    <xsl:otherwise>
      <xsl:text>sans-serif</xsl:text>
    </xsl:otherwise>
  </xsl:choose>
</xsl:variable>
若必須使用其他字型,FOP 也提供工具把 Adobe Type 1 與 TrueType 字體轉為 XML font-metric 檔,再透過設定檔註冊,細節請參考 FOP 說明文件。
size 對應 font-size,轉換規則分四種情況:含 "pt" 字串(如 24pt)直接沿用;以加號或減號開頭(如 +2、-1)視為相對放大縮小,例如 +1 對應 110%;介於 1 到 7 的數字對應一組固定字級;其餘一律退回 12pt。完整的 <font> 模板如下,最後用這三個變數組出 <fo:inline>:
<xsl:template match="font">
  <xsl:variable name="color"> ... </xsl:variable>
  <xsl:variable name="face"> ... </xsl:variable>
  <xsl:variable name="size">
    <xsl:choose>
      <xsl:when test="@size">
        <xsl:choose>
          <xsl:when test="contains(@size, 'pt')">
            <xsl:value-of select="@size"/>
          </xsl:when>
          <xsl:when test="@size = '+1'"><xsl:text>110%</xsl:text></xsl:when>
          <xsl:when test="@size = '+2'"><xsl:text>120%</xsl:text></xsl:when>
          <xsl:when test="@size = '+3'"><xsl:text>130%</xsl:text></xsl:when>
          <xsl:when test="@size = '+4'"><xsl:text>140%</xsl:text></xsl:when>
          <xsl:when test="@size = '+5'"><xsl:text>150%</xsl:text></xsl:when>
          <xsl:when test="@size = '+6'"><xsl:text>175%</xsl:text></xsl:when>
          <xsl:when test="@size = '+7'"><xsl:text>200%</xsl:text></xsl:when>
          <xsl:when test="@size = '-1'"><xsl:text>90%</xsl:text></xsl:when>
          <xsl:when test="@size = '-2'"><xsl:text>80%</xsl:text></xsl:when>
          <xsl:when test="@size = '-3'"><xsl:text>70%</xsl:text></xsl:when>
          <xsl:when test="@size = '-4'"><xsl:text>60%</xsl:text></xsl:when>
          <xsl:when test="@size = '-5'"><xsl:text>50%</xsl:text></xsl:when>
          <xsl:when test="@size = '-6'"><xsl:text>40%</xsl:text></xsl:when>
          <xsl:when test="@size = '-7'"><xsl:text>30%</xsl:text></xsl:when>
          <xsl:when test="@size = '1'"><xsl:text>8pt</xsl:text></xsl:when>
          <xsl:when test="@size = '2'"><xsl:text>10pt</xsl:text></xsl:when>
          <xsl:when test="@size = '3'"><xsl:text>12pt</xsl:text></xsl:when>
          <xsl:when test="@size = '4'"><xsl:text>14pt</xsl:text></xsl:when>
          <xsl:when test="@size = '5'"><xsl:text>18pt</xsl:text></xsl:when>
          <xsl:when test="@size = '6'"><xsl:text>24pt</xsl:text></xsl:when>
          <xsl:when test="@size = '7'"><xsl:text>36pt</xsl:text></xsl:when>
          <xsl:otherwise><xsl:text>12pt</xsl:text></xsl:otherwise>
        </xsl:choose>
      </xsl:when>
      <xsl:otherwise><xsl:text>12pt</xsl:text></xsl:otherwise>
    </xsl:choose>
  </xsl:variable>

  <fo:inline font-size="{$size}" font-family="{$face}"
             color="{$color}">
    <xsl:apply-templates select="*|text()"/>
  </fo:inline>
</xsl:template>
這些百分比與字級數值都是我自己挑的,你可以依版面需要隨意替換。下半篇將接著處理 h1 到 h6 標題、水平線、圖片、各類清單、表格與上下標等元素。