Feed 的基本概念
在互聯網發展的早期,隨著信息發布日益頻繁,單靠傳統的遠程 HTML 文檔逐頁瀏覽,已難以滿足人們對信息時效性的渴求。於是信息发布商們開始尋找新途徑,把更新內容及時送達用戶——Web feed 應運而生。它本質上是一種以 XML 為基礎的數據格式,常用來發布博客、滾動新聞等頻繁更新的內容。
feed 的用途
你在瀏覽網頁時見到的那枚橘紅色圖標  ,正是 feed 的標誌。點擊它就能看到互聯網內容服務商提供的 feed,用戶則可憑 feed 的 URL 獲取更新。以 Firefox 為例,遇到提供 feed 的網頁時,只需單擊地址欄右側的 feed 圖標,即可訂閱該頁的內容更新。
用戶還能用專用的 feed 閱讀器「訂閱」這些 feed,按個人偏好有選擇地閱讀。如今流行的在線閱讀器(如 Google Reader、國內的鮮果網)還為 feed 內容提供分享、討論、加標記等功能,方便你在朋友、同事與社交網絡之間共享信息與知識。
feed 的特點
從開發者視角看,feed 是一份包含資源鏈接與一系列元數據的 XML 文檔。目前最受歡迎的 feed 格式主要有 RSS 與 Atom 兩種。
RSS 大致包含四部分:channel(發布者提供的元數據)、image(圖標或圖片)、item(feed 中的更新條目)以及 text(供用戶反饋的表單)。當前最常用的是 RSS 2.0 版本,有興趣的讀者可查閱相關資料了解細節。
針對 RSS 在國際化與內容復用上的不足,Atom 提供了更嚴謹全面、更具可擴展性的 feed 數據格式與發布協議。本文所談的 Atom,通常特指 IETF 提出的 Atom 1.0。
清單 1. Atom 1.0 樣例
<?XML version="1.0" encoding="utf-8"?>
<feed XMLns="https://www.w3.org/2005/Atom">
<title>Example Feed</title>
<link href="https://example.org/"/>
<updated>2003-12-13T18:30:02Z</updated>
<author>
<name>John Doe</name>
</author>
<id>urn:uuid:60a76c80-d399-11d9-b93C-0003939e0af6</id>
<entry>
<title>Atom-Powered Robots Run Amok</title>
<link href="https://example.org/2003/12/13/atom03"/>
<id>urn:uuid:1225c695-cfb8-4ebb-aaaa-80da344efa6a</id>
<updated>2003-12-13T18:30:02Z</updated>
<summary>Some text.</summary>
</entry>
</feed>
feed 的優勢
相比一次次群發電子郵件,用 feed 發布信息優勢明顯:用戶無須提供私人郵箱,可隨時訂閱、隨時退訂,feed 提供的摘要與資源鏈接也更方便閱讀。對網站開發者而言,採用 feed 格式發布內容,等於給了用戶更多閱讀選擇——他們既能通過第三方閱讀器有選擇地查閱,也能借助聚合、過濾、排序、分享等手段,把感興趣的內容重組為新 feed 再發布。這既提升了信息更新的時效性,也有利於信息的有效傳播。
通常,feed 承載的是供人閱讀的內容,如新聞、博客、相冊等。近些年伴隨 Web 2.0 的流行,feed 也被用來發布結構化數據,比如 Google 在線電子表格數據、IBM 在線社區更新等;甚至許多流行的開放 API(如 Yahoo! 搜索、豆瓣)也選用 feed 作為數據格式。
WebSphere sMash 中對 feed 的支持
WebSphere sMash 是 IBM 面向 Web 2.0 應用提供的開發與運行平台,針對開發者使用 feed 的不同場景給出了多種支持,核心目標是讓基於 feed 的技術與協議變得更簡單,免去對協議細節的繁瑣編程。sMash 中有多個組件為 feed 編程提供各類支持,詳見表 1。在下文的簡要介紹之後,本文將逐步演示多個簡單場景的創建過程,讓你親身感受 sMash 為 feed 編程帶來的簡潔與樂趣。
表 1. WebSphere sMash 中 feed 相關組件介紹
模塊名稱/用途:
zero.atom:提供讀取與輸出 Atom 1.0 類型 XML 文檔的編程接口,涵蓋將內容發布為 feed 及一系列配置功能。
zero.rss:消費與發布 RSS 類型 feed,並受益於開源項目 Rome 的擴展庫,提供多種流行 RSS feed 間的格式轉換。
zero.feed:提供服務器端與瀏覽器端操作 feed 內容的編程接口,包含 Java、Groovy 與 Ajax 風格的 API。
zero.resource:通過 Zero 資源模型提供高度簡化的方式創建 RESTful 資源,讓程序員輕鬆發布基於 Atom 的開放編程接口。
zero.assemble.flow:通過 Assemble flow 調用第三方 REST 服務,讓程序員能為各類 REST 服務提供者輕鬆附上 feed 格式的數據視圖。
為數據提供 feed 視圖
第一個例子示範如何為已有數據提供 feed 視圖。這裡用一個 MySQL 數據庫充當數據源,其中一張 blog_posts 表保存演示用的內容。Groovy 腳本從中讀取最新 10 條記錄,並為它們提供 Atom 格式的 feed 視圖。
1. 先用 sMash 命令行工具創建應用程序 feedview.demo:
zero create feedview.demo2. 在創建好的應用程序的依賴管理配置文件 config/ivy.xml 中加入所需模塊。
清單 2. 使用 zero.atom 和 zero.data 模塊,以及 MySQL 的 JDBC 驅動
<dependencies>
<dependency org="zero" name="zero.core" rev="[1.1.0.0, 2.0.0.0["/>
<dependency org="zero" name="zero.atom" rev="[1.1.0.0, 2.0.0.0["/>
<dependency org="zero" name="zero.data" rev="[1.1.0.0, 2.0.0.0["/>
<dependency org="mysql" name="mysql-connector-java" rev="5.1+"/>
</dependencies>
3. 創建 Groovy 腳本並保存至 public/latest_posts/atom/index.groovy。
清單 3. 從數據庫獲取內容數據、創建 Atom 數據結構,並將其發布為一個 Atom feed
// file: /public/latest_posts/atom/index.groovy
try {
// Get configured DataManager for data access
def data = zero.data.groovy.Manager.create('blog_db')

// Retrieve posts data
def result = data.queryArray(
 'SELECT ID as id, post_date as updated, content as summary '
 + 'FROM blog_posts order by updated desc limit 0, 10')
def feed = [
 title: "latest 10 posts",
 updated: new Date(),
 entries: result
]
request.docType = 'feed'
request.view = 'atom'
request.atom.output = feed
render()

} catch (Exception e) {
 request.status = HttpURLConnection.HTTP_INTERNAL_ERROR
 request.error.message = e.getMessage()
 request.view = "error"
 render()
}
4. 當然,你還需要在配置文件 config/zero.config 中加入必要信息以連接數據庫。
清單 4. 連接 MySQL 數據庫
/config/db/blog_db = {
 "class" : "com.mysql.jdbc.jdbc2.optional.MySQLDataSource",
 "serverName" : "localhost",
 "portNumber" : 3306,
 "databaseName" : "MYDBNAME",
 "user" : "someuser",
 "password" : "secretpassword"
}
5. 在命令行輸入以下命令,解析並獲取相關模塊,隨後啟動這個 sMash 應用程序:
zero resolve
zero start
6. 用瀏覽器訪問 https://localhost:8080/latest_posts/atom/,你就能看到已發布為 Atom feed 的數據。
個性化 feed 內容
除了把已有內容發布為 feed,另一大典型場景是消費第三方提供的 feed。sMash 的 zero.feed 包為消費與處理第三方 feed 提供了豐富的功能與極簡的 API。以查看搜狐 IT 新聞為例,若你只想看當天內容,只需寥寥幾行腳本便能搞定。
1. 用命令行工具創建名為 personalfeed.demo 的 sMash 應用程序:
zero create personalfeed.demo2. 在依賴管理文件 config/ivy.xml 中增加對 zero.feed 模塊的依賴:
清單 5. 使用 zero.feed 模塊
<dependencies>
<dependency org="zero" name="zero.core" rev="[1.1+,2.0.0.0["/>
<dependency org="zero" name="zero.feed" rev="[1.1+,2.0.0.0["/>
</dependencies>
3. 創建腳本文件 /public/sohuITtoday/index.groovy:
清單 6. 使用 Groovy feed API
// set response header "Content-Type"
headers.out."Content-Type" = "application/atom+xml"

// fetch sohu IT news feed and filter only today
zero.feed.FeedFactory.fetch("https://news.sohu.com/rss/it.xml")
.after("-P1D")
.writeTo(request.writer[])
4. 啟動 sMash 應用程序,訪問 https://localhost:8080/sohuITtoday/ 即可。
5. 若你還想看新浪 IT 與網易 IT 新聞,可把它們聚合為一個 feed。在 personalfeed.demo 中創建 /public/ITtoday/index.groovy:
清單 7. 聚合並過濾 feed 內容
// set response header "Content-Type"
headers.out."Content-Type" = "application/atom+xml"
zero.feed.FeedFactory.aggregate(
 "https://news.sohu.com/rss/it.xml",
 "https://rss.sina.com.cn/news/allnews/tech.xml",
 "https://tech.163.com/special/00091JPQ/rssit.xml")
.after("-P1D")
.writeTo(request.writer[])
最後在瀏覽器訪問 https://localhost:8080/ITtoday/,你便會看到一份匯聚三大網站 IT 新聞的 feed。
除了編寫服務端運行的 Groovy 來抓取 feed,zero.feed 模塊還提供 Ajax 風格的 JavaScript 編程接口,意味著 Web 開發者僅憑瀏覽器就能針對 feed 編程。為了簡化 JavaScript 訪問 feed 時繁瑣的方法調用,開發者還能用 JSON 格式代替 XML 來訪問 feed。
仍以搜狐 IT 新聞為例,直接創建 HTML 文件 public/sohuITToday/sample.html:
清單 8. 使用 JavaScript 訪問 feed
<html>
<head>
<script type="text/javascript" src="/dojo/dojo.js"></script>
<script type="text/javascript">
dojo.require("dojo.parser");
dojo.require("zero.feed.Feed");
</script>
<script type="text/javascript">
function fetchSohuIT() {
 zero.feed.FeedFactory.fetch("https://news.sohu.com/rss/it.xml")
 .after("-P1D")
 .loadAsJSON(function(feed) {
 var items = feed.entries;
 var htmlContent = "";
 for (var i = 0; i < items.length; i++) {
 var title = items[i].title;
 var link = items[i].links[0].href;
 htmlContent += "<a href='" + link + "' target='_blank'>"
 + title + "</a><br/>";
 }
 dojo.byId("feed").innerHTML = htmlContent;
 });
}
</script>
</head>
<body>
<p>This sample shows how to get resulting feed in JSON format.</p>
<button onclick="fetchSohuIT();" dojoType="dijit.form.Button">
load sohu IT news!
</button>
<div id="feed"></div>
</body>
</html>
運行 sMash 應用程序,訪問 https://localhost:8080/sohuITtoday/sample.html,單擊按鈕「load sohu IT news!」,稍候便會看到圖 1 的效果。
圖 1. AJax feed API 訪問搜狐 IT 新聞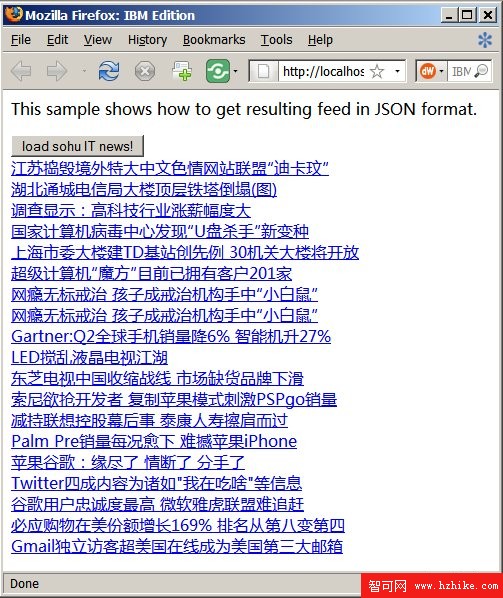
為數據服務提供 REST 風格的 API
ZRM 是什麼?
ZRM 是 Zero 資源模型(Zero Resource Model)的縮寫,它提供了一種創建 RESTful 資源的簡便途徑,讓你能輕鬆搭建 REST 風格的數據服務。
為數據服務開放 API,可方便第三方數據消費者使用;而以 REST 風格構建 API,早已是當今最普遍的做法。以豆瓣的開放 API 為例,它提供 REST 風格的 URI,並以 Atom 1.0 作為數據格式,方便開發者編程訪問豆瓣的各類數據服務。借助 sMash,你也能輕鬆創建這樣的開放 API。
下面我們用 sMash ZRM 打造一個簡單的聯系人管理程序,為聯系人數據提供 RESTful API。為簡化開發,推薦使用 WebSphere sMash 的開發工具 AppBuilder。
1. 打開 AppBuilder 創建 sMash 應用程序 contact.demo。
圖 2. 使用 AppBuilder 創建應用程序 contact.demo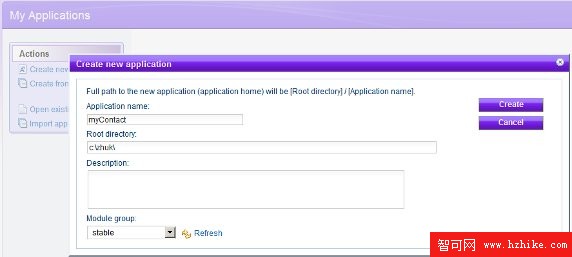
圖片看不清楚?請點擊這裡查看原圖(大圖)。
2. 為聯系人信息創建一個 Zero 資源模型(ZRM),指定相關列名與數據類型。
圖 3. 選擇創建文件類型 ZRM model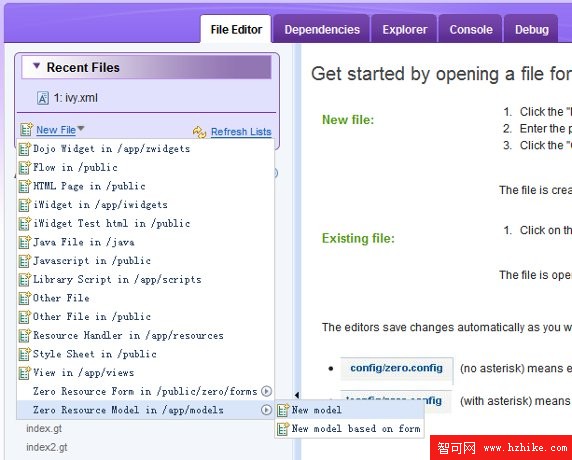
圖片看不清楚?請點擊這裡查看原圖(大圖)。
圖 4. 創建 ZRM model /app/models/contact.json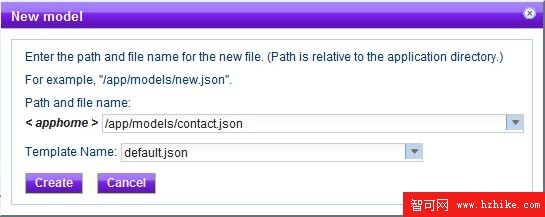
圖 5. 使用 ZRM model 編輯器指定列名稱和數據類型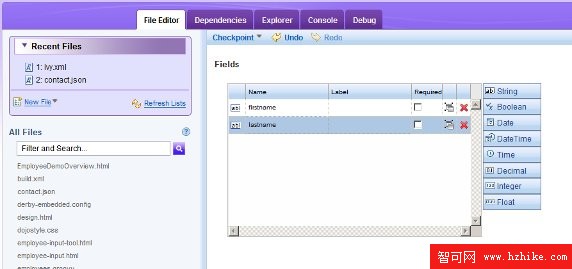
圖片看不清楚?請點擊這裡查看原圖(大圖)。
圖 6. 創建 resource handler app/resources/contact.groovy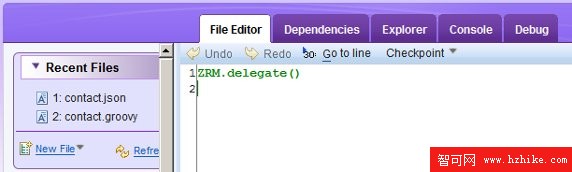
圖片看不清楚?請點擊這裡查看原圖(大圖)。
3. 創建數據庫與樣例數據。
圖 7. 切換到 Console 標簽運行命令 zero model sync 創建數據庫表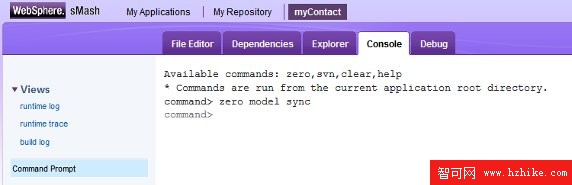
圖片看不清楚?請點擊這裡查看原圖(大圖)。
圖 8. 為樣例數據創建 SQL 腳本 /init_data.sql
圖片看不清楚?請點擊這裡查看原圖(大圖)。
圖 9. 運行 SQL 腳本導入樣例數據:zero runsql init_data.sql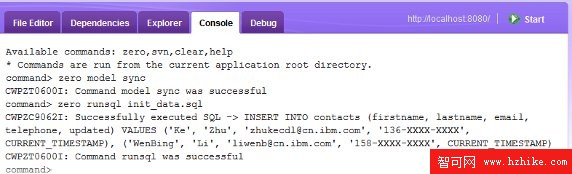
圖片看不清楚?請點擊這裡查看原圖(大圖)。
此時單擊 AppBuilder 右上角的「Start」按鈕啟動 contact.demo,在瀏覽器打開 https://localhost:8080/resources/contact?format_as=atom,即可看到 feed 格式的聯系人信息。
zero.resource 模塊為以上 RESTful API 提供了豐富的查詢能力。例如 https://localhost:8080/resources/contact?telephone_startswith=158&format_as=atom 會列出所有電話號碼以 158 開頭的聯系人。
4. 為保護數據服務安全,你應為開放 API 加上身份認證。這裡可借助 sMash 的安全特性,輕鬆把 REST API 保護起來。在 config/zero.config 中加入以下配置:
清單 9. 安全設置
@include "security/enableSecurity.config"
# secure contact API by basic authentication
@include "security/basicAuthentication.config" {
 "conditions": "/request/path =~ /resources/contact(/.*)?"
}
# only people in group "friends" can access contact API
@include "security/authorization.config" {
 "conditions": "/request/path =~ /resources/contact(/.*)?",
 "groups" : ["FRIENDS"]
}
這段配置為聯系人 REST API 提供了 HTTP 基本身份驗證,並授權僅 FRIENDS 群組成員可訪問。
為第三方服務提供 feed 數據視圖
雖然 feed 已是 Web 2.0 風潮中最常見的數據發布格式,但現實中仍有大量數據服務並未採用 RSS 或 Atom,例如 Amazon Web Services、eBay Web Services 提供的 HTTP API。借助 WebSphere sMash,你能連接這類服務,並把 XML 格式數據轉換為 feed 格式。
這裡以 Last.fm 的 Track Search 服務為例,通過 XSL 與一個 Groovy 方法,為它提供 feed 格式的數據視圖。
1. 第一步自然是創建 sMash 應用程序,此處直接介紹後續步驟。打開 AppBuilder 的 Dependencies 標簽,點擊「Add」,選中 zero.assemble.flow。
圖 10. 使用 zero.assemble.flow 模塊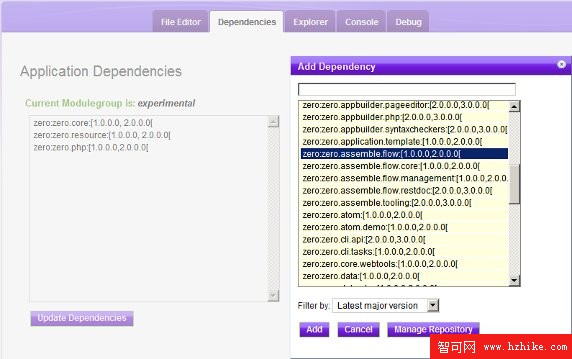
圖片看不清楚?請點擊這裡查看原圖(大圖)。
2. 為 TrackSearch 服務提供服務描述文件 app/assemble/services/LastfmSearch.xml。
清單 10. 服務描述文件片段
<?XML version="1.0" encoding="utf-8"?>
<entry XMLns="https://www.w3.org/2005/Atom"
XMLns:z="https://www.projectzero.org/assemble/component">
<title>Last.fm Web Services</title>
<link rel=
 "https://www.projectzero.org/assemble/component/url-template"
 type="text/xml"
 href="https://ws.audioscrobbler.com/2.0/?method=
 {method}&api_key={apiKey}&artist=
 {artist?}&track={track}"
 />
 ......
3. 創建 XSL 文件 public/stylesheet/lastfm.xsl,把 Last.fm 返回的結果轉換為 Atom feed。
清單 11. 格式轉換文件片段
<?XML version="1.0" encoding="UTF-8"?>
<xsl:stylesheet version="1.0" XMLns:xsl="https://www.w3.org/1999/XSL/Transform"
XMLns="https://www.w3.org/2005/Atom"
XMLns:opensearch="https://a9.com/-/spec/opensearch/1.1/">
 <xsl:template match="/">
 <feed><title>
 Search result for <xsl:value-of select=
 "lfm/results/opensearch:Query/@searchTerms"/>
 </title>
 <opensearch:totalResults>
 <xsl:value-of select="lfm/results/opensearch:totalResults"/>
 </opensearch:totalResults>
 <xsl:apply-templates select="lfm/results/trackmatches/track"/>
 </feed>
 </xsl:template>
......
4. 在 config/zero.config 中填入你的 API Key:
/config/lastfm/apiKey = "Last.fm API Key: https://www.last.fm/api/account"5. 最後創建 Groovy 腳本 public/testTrackSearch/index.groovy 調用這個 TrackSearch 服務,此處以關鍵詞「Believe」搜索:
清單 12. Groovy 腳本調用 Track Search 服務
def criteria = [method: "track.search", track: "Believe", format: "atom"]
// use service description file /app/assemble/services/LastfmSearch.xml
def results = invokeService("TrackSearch", criteria)
// rendering
request.view = "xml"
request.xml.output = results
headers.out."Content-Type" = "application/atom+xml"
render()
啟動應用程序,在瀏覽器輸入 https://localhost:8080/testTrackSearch,即可看到圖 11 所示的 feed。
圖 11. 為 Track Search 服務提供 feed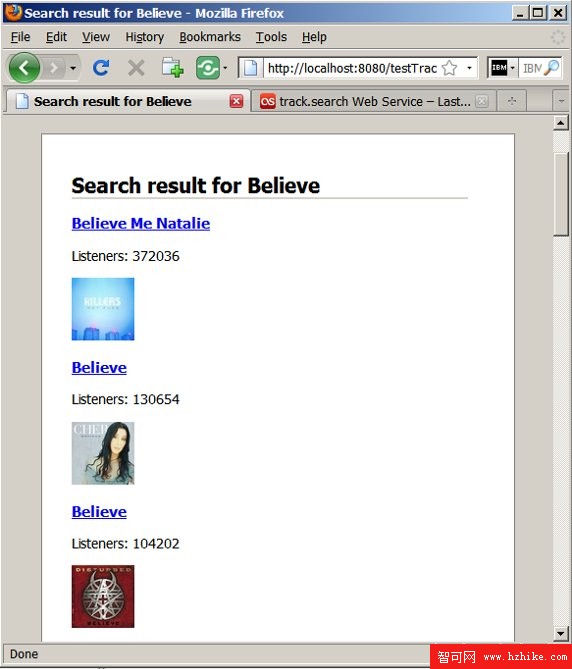
圖片看不清楚?請點擊這裡查看原圖(大圖)。
綜合范例:統計 digg.com 熱門文章的 dig 數量
通過前文的介紹,我們已看到 sMash 為 feed 的各種應用場景提供了易用而全面的支持。最後,這裡用 sMash 的 Ajax feed API 編寫一個頗具趣味的實例,展示如何用 JavaScript 統計 digg.com 上熱門文章被 dig 的最大、最小與平均次數。
首先創建 sMash 應用程序,參照「個性化 feed 內容」一節修改配置、增加對 zero.feed 模塊的依賴,然後創建文件 public/digStatistics.html:
清單 13. Html 文件中的 JavaScript 代碼片段
function doGrouping() {
 dojo.byId("loadingImg").style.display = "block";
 // grouping entries with statistics of digg counts
 var queryParams = {
 "select": [
 "digg:category/text() as atom:title",
 "count($collection) as atom:summary",
 "sum($collection/digg:diggCount) as digg:totalCount",
 "max($collection/digg:diggCount) as digg:maxDiggCount",
 "min($collection/digg:diggCount) as digg:minDiggCount",
 "avg($collection/digg:diggCount) as digg:avgDiggCount"
 ],
 "groupBy": "digg:category"
 };
 zero.feed.FeedFactory.fetch("https://digg.com/rss/index.xml")
 .declareNamespaces({"digg":"https://digg.com/docs/diggrss/"})
 .query(queryParams)
 .filterByXPath("atom:summary > 1")
 .loadAsXML(function(feed){
 // …
 });
}
最後啟動這個 sMash 應用程序,用瀏覽器訪問 https://localhost:8080/digStatistics.html,單擊按鈕「digg.com statistics」,你就會看到圖 12 那樣饒有趣味的統計結果了!若需要完整的演示代碼,可在 sMash 的演示程序 zero.flow.demo 中找到它。
圖 12. 使用 AJax feed API 創建的 digg.com 統計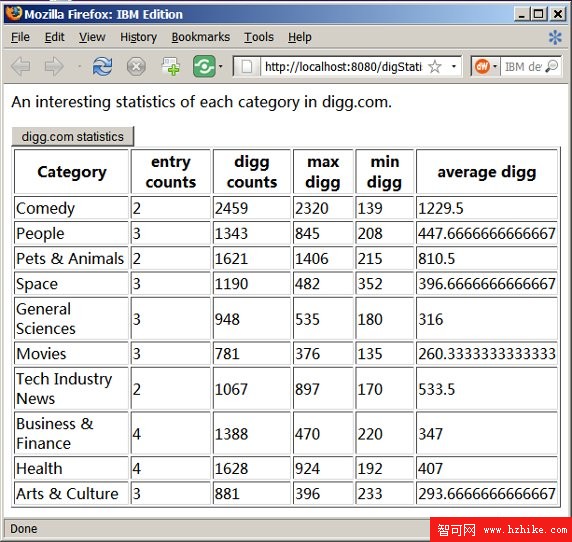
圖片看不清楚?請點擊這裡查看原圖(大圖)。
結束語
透過本文對 WebSphere sMash 開發 REST 風格 Web 應用程序的介紹,尤其是它圍繞 RSS/Atom feed 這類流行信息聚合格式所提供的豐富功能與工具支持,相信讀者對 feed 的應用與開發已有相當的體會。文中例子的完整代碼都能在「下載」欄目中找到,你只要裝好 WebSphere sMash 的命令行工具即可運行;若再搭配 AppBuilder 或 Eclipse 插件,開發體驗會更加輕鬆愜意。
- 上一篇文章: 用 XML 約束檢查實現基本文檔結構
- 下一篇文章: 探索 XUL 內的多線程編程