Canvas 預設用黑色作畫。想換個顏色,就得在下筆之前先告訴它。這件事看起來簡單,但一旦牽扯到透明度,就有兩套完全不同的機制在運作,很多人會搞混。這篇就把它們分清楚。
指定顏色
兩個屬性,分工明確:
ctx.strokeStyle = color;   // 線條(描邊)的顏色
ctx.fillStyle   = color;   // 區域(填充)的顏色
來看實際的例子,畫三個重疊的圓:
onload = function() {
  draw();
};

function draw() {
  var canvas = document.getElementById('c1');
  if (!canvas || !canvas.getContext) { return false; }
  var ctx = canvas.getContext('2d');

  ctx.beginPath();
  ctx.fillStyle = 'rgb(192, 80, 77)';   // 紅
  ctx.arc(70, 45, 35, 0, Math.PI * 2, false);
  ctx.fill();

  ctx.beginPath();
  ctx.fillStyle = 'rgb(155, 187, 89)';  // 綠
  ctx.arc(45, 95, 35, 0, Math.PI * 2, false);
  ctx.fill();

  ctx.beginPath();
  ctx.fillStyle = 'rgb(128, 100, 162)'; // 紫
  ctx.arc(95, 95, 35, 0, Math.PI * 2, false);
  ctx.fill();
}
效果如下圖:

注意每個圓之前都呼叫了 beginPath()。少了它,路徑會持續累加,顏色就容易互相污染。
用 rgba 指定透明度
和 CSS 一樣,顏色字串可以帶第四個 alpha 值。改動其實只有一個字母:
onload = function() {
  draw();
};

function draw() {
  var canvas = document.getElementById('c1');
  if (!canvas || !canvas.getContext) { return false; }
  var ctx = canvas.getContext('2d');

  ctx.beginPath();
  ctx.fillStyle = 'rgba(192, 80, 77, 0.7)';
  ctx.arc(70, 45, 35, 0, Math.PI * 2, false);
  ctx.fill();

  ctx.beginPath();
  ctx.fillStyle = 'rgba(155, 187, 89, 0.7)';
  ctx.arc(45, 95, 35, 0, Math.PI * 2, false);
  ctx.fill();

  ctx.beginPath();
  ctx.fillStyle = 'rgba(128, 100, 162, 0.7)';
  ctx.arc(95, 95, 35, 0, Math.PI * 2, false);
  ctx.fill();
}
結果就是下面這樣,重疊處會透出混色:
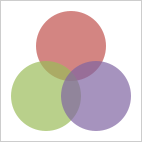
程式碼幾乎沒變,只是 rgb(r, g, b) 變成 rgba(r, g, b, a)。a 的範圍是 0 到 1,0 完全透明、1 完全不透明。所以嚴格來說,這個值叫「不透明度」(alpha 在語意上是反的,但習慣上大家還是把第四個參數叫 alpha)。
這招比較不常用的原因是相容性:IE9 之前不支援 rgba 色彩。
全域透明度 globalAlpha
另一條路是 globalAlpha。預設值 1.0 代表完全不透明,範圍 0.0(全透明)到 1.0。
它與陰影設定有一個共同的特性:都是基於狀態的。也就是說,一旦設下去就會持續影響後續所有繪圖動作,直到你把它改回來。如果不想讓透明度全域生效,就必須在下次繪圖前重設。
順帶整理一下 Canvas 中所有「基於狀態」的屬性,這些都需要自己注意重設:
- globalAlpha
- globalCompositeOperation
- fillStyle、strokeStyle
- font、textAlign、textBaseline
- lineCap、lineJoin、lineWidth、miterLimit
- shadowBlur、shadowColor、shadowOffsetX、shadowOffsetY
實務上的解法是養成習慣:在每次狀態敏感的繪圖前後包一層 save() 與 restore()。
用 globalAlpha 隨手畫一團彩色泡泡
把 globalAlpha 設成 0.5,然後隨機畫 50 個圓,重疊處就會自然堆疊出深淺變化:
<!DOCTYPE html>
<html lang="zh">
<head>
  <meta charset="UTF-8">
  <title>全局透明</title>
  <style>
    body { background: url("./images/bg3.jpg") repeat; }
    #canvas { border: 1px solid #aaaaaa; display: block; margin: 50px auto; }
  </style>
</head>
<body>
<div id="canvas-warp">
  <canvas id="canvas">
    你的瀏覽器居然不支持 Canvas?!趕快換一個吧!!
  </canvas>
</div>

<script>
  window.onload = function() {
    var canvas = document.getElementById("canvas");
    canvas.width  = 800;
    canvas.height = 600;
    var context = canvas.getContext("2d");

    context.fillStyle = "#FFF";
    context.fillRect(0, 0, 800, 600);

    context.globalAlpha = 0.5;

    for (var i = 0; i <= 50; i++) {
      var R = Math.floor(Math.random() * 255);
      var G = Math.floor(Math.random() * 255);
      var B = Math.floor(Math.random() * 255);

      context.fillStyle = "rgb(" + R + "," + G + "," + B + ")";
      context.beginPath();
      context.arc(Math.random() * canvas.width, Math.random() * canvas.height,
                  Math.random() * 100, 0, Math.PI * 2);
      context.fill();
    }
  };
</script>
</body>
</html>
執行結果:

是不是有點藝術家的味道了?關鍵就在於:alpha 疊加的順序會影響最終色階,先畫的會被後畫的壓在下面,所以隨機產生的层次感其實來自「繪圖順序」而非刻意調色。
該用哪一個
- 只需要「某一筆」半透明 → 用
rgba(),作用範圍明確,不會外溢。 - 一整批圖形共用同一透明度 → 用
globalAlpha,少寫很多字,但記得重設。 - 需要相容舊版 IE → 避開 rgba,改用
globalAlpha。
兩者並非互斥,也可以搭配使用,最終透明度會是兩者相乘的結果。