用 HTML5 Canvas 手繪圓角矩形與延伸應用實例
編輯:HTML5教程
圓角矩形其實不難拆解:它由四段直線與四段四分之一圓弧拼接而成。理解這個結構之後,我們就能把它寫成一個可重複呼叫的函式,而不是死板地畫出單一圖形。
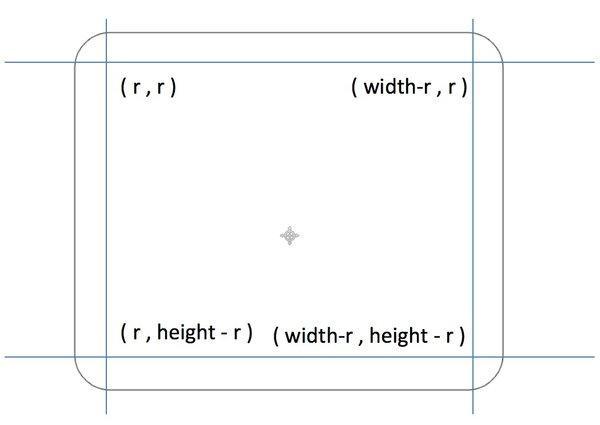
因為目標是「函式」,所以先釐清需要哪些參數:座標 (x, y)、寬高 (width, height) 以及圓角半徑 (radius)。想清楚之後,程式碼就順勢而出了。
<!DOCTYPE html>
<html lang="zh">
<head>
<meta charset="UTF-8">
<title>圓角矩形</title>
<style>
body { background: url("./images/bg3.jpg") repeat; }
#canvas { border: 1px solid #aaaaaa; display: block; margin: 50px auto; }
</style>
</head>
<body>
<div id="canvas-warp">
<canvas id="canvas">
你的瀏覽器不支援 Canvas,請更換一個吧!
</canvas>
</div>
<script>
window.onload = function(){
var canvas = document.getElementById("canvas");
canvas.width = 800;
canvas.height = 600;
var context = canvas.getContext("2d");
context.fillStyle = "#FFF";
context.fillRect(0,0,800,600);

drawRoundRect(context, 200, 100, 400, 400, 50);
context.strokeStyle = "#0078AA";
context.stroke();
}

function drawRoundRect(cxt, x, y, width, height, radius){
cxt.beginPath();
cxt.arc(x + radius, y + radius, radius, Math.PI, Math.PI * 3 / 2);
cxt.lineTo(width - radius + x, y);
cxt.arc(width - radius + x, radius + y, radius, Math.PI * 3 / 2, Math.PI * 2);
cxt.lineTo(width + x, height + y - radius);
cxt.arc(width - radius + x, height - radius + y, radius, 0, Math.PI * 1 / 2);
cxt.lineTo(radius + x, height +y);
cxt.arc(radius + x, height - radius + y, radius, Math.PI * 1 / 2, Math.PI);
cxt.closePath();
}
</script>
</body>
</html>
執行結果:
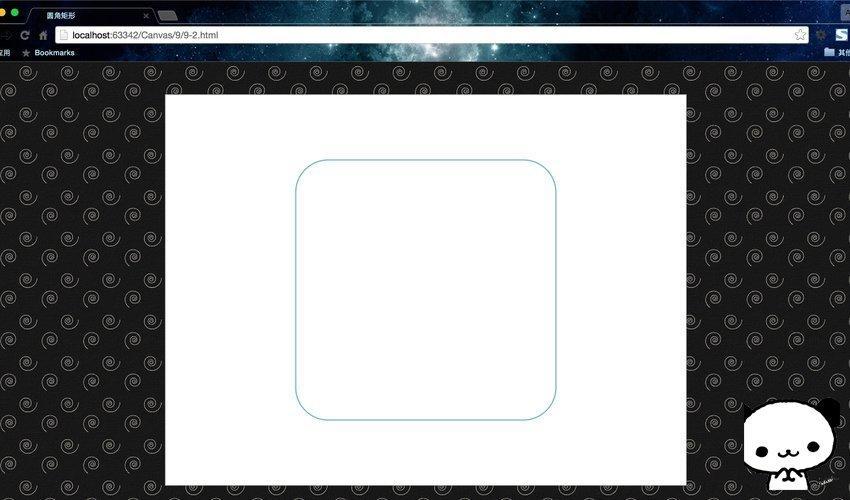
強烈建議親手畫一次,這個過程對熟悉 Canvas 路徑(path)的運作很有幫助。
延伸應用一:繪製 2048 遊戲介面
有了這個函式,我們就能拿來做點有趣的事。以下程式碼不多加解釋,建議先自己動手試寫看看。這裡採用的是硬編碼寫法,還有優化空間,讀者可以嘗試改進。
<!DOCTYPE html>
<html lang="zh">
<head>
<meta charset="UTF-8">
<title>2048遊戲界面</title>
<style>
body { background: url("./images/bg3.jpg") repeat; }
#canvas { border: 1px solid #aaaaaa; display: block; margin: 50px auto; }
</style>
</head>
<body>
<div id="canvas-warp">
<canvas id="canvas">
你的瀏覽器不支援 Canvas,請更換一個吧!
</canvas>
</div>
<script>
window.onload = function(){
var canvas = document.getElementById("canvas");
canvas.width = 800;
canvas.height = 600;
var context = canvas.getContext("2d");
context.fillStyle = "#FFF";
context.fillRect(0,0,800,600);

drawRoundRect(context, 200, 100, 400, 400, 5);
context.fillStyle = "#AA7B41";
context.strokeStyle = "#0078AA";
context.stroke();
context.fill();

for(var i = 1; i <= 4; i++){
for(var j = 1; j <= 4; j++){
drawRoundRect(context, 200 + 16 * i + 80 * (i - 1), 100 + 16 * j + 80 * (j - 1), 80, 80, 5);
context.fillStyle = "#CCBFB4";
context.strokeStyle = "#0078AA";
context.stroke();
context.fill();
}
}
}

function drawRoundRect(cxt, x, y, width, height, radius){
cxt.beginPath();
cxt.arc(x + radius, y + radius, radius, Math.PI, Math.PI * 3 / 2);
cxt.lineTo(width - radius + x, y);
cxt.arc(width - radius + x, radius + y, radius, Math.PI * 3 / 2, Math.PI * 2);
cxt.lineTo(width + x, height + y - radius);
cxt.arc(width - radius + x, height - radius + y, radius, 0, Math.PI * 1 / 2);
cxt.lineTo(radius + x, height +y);
cxt.arc(radius + x, height - radius + y, radius, Math.PI * 1 / 2, Math.PI);
cxt.closePath();
}
</script>
</body>
</html>
執行結果:
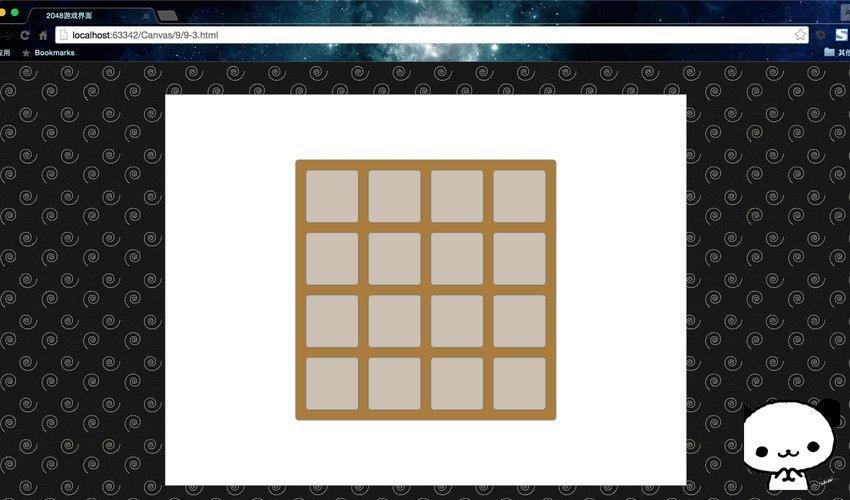
把這個圓角矩形函式寫好之後,可以進一步封裝進自己的 JS 檔裡。日後遇到好用的函式就往裡頭放,長期累積下來,這份檔案就等於是一套屬於自己的圖形庫與遊戲引擎了,是不是很酷?其實遊戲開發正是 Canvas 的主要舞台,而每一位遊戲設計師,骨子裡都是個藝術家。
延伸應用二:繪製微信對話框
不妨試著用 Canvas 畫一個微信聊天介面,當作練習與複習。

這個練習用到了繪製矩形、繪製圓角矩形、繪製多線條圖形與填色等技巧。由於還牽涉到我們尚未介紹的 Canvas 文字 API,所以只要能畫出個大概樣子就算及格了。能把介面畫出來,基本上也就掌握了 Canvas API 的精髓。
有趣的是,上述對話其實是「產生」出來的——出自「微信介面產生器網頁版」这个小工具,堪稱微商神器。
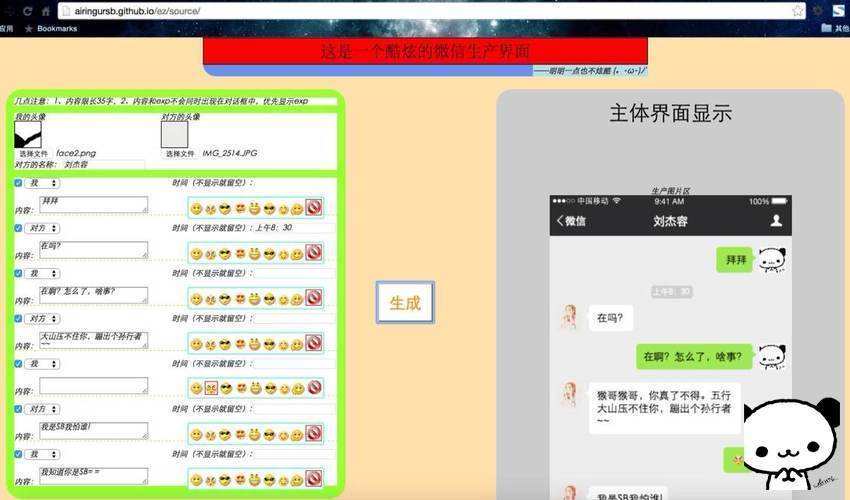
這只是當初花兩天寫出的雛形版,還不到正式發布的程度,撰文當時介面仍在持續優化。有興趣的讀者可以親手做一個,也能參考我在 GitHub 上的「微信介面產生器」專案。這裡就不再重複貼出介面程式碼了。
學到這一步,基本上所有基礎的 Canvas 繪圖 API 都已經齊備。接下來,就拿起你的畫筆自由揮灑吧!
- 上一篇文章: 深入解析 HTML5 Canvas 圖像平移與旋轉的實作技巧
- 下一篇文章: 最炫酷的 H5 是怎麼做出來的?一組動態實例拆解