HTML5 Canvas 紋理填充與描邊(Fill & Stroke)實作教學
編輯:HTML5詳解
本文用一個小 demo 說明如何在 HTML5 Canvas 上完成文字與圖形的「填充(Fill)」與「描邊(Stroke)」,並進一步改用圖片作為紋理(Pattern)來上色,做出帶木紋質感的文字與方塊。
一、純色填充與描邊
填充色由 fillStyle 決定,描邊色由 strokeStyle 決定,線條粗細則由 lineWidth 控制。這裡有個容易忽略的細節:描邊與填充是兩個各自獨立的 API,strokeText 只畫輪廓,fillText 才會填滿內部。若想避免填色把輪廓蓋掉,順序應該是先描邊、再填充。
ctx.font = '60pt Calibri';
ctx.lineWidth = 3;
ctx.strokeStyle = 'green';
ctx.strokeText('Hello World!', 20, 100);
ctx.fillStyle = 'red';
ctx.fillText('Hello World!', 20, 100);
二、改用紋理來填充與描邊
Canvas 除了純色,還允許拿一張圖當畫筆使用。做法是先載入紋理圖,透過 ctx.createPattern(image, repeatMode) 建立 pattern 物件,再把這個物件指派給 fillStyle 或 strokeStyle,之後所有繪製都會被這張圖平鋪填滿。
第二個參數決定平鋪規則,共有四種取值:
repeat:X、Y 兩軸方向都重複,是最常用的模式repeat-x:只沿 X 軸水平重複repeat-y:只沿 Y 軸垂直重複no-repeat:不重複,僅貼一次
var woodfill = ctx.createPattern(imageTexture, 'repeat');
ctx.strokeStyle = woodfill;
ctx.strokeText('Hello World!', 20, 200);

// 用同一個紋理填滿矩形
ctx.fillStyle = woodfill;
ctx.fillRect(60, 240, 260, 440);
本文使用的紋理圖片:

實務上要特別注意:createPattern 之前,圖片必須已經載入完成,否則會得到一片空白。因此正確做法是把繪製邏輯放在 img.onload 回呼裡,而不是同步建立 pattern。
三、運行結果與完整代碼
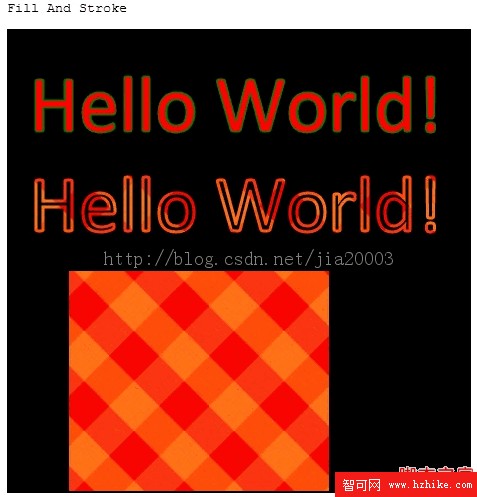
以下是可以直接存成 HTML 檔執行的完整範例:
<!DOCTYPE html>
<html>
<head>
<meta charset="UTF-8">
<title>Canvas Fill And Stroke Text Demo</title>
<script>
var ctx = null;            // 全域 2D context
var imageTexture = null;

window.onload = function () {
  var canvas = document.getElementById('text_canvas');
  canvas.width  = canvas.parentNode.clientWidth;
  canvas.height = canvas.parentNode.clientHeight;

  if (!canvas.getContext) {
    console.log('此瀏覽器不支援 Canvas,請改用 HTML5 相容的瀏覽器。');
    return;
  }

  ctx = canvas.getContext('2d');
  ctx.fillStyle = 'black';
  ctx.fillRect(0, 0, canvas.width, canvas.height);

  // 純色填充與描邊
  ctx.font = '60pt Calibri';
  ctx.lineWidth = 3;
  ctx.strokeStyle = 'green';
  ctx.strokeText('Hello World!', 20, 100);
  ctx.fillStyle = 'red';
  ctx.fillText('Hello World!', 20, 100);

  // 載入紋理圖,等載入完成後再繪製
  imageTexture = new Image();
  imageTexture.onload = loaded;   // 注意:指派函式本身,不要加上括號
  imageTexture.src = 'pattern.png';
};

function loaded() {
  // 稍作延遲,確保瀏覽器已完成圖片解碼
  setTimeout(textureFill, 1000 / 30);
}

function textureFill() {
  // var woodfill = ctx.createPattern(imageTexture, 'repeat-x');
  // var woodfill = ctx.createPattern(imageTexture, 'repeat-y');
  // var woodfill = ctx.createPattern(imageTexture, 'no-repeat');
  var woodfill = ctx.createPattern(imageTexture, 'repeat');

  ctx.strokeStyle = woodfill;
  ctx.strokeText('Hello World!', 20, 200);

  ctx.fillStyle = woodfill;
  ctx.fillRect(60, 240, 260, 440);
}
</script>
</head>
<body>
<h1>HTML5 Canvas Text Demo</h1>
<pre>Fill And Stroke</pre>
<div id="my_painter">
  <canvas id="text_canvas"></canvas>
</div>
</body>
</html>
原始範例中把事件寫成 imageTexture.onload = loaded();,加了括號會讓函式立刻被執行一次,而不是等圖片下載完年才觸發,這是初學者最常踩到的雷。改寫成 imageTexture.onload = loaded; 才是正確寫法。