一、前言
檔案上傳是相當常見的功能,但傳統「點擊上傳按鈕、再逐層尋找檔案路徑」的操作方式頗為繁瑣,使用者體驗打了折扣。所幸 HTML5 開始原生支援拖拉(Drag and Drop)上傳所需的 API,讓使用者能直接把檔案拖進指定區域完成上傳。另一方面,Node.js 近來愈發受到歡迎,而其中最廣泛使用的開發框架莫過於 Express——它是一款類似 MVC 模式的輕量級框架。本文就來示範如何結合 HTML5、Node.js 與 Express,實作一個流暢的拖拉上傳功能。
二、基礎知識
1、Node.js 概覽
簡單來說,Node.js 是一個讓 JavaScript 得以在伺服器端執行的開發平台,近年發展迅速,淘寶等國內大型企業也已開始採用。傳統的 Web 開發平台多仰賴多執行緒來處理高併發請求,而 Node.js 則採用單執行緒、非同步 I/O、事件驅動的設計模型,因而獲得了顯著的效能提升——這正是它最大的特色。在 Node.js 中,所有 I/O 操作都以回呼(callback)方式進行:執行 I/O 時會先把請求推入事件佇列,等待程式處理,待 I/O 完成後再呼叫回呼函式回傳結果。
以查詢資料庫為例:
mysql.query("SELECT * FROM myTable", function(res){
  callback(res);
});
這段程式碼執行時,Node.js 不會停下來等待資料庫回傳結果,而是繼續往下執行;等到資料庫取回資料後,會把它丟進事件循環佇列,待執行緒進入該佇列時才真正執行 callback 的內容。這種非同步的特性正是 Node.js 高效能的關鍵。
想深入了解 Node.js,可以參考網路上的入門教學與相關文章。
2、Express 概覽
Node.js 擁有活躍的開源社群與大量第三方函式庫,其中 Express 是最廣泛、最常用的框架之一,也是官方推薦的選擇。它除了封裝常見的 HTTP 操作,還提供路由控制、樣板解析、動態視圖、使用者工作階段等功能。不過它並非萬能框架,核心功能多半是對 HTTP 的封裝,屬於輕量級設計,許多進階能力仍需整合第三方函式庫才能實現。
值得注意的是,Express 對檔案上傳提供了便利的支援:當上傳請求送達後,Express 會先接收檔案並存入一個臨時目錄,接著在我們路由到的方法中,只需把檔案從臨時目錄複製到正式存放資料夾即可。本文的伺服器端實作正是建立在這個機制之上。
3、HTML5 拖拉上傳 API
HTML5 帶來了許多新特性,拖拉事件與檔案上傳便是其中之一。基於篇幅考量,本文將重點放在程式碼實作,讀者若有興趣,可參考 HTML5 相關的事件屬性文件與教學資源。
三、拖拉上傳實作
1、程式碼實作
先來看前端 JS 的檔案結構:
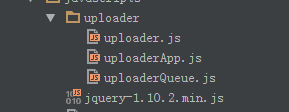
其中各檔案職責如下:
uploader.js 主要負責封裝 HTML5 的上傳功能;uploaderQueue.js 負責管理上傳檔案佇列與上傳物件,把佇列中的檔案送到伺服器;uploaderApp.js 則是上傳功能的入口,負責監聽拖曳事件、把拖入的檔案推進佇列並啟動上傳流程。
以下針對核心程式碼做簡要說明,完整程式碼可至原頁面下載。首先是對 HTML5 原生上傳 API 的封裝 uploader.js:
function uploader(url, data, files) {
  this._files = files;
  this._data = data;
  this._url = url;
  this._xhr = null;
  this.onloadstart = {};
  this.onload = {};
  this.onloadend = {};
  this.onprogress = {};
  this.onerror = {};
  this.ontimeout = {};
  this.callback = {}; // 請求完成後的回呼
  _self = this;
}
uploader.prototype = {
  init: function () {
    if (!isValid()) { throw e; }
    this._xhr = new XMLHttpRequest();
    this._bindEvents();
  },
  send: function () {
    if (this._xhr == null) { this.init(); }
    var formData = this._createFormData();
    this._xhr.open('post', this._url, true);
    this._xhr.send(formData);
  },
  _bindEvents: function () {
    _self = this;
    this._xhr.upload.loadstart = function (e) { evalFunction(_self.onloadstart, e); }
    this._xhr.upload.onload = function (e) { evalFunction(_self.onload, e); };
    this._xhr.upload.onloadend = function (e) { evalFunction(_self.onloadend, e); }
    this._xhr.upload.onprogress = function (e) { evalFunction(_self.onprogress, e) };
    this._xhr.upload.onerror = function (e) { evalFunction(_self.onerror, e); };
    this._xhr.upload.ontimeout = function (e) { evalFunction(_self.ontimeout, e); }
    this._xhr.onreadystatechange = function () {
      if (_self._xhr.readyState == 4) {
        if (typeof _self.callback === 'function') {
          var status = _self._xhr.status;
          var data = _self._xhr.responseText;
          _self.callback(status, data);
        }
      }
    }
  },
  _createFormData: function () {
    var formData = new FormData();
    this._addDataToFormData(formData);
    this._addFileToFormData(formData);
    return formData;
  },
  _addDataToFormData: function (formData) {
    if (this._data) {
      for (var item in this._data) {
        formData.append(item, this._data[item]);
      }
    }
  },
  _addFileToFormData: function (formData) {
    if (this._files) {
      for (var i = 0; i < this._files.length; i++) {
        formData.append('file[' + i + ']', this._files[i]);
      }
    }
  }
};

var uploaderFactory = {
  send: function (url, data, files, callback) {
    var insUploader = new uploader(url, data, files);
    insUploader.callback = function (status, resData) {
      if (typeof callback === 'function') {
        callback(status, resData);
      }
    }
    insUploader.send();
    return insUploader;
  }
};
uploader 物件對 HTML5 原生 API 做了簡單封裝,而 uploaderFactory 則提供一個類似 jQuery ajax 的簡潔介面,讓檔案上傳的呼叫更直覺。HTML5 是在原本的 XMLHttpRequest 基礎上擴充了屬性與方法,並提供 FormData 物件來支援檔案上傳。
上傳佇列(uploaderQueue.js)同樣是關鍵,它包含兩個物件:Queue 負責佇列的增刪改查,UploadEngine 則是上傳引擎,負責從佇列取出檔案、呼叫 uploader 上傳,並更新檔案狀態。兩者皆為單例物件。先看佇列物件:
(function (upladerQueue) {
  var Status = { Ready: 0, Uploading: 1, Complete: 2 }
  var _self = null;
  var instance = null;
  function Queue() {
    this._datas = [];
    this._curSize = 0; // 當前長度
    _self = this;
  }
  Queue.prototype = {
    add: function (data) {
      var key = new Date().getTime();
      this._datas.push({ key: key, data: data, status: Status.Ready });
      this._curSize = this._datas.length;
      return key;
    },
    remove: function (key) {
      var index = this._getIndexByKey(key);
      this._datas.splice(index, 1);
      this._curSize = this._datas.length;
    },
    get: function (key) {
      var index = this._getIndexByKey(key);
      return index != -1 ? this._datas[index].data : null;
    },
    clear: function () {
      this._datas = [];
      this._curSize = this._datas.length;
    },
    size: function () {
      return this._curSize;
    },
    setItemStatus: function (key, status) {
      var index = this._getIndexByKey(key);
      if (index != -1) {
        this._datas[index].status = status;
      }
    },
    nextReadyingIndex: function () {
      for (var i = 0; i < this._datas.length; i++) {
        if (this._datas[i].status == Status.Ready) {
          return i;
        }
      }
      return -1;
    },
    getDataByIndex: function (index) {
      if (index < 0) { return null; }
      return this._datas[index];
    },
    _getIndexByKey: function (key) {
      for (var i = 0; i < this._datas.length; i++) {
        if (this._datas[i].key == key) { return i; }
      }
      return -1;
    }
  };
  function getInstace() {
    if (instance === null) {
      instance = new Queue();
      return instance;
    } else {
      return instance;
    }
  }
  upladerQueue.Queue = getInstace();
  upladerQueue.UploadStatus = Status;
})(window.uploaderQueue);
佇列以陣列管理每個檔案物件,每個物件都具備 key、data、status 三個屬性,主要負責檔案的新增、刪除、更新與查詢。
另一個重要物件是上傳引擎(uploadEngine.js):
(function (upladerQueue) {
  var instance = null;
  var _self;
  function uploadEngine() {
    this._url = null;
    this._curUploadingKey = -1; // 標誌
    this.uploadStatusChanged = {};
    this.uploadItemProgress = {};
    _self = this;
  }
  uploadEngine.prototype = {
    setUrl: function (url) {
      this._url = url;
    },
    run: function () {
      if (this._curUploadingKey === -1 && this._url) {
        this._startUpload();
      }
    },
    _startUpload: function () {
      _self = this;
      var index = upladerQueue.Queue.nextReadyingIndex();
      if (index != -1) {
        this._uploadItem(index);
      } else {
        this._curUploadingKey = -1;
        return null;
      }
    },
    _uploadItem: function (index) {
      var data = upladerQueue.Queue.getDataByIndex(index).data;
      _self = this;
      this._readyUploadItem(index);
      var upload = uploaderFactory.send(this._url, null, data.files, function (status, data) {
        _self._completedUploadItem.call(_self, status, data);
      });
      this._uploadItemProgress(upload);
    },
    _uploadItemProgress: function (upload) {
      upload.onprogress = function (e) {
        _self.uploadItemProgress(_self._curUploadingKey, e);
      }
    },
    _readyUploadItem: function (index) {
      this._curUploadingKey = upladerQueue.Queue.getDataByIndex(index).key;
      if (typeof this.uploadStatusChanged === 'function') {
        this.uploadStatusChanged(this._curUploadingKey, upladerQueue.UploadStatus.Uploading);
      }
      upladerQueue.Queue.setItemStatus(this._curUploadingKey, upladerQueue.UploadStatus.Uploading);
    },
    _completedUploadItem: function (status, data) {
      if (typeof this.uploadStatusChanged === 'function') {
        this.uploadStatusChanged(this._curUploadingKey, upladerQueue.UploadStatus.Complete);
      }
      upladerQueue.Queue.setItemStatus(this._curUploadingKey, upladerQueue.UploadStatus.Complete);
      this._startUpload();
    }
  };
  function getInstace() {
    if (instance === null) {
      instance = new uploadEngine();
    }
    return instance;
  }
  upladerQueue.Engine = getInstace();
})(window.uploaderQueue);
這個物件主要提供 run 與 setUrl 兩個方法,用於啟動引擎與設定上傳路徑。它內部以遞迴方式把佇列中的檔案逐一上傳,並透過 uploadItemProgress 通知外部上傳進度、透過 uploadStatusChanged 通知檔案狀態,以便即時更新 UI。
uploaderApp.js 主要包含三個物件:一個類似 jQuery 的簡易物件(App$)負責綁定事件、一個代表拖拉區域的 uploaderArea 物件,以及作為入口的 uploaderMain 物件。後者負責初始化各物件並對外提供 init 方法。以下聚焦說明 uploaderMain:
(function (app) {
  var _self;
  function uploaderMain(id) {
    this._id = id;
    this._area = null;
    this.uploaders = [];
    this._URL = 'file/uploader';
  }
  uploaderMain.prototype = {
    init: function () {
      _self = this;
      this._initArea();
      this._initQueueEng();
    },
    _initQueueEng: function () {
      uploaderQueue.Engine.setUrl(this._URL);
      uploaderQueue.Engine.uploadStatusChanged = function (key, status) {
        if (status === uploaderQueue.UploadStatus.Uploading) {
          _self._area.hideItemCancel(key);
        } else if (status === uploaderQueue.UploadStatus.Complete) {
          _self._area.completeItem(key);
          _self._area.showItemCancel(key);
        }
      }
      uploaderQueue.Engine.uploadItemProgress = function (key, e) {
        var progress = e.position / e.total;
        _self._area.changeItemProgress(key, Math.round(progress * 100));
      }
    },
    _initArea: function () {
      this._area = new app.area(this._id);
      this._area.init();
      this._area.drop = function (e) {
        var key = uploaderQueue.Queue.add({ files: e.dataTransfer.files });
        uploaderQueue.Engine.run();
        return key;
      }
      this._area.cancelItem = function (key) {
        uploaderQueue.Queue.remove(key);
      }
    }
  };
  app.main = uploaderMain;
})(window.uploaderApp);
uploaderMain 相當於各物件之間的中介,負責初始化與相互調用,讓各模組協作完成整體功能。它對外只暴露一個 init 方法,因此在 HTML 頁面中,只需以下幾行即可啟動整個程式:
<script type="text/javascript">
var main = new uploaderApp.main('container');
main.init();
</script>
最後來看後端(Node.js)端的實作。如前所述,Express 已完整封裝了檔案上傳:當路由到 action 時,檔案其實已上傳完畢,只是暫存在臨時目錄,而這個目錄可在 app.js 中設定:
app.use(express.bodyParser({ uploadDir: __dirname + '/public/temp' }));
如此一來,上傳的檔案便會存放在 /public/temp 目錄下,檔名則由 Express 依特定演算法隨機產生。我們在 action 中要做的,就是把臨時檔案搬移到正式存放目錄,再刪除臨時檔:
function uploader(req, res) {
  if (req.files != 'undifined') {
    console.dir(req.files);
    utils.mkDir().then(function (path) {
      uploadFile(req, res, path, 0);
    });
  }
}
function uploadFile(req, res, path, index) {
  var tempPath = req.files.file[index].path;
  var name = req.files.file[index].name;
  if (tempPath) {
    var rename = promise.denodeify(fs.rename);
    rename(tempPath, path + name).then(function () {
      var unlink = promise.denodeify(fs.unlink);
      unlink(tempPath);
    }).then(function () {
      if (index == req.files.file.length - 1) {
        var res = { code: 1, des: '上傳成功' };
        res.send(res);
      } else {
        uploadFile(req, res, path, index + 1);
      }
    });
  }
}
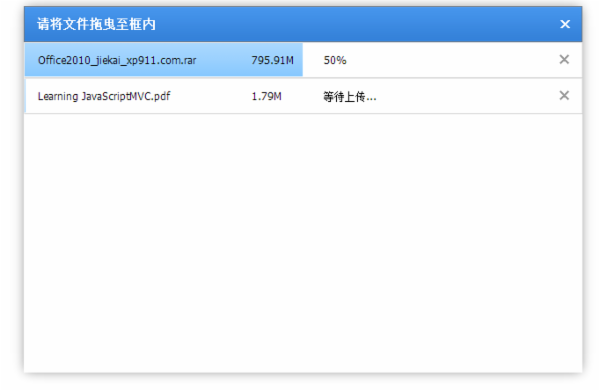
2、實現效果
四、取得程式碼
完整程式碼可至原文章提供的下載連結取得,讀者可依此進一步研究與調整。