核心定位公式只有一行:
$(this).css({"left":Math.sin((ahd*index+ainhd))*radius+dotLeft,"top":Math.cos((ahd*index+ainhd))*radius+dotTop});
效果圖:

分析圖:
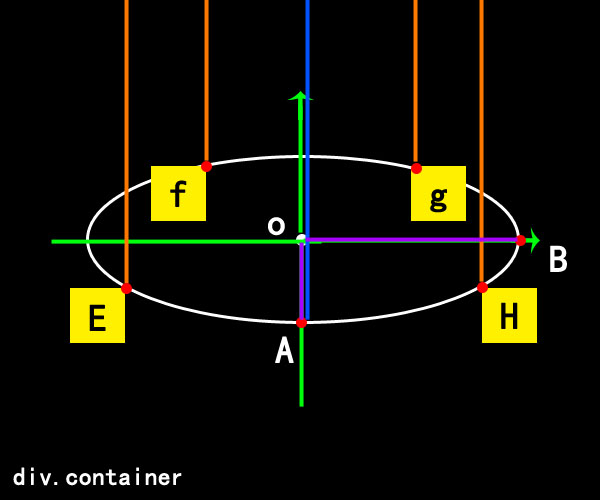
圖例說明:黑色是外層容器;黃色是需要沿軌道排列的圖片;橙色是每張圖片距容器頂部的距離;紫色是長/短半徑;藍色是距頂部的最大距離;綠色是座標軸;白色是橢圓運動軌跡。
一、從圓形推廣到橢圓
前面兩篇已經談過「圓形排列」與「圓形運動」,有了這個基礎,改成橢圓就很自然。
橢圓與圓的唯一差別在半徑:圓只有一個半徑,橢圓有長半徑與短半徑兩個(圖中的 OA 與 OB)。所以只要把公式裡的單一半徑分別換成長半徑與短半徑,其他都不動:
$(this).css({"left":Math.sin((ahd*index+ainhd))*OB+dotLeft,"top":Math.cos((ahd*index+ainhd))*OA+dotTop});
二、排列時的寬高與透明度變化
觀察後可以發現一個規律:在運動過程中,距容器頂部距離相同(即橙色線段等長)的圖片,應該具有相同的寬度、高度與透明度。
那就用這個距離來決定縮放比例。比例為 1 時就是原始尺寸,比例小於 1 就縮小。而「距頂部距離」除以「距頂部的最大距離」剛好落在 0 到 1 之間,正是我們要的比例值。
先求出每張圖片距頂部的距離(橙色線段):
(Math.cos((ahd*index+ainhd))*b+dotTop)
再除以最大距離 totTop(藍色線段)得到比例:
var allpers = (Math.cos((ahd*index+ainhd))*b+dotTop)/totTop;
因為分母固定、分子隨運動變化,用這個比例去乘寬、高、透明度,就能實現「等高的圖片外觀一致」。由於比例可能出現極端接近 0 的情況,記得設一個下限:
var wpers = Math.max(0.1, allpers);
var hpers = Math.max(0.1, allpers);
$(this).css({
  "width": wpers * wid,
  "height": hpers * hei,
  "opacity": allpers
});
三、z-index 怎麼辦
視覺上離我們最近的圖片應該疊在最上層,而這個層級也隨運動變化。同樣可以借用 allpers,用 Math.ceil(allpers*10) 把它映射到 1~10 的整數(這裡剛好是 10 張圖,數量不同時公式要跟著調整)。
四、完整程式碼
$(function () {
    var dotLeft = ($(".container").width() - $(".dot").width()) / 2 - 100;   // 圓心橫座標
    var dotTop  = ($(".container").height() - $(".dot").height()) / 2 - 100;  // 圓心縱座標
    var a = 460;    // 長半徑
    var b = 120;    // 短半徑
    var avd = 360 / $(".container img").length;   // 每張圖佔的角度
    var ahd = avd * Math.PI / 180;                // 換成弧度
    var speed = 2;                                // 運動速度
    var wid = $(".container img").width();
    var hei = $(".container img").height();
    var totTop = dotTop + 100;                    // 距頂部的最大距離

    $(".dot").css({ "left": dotLeft, "top": dotTop });

    var fun_animat = function () {
        speed = speed < 360 ? speed : 2;
        speed += 2;
        var ainhd = speed * Math.PI / 180;   // 本輪的運動弧度

        $(".container img").each(function (index) {
            var allpers = (Math.cos((ahd * index + ainhd)) * b + dotTop) / totTop;
            var wpers = Math.max(0.1, allpers);
            var hpers = Math.max(0.1, allpers);
            $(this).css({
                "left": Math.sin((ahd * index + ainhd)) * a + dotLeft,
                "top": Math.cos((ahd * index + ainhd)) * b + dotTop,
                "z-index": Math.ceil(allpers * 10),
                "width": wpers * wid,
                "height": hpers * hei,
                "opacity": allpers
            });
        });
    };

    setInterval(fun_animat, 100);
})
原理釐清之後,真正的程式碼量其實很少。有興趣的話可以回頭看《基於 javascript 實現按圓形排列 DIV 元素(一)》與(二)。
- 上一篇文章: 微信公眾平台開發教程(四):打造一個會回話的機器人
- 下一篇文章: JavaScript 中動態建立 JSON 並動態增修屬性與屬性值