學習 Vue.js 時,我看到國外一篇講述如何用 Vue.js 與 Vuex 打造簡單筆記單頁應用的文章,收穫不少。我在它的基礎上做了些優化與自訂功能,在此分享心得。
這篇教程會帶我們實作一個筆記應用,藉此學會在 Vue 專案中使用 Vuex:Vuex 是什麼、什麼時候該用它,以及如何把整個應用組裝起來。
先看一下成品:
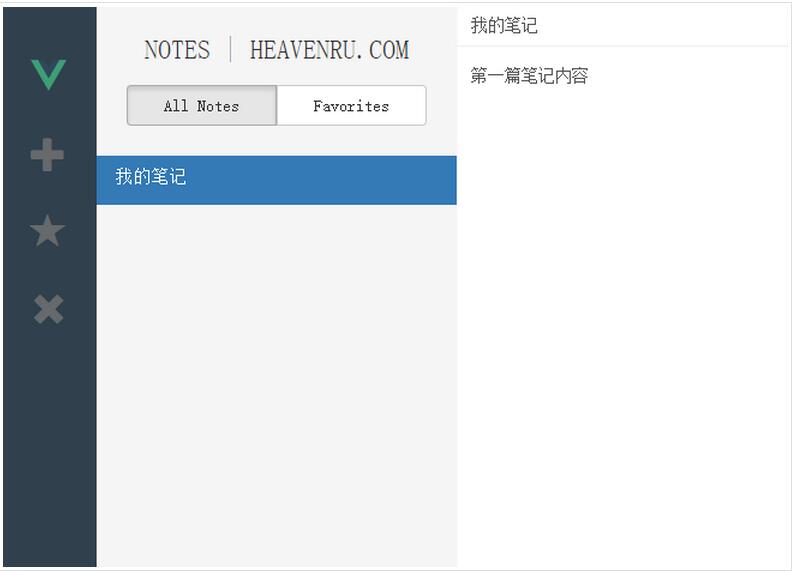
專案原始碼:vuex-notes-app,需要的朋友可以直接下載查看。
主要知識點
- Vuex 狀態管理機制的使用
- Vue.js 的基礎 API
- Vue-cli 腳手架的安裝與使用
- vue-router 的使用
- ES6 語法(推薦先看阮一峰的入門教程)
先搞懂 Vuex 是什麼
在急著動工之前,最好先花幾分鐘理解 Vuex 的核心概念。
Vuex 是一套專為 Vue.js 應用設計的集中式狀態管理架構。它借鑑了 Flux 與 Redux 的思想,但簡化了概念,並採用了一種能更好發揮 Vue 響應式機制的實作方式。
state 這個詞初次接觸時可能有點模糊,簡單說,就是把 state 看成專案中所使用資料的集合。Vuex 讓「元件本地狀態」與「應用層級狀態」有了明確區分:
元件本地狀態(component local state):只在元件內部使用的狀態,有點類似透過設定選項傳入 Vue 元件內部的資料。
應用層級狀態(application level state):同時被多個元件共享的狀態。
假設有這樣一個場景:一個父元件包含兩個子元件。父元件可以輕易用 props 向子元件傳遞資料。但問題來了——兩個子元件該怎麼互相通訊?子元件又該怎麼把資料回傳給父元件?專案小的時候這都不難,靠事件派發與監聽就能搞定。
然而隨著專案長大,三個問題會浮現:
- 要追蹤所有事件變得非常困難:哪個事件是哪個元件派發的?哪個元件該監聽哪個事件?
- 專案邏輯散落在各元件之中,容易導致混亂,不利維護。
- 父元件與子元件的耦合越來越嚴重,因為它必須明確地派發並監聽子元件的特定事件。
這正是 Vuex 要解決的問題。它的四個核心概念是:
State(狀態樹):Vuex 使用單一狀態樹,用一個物件包含全部的應用層級狀態,作為「唯一資料來源(SSOT)」存在。每個應用只有一個 store 實例。單一狀態樹讓我們能直接定位任一特定的狀態片段,除錯時也能輕易取得整個應用狀態的快照。
Getters:用來從 store 取得資料給 Vue 元件。
Mutations:唯一能驅動狀態變化的地方。
Actions:提供給元件呼叫的函式,用以派發 mutations。
如果這四個概念一時還不太消化,不用著急,後面的實戰會逐一解釋。底下這張官方圖說明了 Vuex 應用的資料流向:
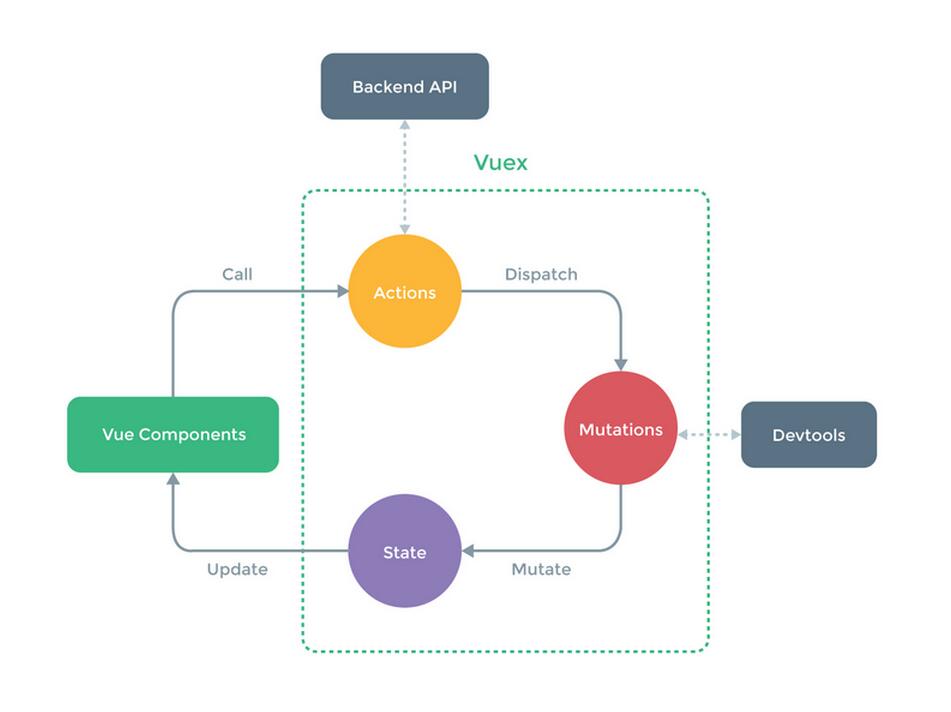
簡單解釋:Vuex 規定應用層級的狀態只能透過 mutation 修改,而 mutation 只能由 action 派發。從元件出發,元件呼叫 action;在 action 這一層我們可以跟後端互動,例如取得初始資料或做中間資料的過濾;接著 action 派發 mutation,mutation 觸發狀態改變,狀態改變再觸發視圖更新。
幾條鐵則:
- 資料流是單向的
- 元件只能呼叫 action
- action 用來派發 mutation
- 只有 mutation 能改變狀態
- store 是響應式的,state 一更新,元件同步更新
環境建置
這個應用用 webpack 做模組打包、處理與熱重啟,並使用 Vue 官方的腳手架 vue-cli。
 npm install -g vue-cli
// 建議 Node.js >= 4.x 或 5.x
 vue init webpack vue-notes-app
cd vue-notes-app
npm install // 安裝依賴包
npm run dev // 啟動服務
初始化一個名為 vue-notes-app 的應用並選擇 webpack 打包方式,依提示選擇設定;ESLint 驗證建議選 AirBNB 規範。
用你慣用的編輯器打開專案,結構大致如下:
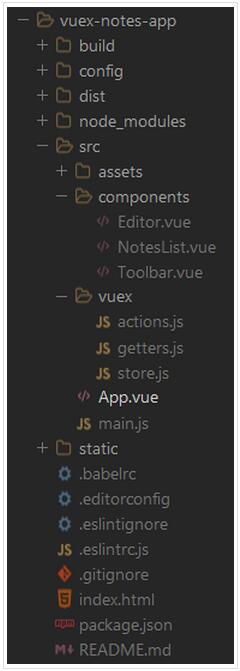
components/ 存放 Vue 元件;vuex/ 存放與 store 相關的東西(state、actions、mutations);build/ 是 webpack 的打包設定;config/ 放一些設定項例如服務埠號;dist/ 一開始不存在,build 之後才會產生;App.vue 是根元件,所有子元件都在這裡被引用;index.html 是整個專案的入口,會引用根元件;main.js 是入口的 js 邏輯,打包後會被注入 index.html。
功能模組
- 新增筆記:新增一篇筆記,編輯區顯示空的內容
- 刪除筆記:刪除後,編輯區顯示目前類別的第一項
- 列表切換:分為全部筆記與收藏筆記,切換後編輯區顯示該列表第一筆
- 收藏筆記:替目前作用中的筆記加上收藏標記
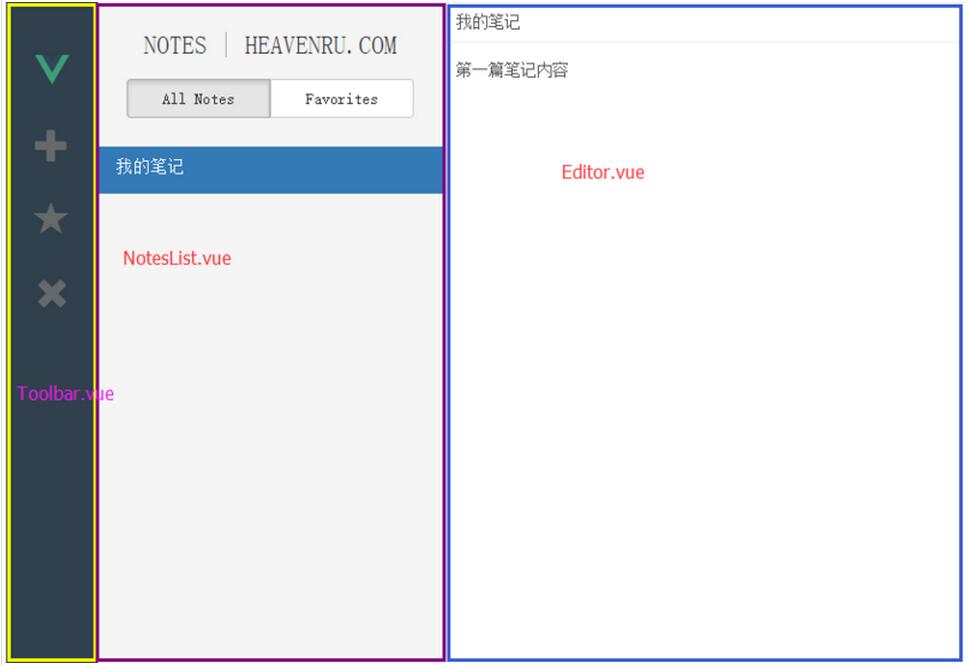
元件劃分
總共使用四個元件:根元件 App.vue、操作欄 Toolbar.vue、列表 NotesList.vue、編輯區 Editor.vue。
建立 Vuex Store
在 vuex/ 下建立 store.js:
 import Vue from 'vue';
import Vuex from 'vuex';
Vue.use(Vuex);

// 需要維護的狀態
const state = {
 notes: [],
 activeNote: {},
 show: ''
};

const mutations = {
 // 初始化 state
 INIT_STORE(state, data) {
 state.notes = data.notes,
 state.show = data.show;
 state.activeNote = data.activeNote;
 },
 // 新增筆記
 NEW_NOTE(state) {
 var newNote = { id: +new Date(), title: '', content: '', favorite: false };
 state.notes.push(newNote);
 state.activeNote = newNote;
 },
 // 修改筆記
 EDIT_NOTE(state, note) {
 state.activeNote = note;
 // 修改原始數據
 for (var i = 0; i < state.notes.length; i++) {
 if(state.notes[i].id === note.id){
 state.notes[i] = note;
 break;
 }
 };
 },
 // 刪除筆記
 DELETE_NOTE(state) {
 state.notes.$remove(state.activeNote);
 state.activeNote = state.notes[0] || {};
 },
 // 切換筆記的收藏與取消收藏
 TOGGLE_FAVORITE(state) {
 state.activeNote.favorite = !state.activeNote.favorite;
 },
 // 切換顯示數據列表類型:全部 or 收藏
 SET_SHOW_ALL(state, show){
 state.show = show;
 // 切換數據展示,需要同步更新 activeNote
 if(show === 'favorite'){
 state.activeNote = state.notes.filter(note => note.favorite)[0] || {};
 }else{
 state.activeNote = state.notes[0] || {};
 }
 },
 // 設置當前激活的筆記
 SET_ACTIVE_NOTE(state, note) {
 state.activeNote = note;
 }
};

export default new Vuex.Store({ state, mutations });
建立 Vuex Actions
在 vuex/ 下建立 action.js:
 function makeAction(type) {
 return ({ dispatch }, ...args) => dispatch(type, ...args);
};

const initNote = { id: +new Date(), title: '我的筆記', content: '第一篇筆記內容', favorite: false };

// 模擬初始化數據
const initData = { show: 'all', notes: [initNote], activeNote: initNote };

export const initStore = ({ dispatch }) => {
 dispatch('INIT_STORE', initData);
};

export const updateActiveNote = makeAction('SET_ACTIVE_NOTE');
export const newNote = makeAction('NEW_NOTE');
export const deleteNote = makeAction('DELETE_NOTE');
export const toggleFavorite = makeAction('TOGGLE_FAVORITE');
export const editNote = makeAction('EDIT_NOTE');
export const updateShow = makeAction('SET_SHOW_ALL');
建立 Vuex Getters
在 vuex/ 下建立 getter.js:
 // 獲取 noteList,這裡會根據 state.show 的狀態做數據過濾
export const filteredNotes = (state) => {
 if(state.show === 'all'){
 return state.notes || {};
 }else if(state.show === 'favorite'){
 return state.notes.filter(note => note.favorite) || {};
 }
};

// 獲取列表展示狀態:all or favorite
export const show = (state) => {
 return state.show;
};

// 獲取當前激活 note
export const activeNote = (state) => {
 return state.activeNote;
};
這就是 Vuex 的所有邏輯了。功能定下來之後,接下來只要在元件中呼叫 action 來實作對應行為。
路由設定
index.html:
 <!DOCTYPE html>
<html>
<head>
<meta charset="utf-8">
<title>vuex-notes-app</title>
<link rel="stylesheet" href="https://maxcdn.bootstrapcdn.com/bootstrap/3.3.6/css/bootstrap.min.css">
</head>
<body>
<div id="app"></div>
<!-- built files will be auto injected -->
</body>
</html>
main.js:
 import Vue from 'vue';
import App from './App';
import VueRouter from 'vue-router';
import VueResource from 'vue-resource';

Vue.use(VueResource);
Vue.use(VueRouter);

const router = new VueRouter();
router.map({
 '/index': { component: App }
});
router.redirect({ '*': '/index' });
router.start(App, '#app');
根元件 App.vue
 <template>
<div id="app" class="app">
 <toolbar></toolbar>
 <notes-list></notes-list>
 <editor></editor>
</div>
</template>

<style>
html, #app { height: 100%; }
body {
 margin: 0; padding: 0; border: 0;
 height: 100%; max-height: 100%; position: relative;
}
</style>

<script>
import Toolbar from './components/Toolbar';
import NotesList from './components/NotesList';
import Editor from './components/Editor';
import store from './vuex/store';
import { initStore } from './vuex/actions';

export default {
 components: { Toolbar, NotesList, Editor },
 store,
 vuex: {
 actions: { initStore }
 },
 ready() {
 this.initStore()
 }
}
</script>
注意設定裡的 vuex 選項,它用來把 actions 中定義的方法暴露出來。根元件只做一件事——初始化模擬資料,因此在生命週期的 ready 階段呼叫了 initStore。
Toolbar.vue
 <template>
<div id="toolbar">
 <i class="glyphicon logo"><img src="../assets/logo.png" width="30" height="30"></i>
 <i @click="newNote" class="glyphicon glyphicon-plus"></i>
 <i @click="toggleFavorite" class="glyphicon glyphicon-star" :class="{starred: activeNote.favorite}"></i>
 <i @click="deleteNote" class="glyphicon glyphicon-remove"></i>
</div>
</template>

<script>
import { newNote, deleteNote, toggleFavorite } from '../vuex/actions';
import { activeNote } from '../vuex/getters';

export default {
 vuex: {
 getters: { activeNote },
 actions: { newNote, deleteNote, toggleFavorite }
 }
}
</script>

<style lang="scss" scoped>
#toolbar{
 float: left;
 width: 80px;
 height: 100%;
 background-color: #30414D;
 color: #767676;
 padding: 35px 25px 25px 25px;
 .starred { color: #F7AE4F; }
 i{
 font-size: 30px;
 margin-bottom: 35px;
 cursor: pointer;
 opacity: 0.8;
 transition: opacity 0.5s ease;
 &:hover{ opacity: 1; }
 }
}
</style>
這裡用到 Vuex 的地方是:我們需要知道目前作用中的筆記是否已收藏,若是就要高亮星號按鈕。做法就是透過 getters 取得 activeNote,判斷它的 favorite 是否為 true。始終記住,Vuex 的資料是單向的、只能從 store 讀取,而 activeNote 一直由 store.js 維護,因此才能給其他元件共用。
NotesList.vue
 <template>
<div id="notes-list">
 <div id="list-header">
 <h2>Notes | heavenru.com</h2>
 <div class="btn-group btn-group-justified" role="group">
 <!-- all -->
 <div class="btn-group" role="group">
 <button type="button" class="btn btn-default" @click="toggleShow('all')"
 :class="{active: show === 'all'}">All Notes</button>
 </div>
 <!-- favorites -->
 <div class="btn-group" role="group">
 <button type="button" class="btn btn-default" @click="toggleShow('favorite')"
 :class="{active: show === 'favorite'}">Favorites</button>
 </div>
 </div>
 </div>

 <!-- 渲染筆記列表 -->
 <div class="container">
 <div class="list-group">
 <a v-for="note in filteredNotes" class="list-group-item" href="#"
 :class="{active: activeNote === note}" @click="updateActiveNote(note)">
 <h4 class="list-group-item-heading">
 {{note.title.trim().substring(0,30)}}
 </h4>
 </a>
 </div>
 </div>
</div>
</template>

<script>
import { updateActiveNote, updateShow } from '../vuex/actions';
import { show, filteredNotes, activeNote } from '../vuex/getters';

export default {
 vuex: {
 getters: { show, filteredNotes, activeNote },
 actions: { updateActiveNote, updateShow }
 },
 methods: {
 toggleShow(show) {
 this.updateShow(show);
 }
 }
}
</script>
列表元件主要有三件事:渲染筆記、切換渲染來源、點擊標題切換 activeNote。
我們透過 getters 的 filteredNotes 取得列表:
 export const filteredNotes = (state) => {
 if(state.show === 'all'){
 return state.notes || {};
 }else if(state.show === 'favorite'){
 return state.notes.filter(note => note.favorite) || {};
 }
};
可見列表內容取決於 state.show。而切換列表的動作正是呼叫 action 更新 state.show,於是列表動態刷新,而且對資料的操作全都透過 action 完成。
切換列表時還要同步更新 activeNote,store.js 裡是這樣做的:
 SET_SHOW_ALL(state, show){
 state.show = show;
 // 切換數據展示,需要同步更新 activeNote
 if(show === 'favorite'){
 state.activeNote = state.notes.filter(note => note.favorite)[0] || {};
 }else{
 state.activeNote = state.notes[0] || {};
 }
}
Editor.vue
 <template>
<div id="note-editor">
 <div class="form-group">
 <input type="text" name="title" class="title form-control" placeholder="請輸入標題"
 @input="updateNote" v-model="currentNote.title">
 <textarea v-model="currentNote.content" name="content" class="form-control" row="3"
 placeholder="請輸入正文" @input="updateNote"></textarea>
 </div>
</div>
</template>

<script>
import { editNote } from '../vuex/actions';
import { activeNote } from '../vuex/getters';

export default {
 vuex: {
 getters: { activeNote },
 actions: { editNote }
 },
 computed: {
 // 透過計算屬性取得一個對象,這樣就能愉快地使用 v-model 了
 currentNote: activeNote
 },
 methods: {
 // 為什麼要這麼做?因為在嚴格模式下不允許直接在模板層面修改 state 中的值
 updateNote() {
 this.editNote(this.currentNote);
 }
 }
}
</script>
編輯區需要即時更新目前作用中的筆記,以及列表中對應那一筆的內容。由於元件中不允许直接修改 store 的狀態值,這裡用一個計算屬性把 store 的狀態交給 currentNote,讓 v-model 有東西可綁;並自訂 updateNote() 方法去呼叫 action,同時把 currentNote 傳進去。
store.js 裡對應的處理是:找到相同 id 的物件重新賦值。因為資料是響應式的,這裡一改,對應的視圖也跟著刷新,於是就達到了即時編輯、即時渲染的效果。
 EDIT_NOTE(state, note) {
 state.activeNote = note;
 // 修改原始數據
 for (var i = 0; i < state.notes.length; i++) {
 if(state.notes[i].id === note.id){
 state.notes[i] = note;
 break;
 }
 };
}
結語與延伸
這個專案並沒有引入 vue-resource,只是自己模擬了部分資料,有興趣的朋友可以試著接上真實 API。由於例子相對簡單,不涉及太深的內容,更深層的探討需要花更多時間實作累積。
最後再提一句:在 action 裡其實能做更多事,例如依 id 非同步取得筆記內容,有興趣的可以自行嘗試,一點一點豐富這個例子。
原文:https://coligo.io/learn-vuex-by-building-notes-app/
另外提醒,本文使用的是 Vue 1.x 時期的 API(vuex 設定選項、ready 生命週期、$remove 等),在 Vue 2 與 Vuex 2 之後寫法已有變動,實際動手時請對照現行文件。
- 上一篇文章: 用 React-router 搭配 Webpack 快速搭建 React 專案
- 下一篇文章: 淺談用 JavaScript 做語音識別
相關文章
-
用 vue.js 實作表單密碼強度驗證 深入探索 Vuex 2.0:用 Vuejs 2.0 + Vuex 2.0 打造記事本應用 在 Bootstrap 專案中以 Vue.js 取代 jQuery HTML5 History API 深度解析:打造無刷新且可回溯的單頁應用 HTML5 學習筆記:History API 讓單頁應用支援瀏覽器上一頁 HTML5 手機單頁應用實踐:移動閱讀產品的架構與優化 實作不刷新頁面的瀏覽器「前进/后退」功能 AngularJS 按需載入 Controller:讓單頁應用首屏更快 超級簡單實現JavaScript MVC 樣式框架 配合 ngView 為 AngularJS 單頁應用添加切換動畫