在 Bootstrap 專案中加入 Google Prettify 做程式碼高亮
編輯:關於JavaScript
要在技術文章中展示程式碼,Google Prettify 是個輕量又省事的選擇:引入一個 JS、一個 CSS,在 body 上呼叫一次 prettyPrint(),再把要highlight的內容包進 <pre class="prettyprint"> 就完成了。
一、取得檔案
可以自行下載放進專案:
https://code.google.com/p/google-code-prettify/https://www.bootcdn.cn/prettify/
或直接用 CDN 引入:
//cdn.bootcss.com/prettify/r298/prettify.min.js
二、效果預覽
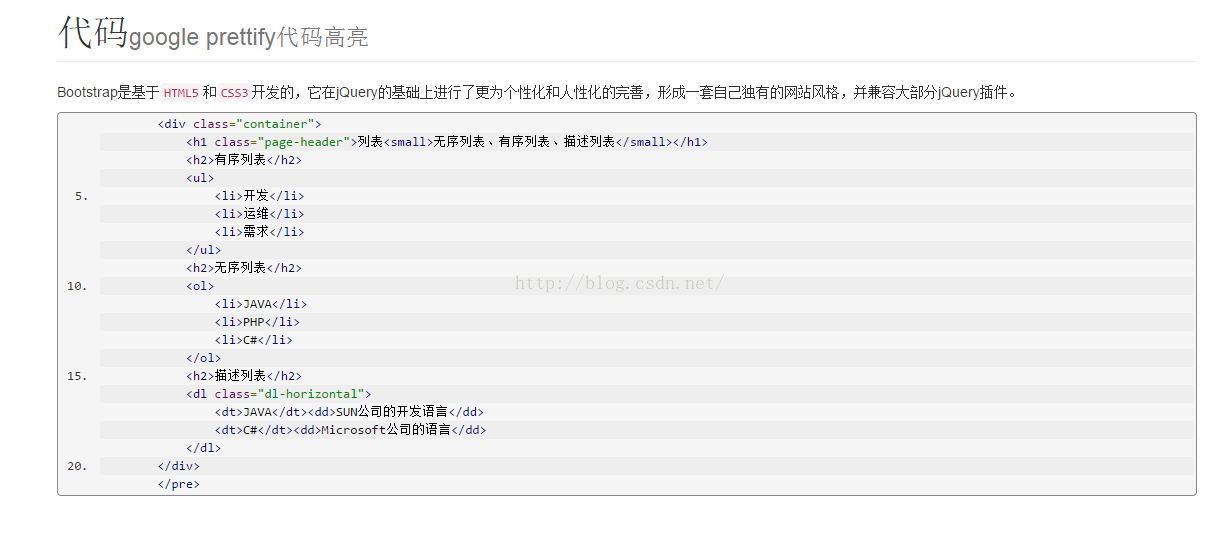
三、完整頁面
<!DOCTYPE html PUBLIC "-//W3C//DTD HTML 4.01 Transitional//EN" "https://www.w3.org/TR/html4/loose.dtd">
<html>
<% String path = request.getContextPath();
   String basePath = request.getScheme() + "://" + request.getServerName() + ":"
                   + request.getServerPort() + path + "/"; %>
<head>

  <!-- 新 Bootstrap 核心 CSS 檔案 -->
  <link rel="stylesheet" href="//cdn.bootcss.com/bootstrap/3.3.5/css/bootstrap.min.css">

  <!-- 可選的 Bootstrap 主題檔案(一般不用引入) -->
  <link rel="stylesheet" href="//cdn.bootcss.com/bootstrap/3.3.5/css/bootstrap-theme.min.css">

  <!-- Prettify 樣式 -->
  <link href="//cdn.bootcss.com/prettify/r298/prettify.min.css" rel="stylesheet">

  <!-- jQuery 檔案。務必在 bootstrap.min.js 之前引入 -->
  <script src="//cdn.bootcss.com/jquery/1.11.3/jquery.min.js"></script>

  <!-- 最新的 Bootstrap 核心 JavaScript 檔案 -->
  <script src="//cdn.bootcss.com/bootstrap/3.3.5/js/bootstrap.min.js"></script>

  <!-- Prettify 腳本 -->
  <script src="//cdn.bootcss.com/prettify/r298/prettify.min.js"></script>

  <meta http-equiv="Content-Type" content="text/html; charset=UTF-8">
  <title>質量錄入</title>
</head>

<body onload="prettyPrint()">

<form action="<%=basePath %>rest/wx" method="post">
  <div class="container">

    <h1 class="page-header">代碼<small>google prettify 代碼高亮</small></h1>

    <p>Bootstrap 是基於 <code>HTML5</code> 和 <code>CSS3</code> 開發的,
       它在 jQuery 的基礎上進行了更為個性化和人性化的完善,
       形成一套自己獨有的網站風格,並兼容大部分 jQuery 插件。</p>

    <pre class="prettyprint linenums">
<div class="container">
  <h1 class="page-header">列表<small>無序列表、有序列表、描述列表</small></h1>

  <h2>有序列表</h2>
  <ul>
    <li>開發</li>
    <li>運維</li>
    <li>需求</li>
  </ul>

  <h2>無序列表</h2>
  <ol>
    <li>JAVA</li>
    <li>PHP</li>
    <li>C#</li>
  </ol>

  <h2>描述列表</h2>
  <dl class="dl-horizontal">
    <dt>JAVA</dt><dd>SUN 公司的開發語言</dd>
    <dt>C#</dt><dd>Microsoft 公司的語言</dd>
  </dl>
</div>
    </pre>

  </div>
</form>

</body>
</html>
四、幾個關鍵設定說明
1. body onload="prettyPrint()"
這是最省事的觸發方式。若頁面內容是透過 AJAX 動態插入的,onload 就不夠用了——那時 DOM 載入時程式碼區塊還不存在。改成在插入完成後手動呼叫一次即可:
PR.prettyPrint();
2. prettyprint 與 linenums 兩個 class
prettyprint:告訴 Prettify 這個區塊需要處理。少了它完全不會有效果。linenums:加上行號。可選。
還可以用 lang-html、lang-js、lang-css 之類的 class 明確指定語言,避免自動偵測猜錯。
3. 程式碼中的 HTML 必須轉義
這一點最容易出問題。範例中 <pre> 裡的標籤都寫成 <div> 形式,因為若不轉義,瀏覽器會把它們當成真正的元素解析,程式碼就會「消失」。有幾種處理方式:
- 手動把
<換成<、>換成>。 - 後端輸出時做 HTML 轉義。
- 把程式碼放在
<script type="text/plain">或<template>中,再用 JS 取出填入。
4. 引入順序
jQuery 必須在 bootstrap.js 之前,這點原始碼註解也特別標了出來。Prettify 的 JS 則只要在使用前載入即可。
五、替代方案比較
Google Prettify 的優點是極簡、體積小、幾乎零設定。缺點是專案已多年未活躍更新,對新版語言(TypeScript、JSX 等)的支援有限。
若你的網站以技術文章為主,可以考慮:
- highlight.js:支援語言多、維護活躍、自動偵測準確。
- Prism.js:輕量、可只載入需要的語言模組,並支援外掛(行號、檔案名標題、複製按鈕)。
兩者用法都與 Prettify 類似——標記 class、呼叫一次初始化。若只是要在後台頁面點綴幾段程式碼,Prettify 仍然堪用。