用 JavaScript 實現蘋果風格懸浮虛擬按鈕
編輯:關於JavaScript
這裡分享一個用 JavaScript 實現的蘋果風格懸浮虛擬按鈕,直接引入程式碼到頁面即可運行。程式碼中有部分冗餘之處,感興趣的朋友可以自己再優化;若發現 BUG 也歡迎提出。
web-touch.js:
//動態注入樣式
var new_element_N = document.createElement("style");
new_element_N.innerHTML = '#drager { position: fixed; width: 35px; height: 35px; background-color: rgba(0,0,0,0.2); z-index: 10000; cursor: pointer; border-radius: 30%; padding: 6px; }'
  + '#drager>div { border-radius: 50%; width: 100%; height: 100%; background-color: rgba(0,0,0,0.3); transition: all 0.2s; }'
  + '#drager:hover>div { background-color: rgba(0,0,0,0.6); }';
document.body.appendChild(new_element_N);
//建立按鈕節點
new_element_N = document.createElement('div');
new_element_N.setAttribute("id", "drager");
new_element_N.style.top = "100px";
new_element_N.style.left = "100px";
new_element_N.innerHTML = '<div></div>';
document.body.appendChild(new_element_N);
var posX, posY;
var screenWidth = document.documentElement.clientWidth;
var screenHeight = document.documentElement.clientHeight;
var fdiv = document.getElementById("drager");
fdiv.onmousedown = function(e){
  screenWidth = document.documentElement.clientWidth;
  screenHeight = document.documentElement.clientHeight;
  if (!e) { e = window.event; }
  posX = e.clientX - parseInt(fdiv.style.left);
  posY = e.clientY - parseInt(fdiv.style.top);
  document.onmousemove = mousemove;
};
//釋放時自動吸附到最近的邊
document.onmouseup = function(){
  document.onmousemove = null;
  var cx = parseInt(fdiv.style.left) + parseInt(fdiv.clientWidth)/2;
  var cy = parseInt(fdiv.style.top) + parseInt(fdiv.clientHeight)/2;
  if (cy <= screenHeight/2) { fdiv.style.top = "0px"; }
  else { fdiv.style.top = (screenHeight - parseInt(fdiv.clientHeight)) + "px"; }
  if (cx <= screenWidth/2) { fdiv.style.left = "0px"; }
  else { fdiv.style.left = (screenWidth - parseInt(fdiv.clientWidth)) + "px"; }
};
function mousemove(ev){
  if (ev == null) { ev = window.event; }
  var left = ev.clientX - posX, top = ev.clientY - posY;
  fdiv.style.top = (top <= 0) ? "0px" : (top > screenHeight - parseInt(fdiv.clientHeight) ? (screenHeight - parseInt(fdiv.clientHeight)) + "px" : top + "px");
  fdiv.style.left = (left <= 0) ? "0px" : (left > screenWidth - parseInt(fdiv.clientWidth) ? (screenWidth - parseInt(fdiv.clientWidth)) + "px" : left + "px");
}
//窗口大小改變時自適應
window.onload = window.onresize = function(){
  screenWidth = document.documentElement.clientWidth;
  screenHeight = document.documentElement.clientHeight;
  if (parseInt(fdiv.style.top) + parseInt(fdiv.clientHeight) > screenHeight) { fdiv.style.top = (screenHeight - parseInt(fdiv.clientHeight)) + "px"; }
  if (parseInt(fdiv.style.left) + parseInt(fdiv.clientWidth) > screenWidth) { fdiv.style.left = (screenWidth - parseInt(fdiv.clientWidth)) + "px"; }
};
//移動端觸屏支援
fdiv.addEventListener('touchstart', fdiv.onmousedown, false);
fdiv.addEventListener('touchmove', function(event){
  if (event.targetTouches.length == 1) {
    event.preventDefault();
    var touch = event.targetTouches[0];
    fdiv.style.top = (touch.pageY <= 0) ? "0px" : touch.pageY - parseInt(fdiv.clientHeight)/2 + "px";
    fdiv.style.left = (touch.pageX <= 0) ? "0px" : touch.pageX - parseInt(fdiv.clientWidth)/2 + "px";
  }
}, false);
fdiv.addEventListener('touchend', document.onmouseup, false);
HTML:
<!doctype html>
<html>
<head><meta charset="UTF-8"><title>Document</title></head>
<body>
<script src="web-touch.js" type="text/javascript"></script>
</body>
</html>
演示圖:
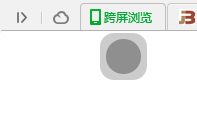
這個懸浮按鈕的核心在於:透過 mousedown/mousemove 拖動、mouseup 時吸附到最近的屏幕邊,並額外適配了移動端的 touch 事件與窗口 resize,兼具桌面與行動裝置體驗。以上就是完整實現,希望對大家有所幫助。
- 上一篇文章: JavaScript 原生 ajax 寫法分享
- 下一篇文章: 用 JavaScript 數據綁定實現一個簡單的 MVVM 庫