Summernote 是一款所見即所得的富文本編輯器,以 jQuery 與 Bootstrap 為基礎打造。它幾乎所有操作都有對應快捷鍵,提供完整 API 與大量可自訂選項(寬高、工具列項目等),官方也針對 PHP、Ruby、Django、NodeJS 等主流後端提供了整合範例。
官網對自己的形容是「Super Simple WYSIWYG editor」。就實際使用經驗來說,它比 Bootstrap 中文官網提供的 bootstrap-wysiwyg 更簡潔、外觀更漂亮,也更順手。
準備工作
先取得官方 API 文件與原始碼(GitHub 上建議下載 develop 開發版),接著看效果圖建立整體印象。
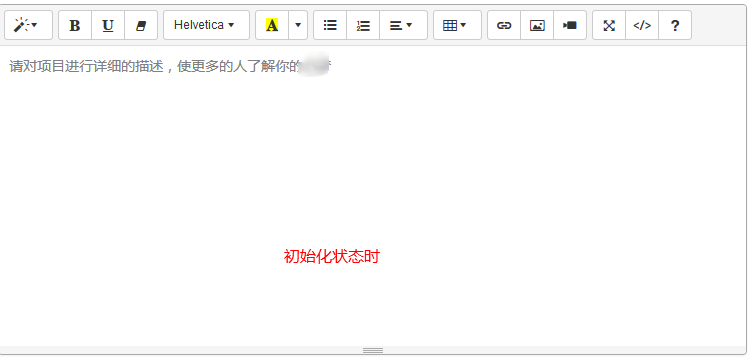
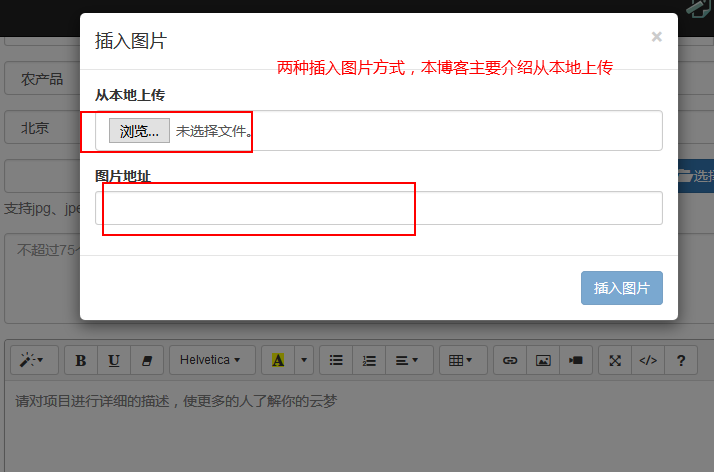

本文涵蓋的三個主題
- 頁面配置:資源引入與初始化參數
- 本地上傳圖片:前端 onImageUpload 與後端 SpringMVC 檔案保存
- 表單提交:把編輯器內容送出並存進資料庫
① 頁面配置
 <!DOCTYPE html>
<html lang="zh-CN">
<%@ include file="/components/common/taglib.jsp"%>
<head>
<meta charset="UTF-8">
<meta name="viewport" content="width=device-width, initial-scale=1.0, maximum-scale=1.0, user-scalable=no" />
<title>summernote - bs3fa4</title>
<!-- include jquery -->
<script type="text/javascript" src="${ctx}/components/jquery/jquery.js"></script>
<!-- include libs stylesheets -->
<link type="text/css" rel="stylesheet" href="${ctx}/components/bootstrap/css/bootstrap.css" />
<script type="text/javascript" src="${ctx}/components/bootstrap/js/bootstrap.min.js"></script>
<!-- include summernote -->
<link type="text/css" rel="stylesheet" href="${ctx}/components/summernote/summernote.css" />
<script type="text/javascript" src="${ctx}/components/summernote/summernote.js"></script>
<script type="text/javascript" src="${ctx}/components/summernote/lang/summernote-zh-CN.js"></script>
<script type="text/javascript">
$('div.summernote').each(function() {
  var $this = $(this);
  var placeholder = $this.attr("placeholder") || '';
  var url = $this.attr("action") || '';
  $this.summernote({
    lang : 'zh-CN',
    placeholder : placeholder,
    minHeight : 300,
    dialogsFade : true,
    dialogsInBody : true,
    disableDragAndDrop : false,
    callbacks : {
      onImageUpload : function(files) {
        var $files = $(files);
        $files.each(function() {
          var file = this;
          var data = new FormData();
          data.append("file", file);
          $.ajax({
            data : data,
            type : "POST",
            url : url,
            cache : false,
            contentType : false,
            processData : false,
            success : function(response) {
              var json = YUNM.jsonEval(response);
              YUNM.debug(json);
              YUNM.ajaxDone(json);
              if (json[YUNM.keys.statusCode] == YUNM.statusCode.ok) {
                if (json[YUNM.keys.result]) {
                  var imageUrl = json[YUNM.keys.result].completeSavePath;
                  $this.summernote('insertImage', imageUrl, function($image) { });
                }
              }
            },
            error : YUNM.ajaxError
          });
        });
      }
    }
  });
});
</script>
</head>
<body>
<div class="container">
<form class="form-horizontal required-validate" action="#" enctype="multipart/form-data" method="post" onsubmit="return iframeCallback(this, pageAjaxDone)">
  <div class="form-group">
    <label class="col-md-2 control-label">項目封面</label>
    <div class="col-md-8 tl th">
      <input type="file" name="image" class="projectfile" value="${deal.image}"/>
      <p class="help-block">支持jpg、jpeg、png、gif格式,大小不超過2.0M</p>
    </div>
  </div>
  <div class="form-group">
    <label class="col-md-2 control-label">項目詳情</label>
    <div class="col-md-8">
      <div class="summernote" name="description" placeholder="請對項目進行詳細的描述,使更多的人了解你的" action="${ctx}/file">${deal.description}</div>
    </div>
  </div>
</form>
</div>
</body>
</html>
這裡有個關鍵眉角:doctype 必須是簡短的 HTML5 寫法 <!DOCTYPE html>。若沿用 XHTML 1.0 Transitional 那一長串,summernote 的元件樣式會跑掉,按鈕大小與版面配置都不一致。另外 Bootstrap 版本建議使用 v3.3.5。
1. 承載用的 div
<div class="summernote" name="description" placeholder="請對項目進行詳細的描述,使更多的人了解你的" action="${ctx}/file">${deal.description}</div>
自訂的三個屬性各有用途:name 對應表單提交時的資料模型欄位名,作用等同 input 的 name;placeholder 提供初始提示文字(div 本身不支援 placeholder,需另行處理);action 是圖片上傳的後端接收位址。至於 ${deal.description} 只是把已存的內容回填顯示,用法與 textarea 賦值相同。
2. 初始化參數
 $('div.summernote').each(function() {
  var $this = $(this);
  var placeholder = $this.attr("placeholder") || '';
  var url = $this.attr("action") || '';
  $this.summernote({
    lang : 'zh-CN',
    placeholder : placeholder,
    minHeight : 300,
    dialogsFade : true,
    dialogsInBody : true,
    disableDragAndDrop : false
  });
});
lang:指定介面語言為簡體中文。
placeholder:初始顯示的提示內容。
minHeight:最小高度 300。這裡刻意不用 height——一旦固定高度,插入比它更高的圖片時編輯器不會自動撐開,底部工具列反而會溢出到編輯器外面。
dialogsFade:讓彈出視窗有滑入滑出的過場動畫。
dialogsInBody:預設 false,此時 dialog 會繼承外層容器(例如 form-horizontal)的樣式,畫面會很怪;設為 true 後掛在 body 之下,就不會被外層樣式污染。
disableDragAndDrop:建議設 false,拖檔上傳在部分情境下會出問題,實測後再決定。
② 本地上傳圖片
前端 onImageUpload
網路上常見的舊寫法如下(來自 Stack Overflow):
 $('.summernote').summernote({
  height:300,
  onImageUpload: function(files, editor, welEditable) {
    sendFile(files[0], editor, welEditable);
  }
});
function sendFile(file, editor, welEditable) {
  data = new FormData();
  data.append("file", file);
  url = "https://localhost/spichlerz/uploads";
  $.ajax({
    data: data, type: "POST", url: url, cache: false,
    contentType: false, processData: false,
    success: function (url) { editor.insertImage(welEditable, url); }
  });
}
但 develop 版本已不支援這種寫法。官方目前把回呼收進 callbacks 物件,或改用事件綁定:
 $('#summernote').summernote({
  callbacks: {
    onImageUpload: function(files) {
      // upload image to server and create imgNode...
      $summernote.summernote('insertNode', imgNode);
    }
  }
});
$('#summernote').on('summernote.image.upload', function(we, files) {
  // upload image to server and create imgNode...
  $summernote.summernote('insertNode', imgNode);
});
實際可用的寫法(後端為 SpringMVC):
 callbacks : {
  onImageUpload : function(files) {
    var $files = $(files);
    $files.each(function() {
      var file = this;
      var data = new FormData();
      data.append("file", file);
      $.ajax({
        data : data,
        type : "POST",
        url : url,
        cache : false,
        contentType : false,
        processData : false,
        success : function(response) {
          var json = YUNM.jsonEval(response);
          YUNM.debug(json);
          YUNM.ajaxDone(json);
          if (json[YUNM.keys.statusCode] == YUNM.statusCode.ok) {
            if (json[YUNM.keys.result]) {
              var imageUrl = json[YUNM.keys.result].completeSavePath;
              $this.summernote('insertImage', imageUrl, function($image) {
                // 可在此對 image 追加樣式
              });
            }
          }
        },
        error : YUNM.ajaxError
      });
    });
  }
}
相關的工具函式:
 debug : function(msg) {
  if (this._set.debug) {
    if (typeof (console) != "undefined") console.log(msg); else alert(msg);
  }
},
jsonEval : function(data) {
  try {
    if ($.type(data) == 'string') return eval('(' + data + ')'); else return data;
  } catch (e) { return {}; }
},
ajaxError : function(xhr, ajaxOptions, thrownError) {
  if (xhr.responseText) {
    $.showErr("<div>" + xhr.responseText + "</div>");
  } else {
    $.showErr("<div>Http status: " + xhr.status + " " + xhr.statusText + "</div>");
  }
},
ajaxDone : function(json) {
  if (json[YUNM.keys.statusCode] == YUNM.statusCode.error) {
    if (json[YUNM.keys.message]) { YUNM.debug(json[YUNM.keys.message]); $.showErr(json[YUNM.keys.message]); }
  } else if (json[YUNM.keys.statusCode] == YUNM.statusCode.timeout) {
    YUNM.debug(json[YUNM.keys.message]);
    $.showErr(json[YUNM.keys.message] || YUNM.msg("sessionTimout"), YUNM.loadLogin);
  }
},
後端 SpringMVC 檔案保存
先在 Spring 設定檔註冊 multipart 解析器與型別轉換器:
 <bean id="multipartResolver" class="org.springframework.web.multipart.commons.CommonsMultipartResolver" p:defaultEncoding="UTF-8">
  <property name="maxUploadSize" value="1024000000"></property>
</bean>
<mvc:annotation-driven conversion-service="conversionService" />
<bean id="conversionService" class="org.springframework.format.support.FormattingConversionServiceFactoryBean">
  <property name="converters">
    <list>
      <bean class="com.honzh.common.plugin.StringToDateConverter" />
      <bean class="com.honzh.common.plugin.CommonsMultipartFileToString" />
    </list>
  </property>
</bean>
控制器很單純,收到請求就交給 Service 存檔並回傳 JSON:
 @Controller
@RequestMapping(value = "/file")
public class FileController extends BaseController {
  private static Logger logger = Logger.getLogger(FileController.class);
  @Autowired private FileService fileService;

  @RequestMapping("")
  public void index(HttpServletRequest request, HttpServletResponse response) {
    logger.debug("獲取上傳文件...");
    try {
      UploadFile uploadFiles = fileService.saveFile(request);
      renderJsonDone(response, uploadFiles);
    } catch (Exception e) {
      logger.error(e.getMessage());
      renderJsonError(response, "文件上傳失敗");
    }
  }
}
Service 負責把 request 轉型、取出檔案、驗證後寫入磁碟:
 @Service
public class FileService {
  private static Logger logger = Logger.getLogger(FileService.class);

  public UploadFile saveFile(HttpServletRequest request) throws IOException {
    MultipartHttpServletRequest multipartRequest = (MultipartHttpServletRequest) request;
    Map<String, MultipartFile> fileMap = multipartRequest.getFileMap();
    Iterator<String> fileIterator = multipartRequest.getFileNames();
    String requestURL = request.getRequestURL().toString();
    String prePath = requestURL.substring(0, requestURL.indexOf(Variables.ctx));
    while (fileIterator.hasNext()) {
      String fileKey = fileIterator.next();
      MultipartFile multipartFile = fileMap.get(fileKey);
      if (multipartFile.getSize() != 0L) {
        validateImage(multipartFile);
        UploadFile file = saveImage(multipartFile);
        file.setPrePath(prePath);
        return file;
      }
    }
    return null;
  }

  private UploadFile saveImage(MultipartFile image) throws IOException {
    String contentType = image.getContentType();
    String type = contentType.substring(contentType.indexOf("/") + 1);
    String fileName = DateUtil.getCurrentMillStr() + new Random().nextInt(100) + "." + type;
    UploadFile file = new UploadFile(Variables.save_directory, fileName);
    file.setContentType(contentType);
    FileUtils.writeByteArrayToFile(file.getFile(), image.getBytes());
    return file;
  }

  private void validateImage(MultipartFile image) { }
}
封裝用的 UploadFile 主要負責拼出相對路徑與完整網址:
 public class UploadFile {
  private String saveDirectory;
  private String fileName;
  private String contentType;
  private String prePath;
  private String completeSavePath;
  private String relativeSavePath;

  public UploadFile(String saveDirectory, String filesystemName) {
    this.saveDirectory = saveDirectory;
    this.fileName = filesystemName;
  }

  public void setPrePath(String prePath) {
    this.prePath = prePath;
    setCompleteSavePath(prePath + getRelativeSavePath());
  }

  public File getFile() {
    if (getSaveDirectory() == null || getFileName() == null) return null;
    setRelativeSavePath(Variables.ctx + "/" + Variables.upload + "/" + getFileName());
    return new File(getSaveDirectory() + "/" + getFileName());
  }
}
後端邏輯並不複雜,熟悉 Java 的朋友應該都能讀懂;若你的後端不是 SpringMVC,替換成對應框架的檔案處理方式即可。

③ 表單提交
這個表單除了 summernote,還含一個一般的檔案 input(專案封面),所以必須走 multipart 流程:
<form class="form-horizontal required-validate" action="#" enctype="multipart/form-data" method="post" onsubmit="return iframeCallback(this, pageAjaxDone)">
核心在 iframeCallback:先跑驗證,再把編輯器的 HTML 內容塞進隱藏 input,最後透過隱藏 iframe 完成帶檔上傳。
 function iframeCallback(form, callback) {
  var $form = $(form), $iframe = $("#callbackframe");
  var data = $form.data('bootstrapValidator');
  if (data && !data.isValid()) return false;

  $("div.summernote", $form).each(function() {
    var $this = $(this);
    if (!$this.summernote('isEmpty')) {
      var editor = "<input type='hidden' name='" + $this.attr("name") + "' value='" + $this.summernote('code') + "' />";
      $form.append(editor);
    } else {
      $.showErr("請填寫項目詳情");
      return false;
    }
  });

  if ($iframe.size() == 0) {
    $iframe = $("<iframe id='callbackframe' name='callbackframe' src='about:blank' style='display:none'></iframe>").appendTo("body");
  }
  if (!form.ajax) $form.append('<input type="hidden" name="ajax" value="1" />');
  form.target = "callbackframe";
  _iframeResponse($iframe[0], callback || YUNM.ajaxDone);
}
重點是這幾行:用 isEmpty 判斷使用者是否有輸入,避免送出空內容;再用 $this.summernote('code') 取得 HTML 字串,包成 name 對應先前設定的欄位名交給後端。
存進資料庫的內容長得像這樣:
<p><img src="https://localhost:8080/ymeng/upload/2016033117093076.jpeg" style=""></p><p><br></p><p>你好,有興趣可以加入我們的群<br></p>

以上就是 summernote 的完整實作流程。若你有不同的做法或更好的建議,歡迎提出交流,一起進步。
- 上一篇文章: Echo.js:體積不足 1KB 且不依賴 jQuery 的圖片延遲載入庫
- 下一篇文章: 用 JS + CSS 做出彩色閃爍文字效果