JavaScript 拖拽應用實例:可拖動進度條
編輯:關於JavaScript
前面聊過拖拽的基本思想,理論有了,實踐在哪裡?這次就用拖拽做一個小實例,效果如下:
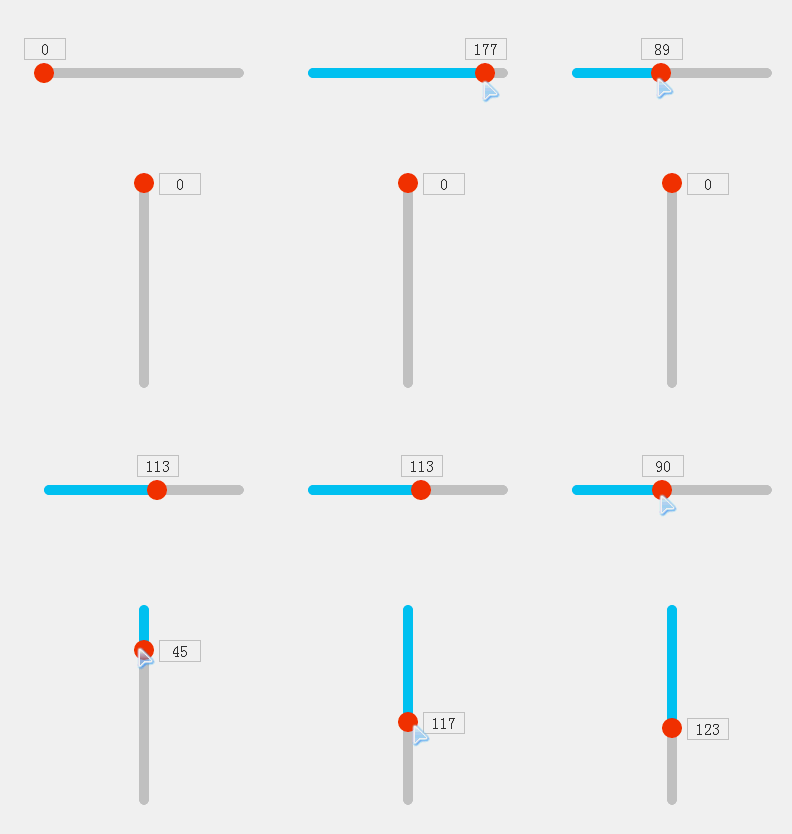
這是一個簡單的拖拽條。你可以把它理解成滾動條,也可以當作表單裡的數量選擇控件,或者改造成進度條——同一套邏輯能延伸出很多形態。
原理在〈JavaScript 小實例:PC 網頁裡的拖拽〉中已經講透,這裡直接上代碼,並同時示範橫向與縱向兩個版本。
CSS
<style>
/* 橫向 */
#drag_wrap {
  width: 220px; height: 10px;
  position: relative; margin: 100px auto;
}
.dis_bg {
  width: 200px; height: 10px;
  border-radius: 10px; background: #ccc; margin-left: 10px;
}
#drag_bg {                 /* 已拖動的填充部分 */
  width: 0; height: 10px;
  border-radius: 10px; background: #0CF;
}
#drag_box {                /* 拖拽手柄 */
  width: 20px; height: 20px;
  border-radius: 10px; background: #F30;
  position: absolute; top: -5px; left: 0; cursor: move;
}
#drag_box span {           /* 數值提示 */
  width: 40px; height: 20px; line-height: 20px; text-align: center;
  border: 1px solid #ccc; position: absolute; top: -25px; left: -10px;
  color: #333; background: #fff;
}

/* 縱向 */
#drag_wrap1 {
  width: 10px; height: 220px;
  position: relative; margin: 100px auto;
}
.dis_bg1 {
  width: 10px; height: 200px;
  border-radius: 10px; background: #ccc; position: absolute; top: 10px;
}
#drag_bg1 {
  width: 10px; height: 0;
  border-radius: 10px; background: #0CF;
}
#drag_box1 {
  width: 20px; height: 20px;
  border-radius: 10px; background: #F30;
  position: absolute; top: -5px; left: -5px; cursor: move;
}
#drag_box1 span {
  width: 40px; height: 20px; line-height: 20px; text-align: center;
  border: 1px solid #ccc; position: absolute; top: 0; left: 25px;
  color: #333; background: #fff;
}
</style>
HTML
<div id="drag_wrap">
  <div class="dis_bg"><div id="drag_bg"></div></div>
  <div id="drag_box"><span>0</span></div>
</div>

<div id="drag_wrap1">
  <div class="dis_bg1"><div id="drag_bg1"></div></div>
  <div id="drag_box1"><span>0</span></div>
</div>
JavaScript
window.onload = function () {
  drag("drag_box", "drag_wrap", "drag_bg", "left");    // 橫向
  drag("drag_box1", "drag_wrap1", "drag_bg1", "top"); // 縱向
};

function drag(obj, parentNode, bgObj, attr, endFn) {
  var obj = document.getElementById(obj);
  var parentNode = document.getElementById(parentNode);
  var bgObj = document.getElementById(bgObj);
  var oNum = obj.getElementsByTagName('span')[0];

  obj.onmousedown = function (ev) {
    var ev = ev || event;

    // 非標準:IE 全局捕獲
    if (obj.setCapture) { obj.setCapture(); }

    var disX = ev.clientX - this.offsetLeft,
        disY = ev.clientY - this.offsetTop;
    var oWidth = obj.offsetWidth,
        oHeight = obj.offsetHeight;
    var pWidth = parentNode.offsetWidth,
        pHeight = parentNode.offsetHeight;

    document.onmousemove = function (ev) {
      var ev = ev || event;

      if (attr == "left") {                       // 橫向拖拽
        var left = ev.clientX - disX;
        if (left <= 0) {
          left = 0;
        } else if (left > pWidth - oWidth) {
          left = pWidth - oWidth;
        }
        obj.style.left = bgObj.style.width = left + 'px';
        oNum.innerHTML = left;

      } else if (attr == "top") {                 // 縱向拖拽
        var top = ev.clientY - disY;
        if (top <= 0) {
          top = 0;
        } else if (top > pHeight - oHeight) {
          top = pHeight - oHeight;
        }
        obj.style.top = bgObj.style.height = top + 'px';
        oNum.innerHTML = top;
      }
    };

    document.onmouseup = function (ev) {
      var ev = ev || event;
      document.onmousemove = document.onmouseup = null;
      endFn && endFn();

      if (obj.releaseCapture) { obj.releaseCapture(); }
    };

    return false;
  };
}
參數說明
· obj:被拖拽的對象
· parentNode:限制活動範圍的容器,一般傳父級
· bgObj:拖動時背景填充的元素
· attr:left 表示橫向,top 表示縱向
· endFn:回調函數,有則執行,可選
兩個實作對比不難發現:橫向與縱向的差别僅僅是「用 clientX 還是 clientY」、「改 left 還是 top」這兩處,其餘邊界判斷與事件流程完全一致。這也提示我們,若要把這個組件抽象得更通用,可以把方向與對應的樣式屬性做成配置項傳入,讓同一份代碼同時支持兩個維度。
- 上一篇文章: JavaScript 拖拽滑塊驗證效果實作(二)
- 下一篇文章: JavaScript 學習筆記:對象的五種創建方式