依賴注入(Dependency Injection,DI)是控制反轉(Inversion of Control,IoC)最常見的實作手段,在 OOP 世界裡長盛不衰——J2EE 陣營有 Spring,JavaScript 社群裡廣為人知的 AngularJS 也在很大程度上建立在 DI 之上。
遺憾的是,JavaScript 長期缺少反射機制、不支援 Annotation 語法,一直沒有屬於自己的 Spring。隨著 ECMAScript 進入快速迭代期,各種方言與框架群雄並起,優秀的 DI 框架出現只是時間問題。
本文整理四種常見做法:
一、基於 Injector、Cache 與函式參數名的依賴注入
二、AngularJS 中基於雙 Injector 的依賴注入
三、TypeScript 中基於裝飾器與反射的依賴注入
四、inversify.js——JavaScript 技術棧中的 IoC 容器
一、用 toString 解析參數名
JavaScript 不原生支援反射,但 Function.prototype.toString 另闢蹊徑:它會以字串形式回傳包含 function 關鍵字在內的整個函式定義。從這份完整定義出發,用正則運算式就能取出參數名,某種程度上也就得知了這個函式的執行依賴。
例如 Student 類上的 write(notebook, pencil),說明它的執行依賴 notebook 與 pencil 兩個物件。於是我們先把這兩個物件放進 cache,再由 injector 注入:
var cache = {}; // 通過解析Function.prototype.toString()取得參數名 function getParamNames(func) { var paramNames = func.toString().match(/^function\s*[^\(]*\(\s*([^\)]*)\)/m)[1]; paramNames = paramNames.replace(/ /g, ''); paramNames = paramNames.split(','); return paramNames; } var injector = { // 將func作用域中的this關鍵字綁定到bind對象上,bind對象可以為空 resolve: function (func, bind) { // 取得參數名 var paramNames = getParamNames(func); var params = []; for (var i = 0; i < paramNames.length; i++) { // 通過參數名在cache中取出相應的依賴 params.push(cache[paramNames[i]]); } // 注入依賴並執行函數 func.apply(bind, params); } }; function Notebook() {} Notebook.prototype.printName = function () { console.log('this is a notebook'); }; function Pencil() {} Pencil.prototype.printName = function () { console.log('this is a pencil'); }; function Student() {} Student.prototype.write = function (notebook, pencil) { if (!notebook || !pencil) { throw new Error('Dependencies not provided!'); } console.log('writing...'); }; // 提供notebook依賴 cache['notebook'] = new Notebook(); // 提供pencil依賴 cache['pencil'] = new Pencil(); var student = new Student(); injector.resolve(student.write, student); // writing...
為了維持良好的封裝性,cache 不一定要暴露在全域,更常見的是放在閉包變數或私有屬性裡:
function Injector() { this._cache = {}; } Injector.prototype.put = function (name, obj) { this._cache[name] = obj; }; Injector.prototype.getParamNames = function (func) { var paramNames = func.toString().match(/^function\s*[^\(]*\(\s*([^\)]*)\)/m)[1]; paramNames = paramNames.replace(/ /g, ''); paramNames = paramNames.split(','); return paramNames; }; Injector.prototype.resolve = function (func, bind) { var self = this; var paramNames = self.getParamNames(func); var params = paramNames.map(function (name) { return self._cache[name]; }); func.apply(bind, params); }; var injector = new Injector(); var student = new Student(); injector.put('notebook', new Notebook()); injector.put('pencil', new Pencil()) injector.resolve(student.write, student); // writing... 比如現在要執行Student類上的另一個方法function draw(notebook, pencil, eraser),因為injector的cache中已經有了notebook和pencil對象,我們只需要將額外的eraser也存放到cache中: function Eraser() {} Eraser.prototype.printName = function () { console.log('this is an eraser'); }; // 為Student增加draw方法 Student.prototype.draw = function (notebook, pencil, eraser) { if (!notebook || !pencil || !eraser) { throw new Error('Dependencies not provided!'); } console.log('drawing...'); }; injector.put('eraser', new Eraser()); injector.resolve(student.draw, student);
就這樣,函式的執行與它依賴物件的建立邏輯被解耦了。
但這個做法有個致命弱點:随着 grunt/gulp/fis 等前端工程化工具的普及,專案上線前大多經過混淆(uglify),參數名會被改成 a、b、c,靠參數名判斷依賴就不可靠了。應變方式是明าด額外屬性來聲明依賴:
Student.prototype.write.depends = ['notebook', 'pencil']; Student.prototype.draw.depends = ['notebook', 'pencil', 'eraser']; Injector.prototype.resolve = function (func, bind) { var self = this; // 首先檢查func上是否有depends屬性,如果沒有,再用正則表達式解析 func.depends = func.depends || self.getParamNames(func); var params = func.depends.map(function (name) { return self._cache[name]; }); func.apply(bind, params); }; var student = new Student(); injector.resolve(student.write, student); // writing... injector.resolve(student.draw, student); // draw...
二、AngularJS 的雙 Injector
熟悉 AngularJS 的人馬上會聯想到:注入之前,我們在定義 module 時還能呼叫 config 方法來配置稍後會被注入的物件,典型例子就是路由裡對 $routeProvider 的配置。
也就是說,AngularJS 不像上一節那樣直接把現成物件(new Notebook())塞進 cache,中間還有一層「實例化」或「呼叫工廠方法」的過程。這就是 providerInjector、instanceInjector,以及各自的 providerCache 與 instanceCache 的由來。
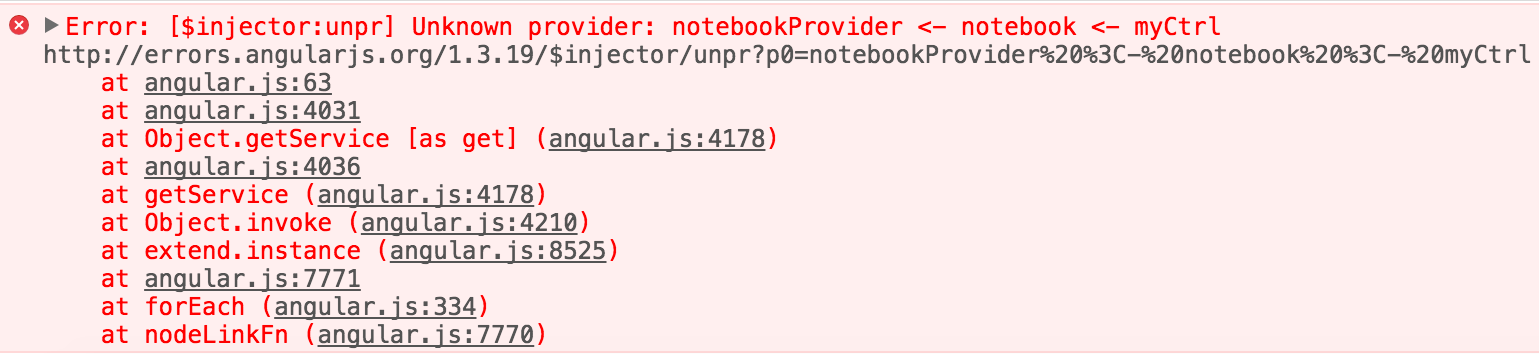
我們平時能拿到的 injector 通常是 instanceInjector,providerInjector 則以閉包變數的形式存在。當我們請求 notebook 依賴時:instanceInjector 先查 instanceCache 上有沒有 notebook,有就直接注入;沒有就把任務轉交 providerInjector;providerInjector 會把 "Provider" 拼到後面組成 "notebookProvider",再查 providerCache,查不到就丟出 Unknown Provider 異常:
若查到了,就把這個 provider 交回 instanceInjector;instanceInjector 呼叫 provider 上的 $get 工廠方法取得 notebook 物件,存入 instanceCache 以備後用,同時注入到最初宣告這個依賴的函式中:
這個設計也有缺陷:用一個 instanceInjector 單例服務全域,副作用是無法單獨追蹤與控制某一條依賴鏈;即使沒有交叉依賴,不同 module 中的同名 provider 也會互相覆蓋。
另外,習慣 Java、C# 高階 IoC 容器的人看到這裡可能會覺得別扭——在 OOP 裡,我們通常不會把依賴以參數形式傳給方法,而是作為屬性透過建構函式或 setter 傳給實例,以維持封裝。一、二兩節的做法確實物件導向特性不足,畢竟它在 JavaScript 裡已經存在多年,甚至不需要 ES5 語法。
三、TypeScript:裝飾器加反射
TypeScript 是個例外。就依賴注入這個話題而言,它至少帶來三點不同:
· 增加了編譯時型別檢查,讓 JavaScript 具備部分靜態語言特性
· 支援裝飾器(Decorator)語法,與傳統的注解頗為相似
· 支援元資訊(Metadata)反射,不再需要呼叫 Function.prototype.toString
這次我們不往函式注入,而是往類的建構函式注入。先重構程式碼:
class Pencil { public printName() { console.log('this is a pencil'); } } class Eraser { public printName() { console.log('this is an eraser'); } } class Notebook { public printName() { console.log('this is a notebook'); } } class Student { pencil: Pencil; eraser: Eraser; notebook: Notebook; public constructor(notebook: Notebook, pencil: Pencil, eraser: Eraser) { this.notebook = notebook; this.pencil = pencil; this.eraser = eraser; } public write() { if (!this.notebook || !this.pencil) { throw new Error('Dependencies not provided!'); } console.log('writing...'); } public draw() { if (!this.notebook || !this.pencil || !this.eraser) { throw new Error('Dependencies not provided!'); } console.log('drawing...'); } }
接著是 injector 與裝飾器 Inject 的實作。injector 的 resolve 收到建構函式時,透過 name 屬性取出類名(class Student 的 name 就是 "Student"),用它當 key 從 dependenciesMap 取出依賴;至於依賴關係何時被存進去,那是裝飾器 Inject 的工作。取出來的依賴已經是建構函式的引用(Notebook、Pencil 等),直接用 new 就能取得物件。最後怎麼把這些依賴當參數傳進 Student?最簡單是 ES6 的 spread 運算子;若環境不支援,可以偽造一個建構函式——注意為了讓 instanceof 不失效,這個偽造建構函式的 prototype 應指向原建構函式的 prototype。
var dependenciesMap = {}; var injector = { resolve: function (constructor) { var dependencies = dependenciesMap[constructor.name]; dependencies = dependencies.map(function (dependency) { return new dependency(); }); // 如果可以使用ES6的語法,下面的代碼可以合並為一行: // return new constructor(...dependencies); var mockConstructor: any = function () { constructor.apply(this, dependencies); }; mockConstructor.prototype = constructor.prototype; return new mockConstructor(); } }; function Inject(...dependencies) { return function (constructor) { dependenciesMap[constructor.name] = dependencies; return constructor; }; }
兩者完成後,就能裝飾 class Student 並享受 DI 的便利:
// 裝飾器的使用非常簡單,只需要在類定義的上方添加一行代碼 // Inject是裝飾器的名字,後面是function Inject的參數 @Inject(Notebook, Pencil, Eraser) class Student { pencil: Pencil; eraser: Eraser; notebook: Notebook; public constructor(notebook: Notebook, pencil: Pencil, eraser: Eraser) { this.notebook = notebook; this.pencil = pencil; this.eraser = eraser; } public write() { if (!this.notebook || !this.pencil) { throw new Error('Dependencies not provided!'); } console.log('writing...'); } public draw() { if (!this.notebook || !this.pencil || !this.eraser) { throw new Error('Dependencies not provided!'); } console.log('drawing...'); } } var student = injector.resolve(Student); console.log(student instanceof Student); // true student.notebook.printName(); // this is a notebook student.pencil.printName(); // this is a pencil student.eraser.printName(); // this is an eraser student.draw(); // drawing student.write(); // writing
還有一種更激進的做法,這裡稱之為 RadicalInject。它對原程式碼侵入性較強,不一定適合具體業務,但要理解它需要對 TypeScript 裝飾器的原理與 Array.prototype.reduce 有比較到位的掌握:
function RadicalInject(...dependencies){ var wrappedFunc:any = function (target: any) { dependencies = dependencies.map(function (dependency) { return new dependency(); }); // 使用mockConstructor的原因和上例相同 function mockConstructor() { target.apply(this, dependencies); } mockConstructor.prototype = target.prototype; // 為什麼需要使用reservedConstructor呢?因為使用RadicalInject對Student方法裝飾之後, // Student指向的構造函數已經不是一開始我們聲明的class Student了,而是這裡的返回值, // 即reservedConstructor。Student的指向變了並不是一件不能接受的事,但是如果要 // 保證student instanceof Student如我們所期望的那樣工作,這裡就應該將 // reservedConstructor的prototype屬性指向原Student的prototype function reservedConstructor() { return new mockConstructor(); } reservedConstructor.prototype = target.prototype; return reservedConstructor; } return wrappedFunc; }
使用 RadicalInject 時,原建構函式實質上已被一個新函式代理,使用起來更簡單,甚至不再需要 injector:
@RadicalInject(Notebook, Pencil, Eraser) class Student { pencil: Pencil; eraser: Eraser; notebook: Notebook; public constructor() {} public constructor(notebook: Notebook, pencil: Pencil, eraser: Eraser) { this.notebook = notebook; this.pencil = pencil; this.eraser = eraser; } public write() { if (!this.notebook || !this.pencil) { throw new Error('Dependencies not provided!'); } console.log('writing...'); } public draw() { if (!this.notebook || !this.pencil || !this.eraser) { throw new Error('Dependencies not provided!'); } console.log('drawing...'); } } // 不再出現injector,直接調用構造函數 var student = new Student(); console.log(student instanceof Student); // true student.notebook.printName(); // this is a notebook student.pencil.printName(); // this is a pencil student.eraser.printName(); // this is an eraser student.draw(); // drawing student.write(); // writing
由於 class Student 的 constructor 需要三個參數,直接無參呼叫 new Student() 會讓 TypeScript 編譯器報錯。這裡只是分享思路,暫且忽略;有興趣的人可以試著用同樣手法代理一個工廠方法而非建構函式來避開這個錯誤。
補充一段背景:AngularJS 2 團隊為了取得更好的裝飾器與反射支援,一度打算另起爐灶,用 AtScript 開發新框架,最終選擇擁抱 TypeScript,於是有了微軟與 Google 的這段合作。但要說明的是,在缺乏標準與瀏覽器廠商支援的情況下,TypeScript 在運行時仍是純粹的 JavaScript。
四、inversify.js:JavaScript 的 IoC 容器
看到各種支持高階語言特性的方言出現,就能預見 IoC 容器終會登場。基於 TypeScript 的 inversify.js 是其中的先行者,它比上一節的示範進步許多,設計初衷就是讓前端工程師能寫出符合 SOLID 原則的程式碼。表現在程式碼上,就是處處有介面,把「Depend upon Abstractions. Do not depend upon concretions.」(依賴抽象,而非依賴具體)落實到底。
繼續用上面的例子,但因為 inversify.js 是面向介面的,需要進一步重構:
interface NotebookInterface { printName(): void; } interface PencilInterface { printName(): void; } interface EraserInterface { printName(): void; } interface StudentInterface { notebook: NotebookInterface; pencil: PencilInterface; eraser: EraserInterface; write(): void; draw(): void; } class Notebook implements NotebookInterface { public printName() { console.log('this is a notebook'); } } class Pencil implements PencilInterface { public printName() { console.log('this is a pencil'); } } class Eraser implements EraserInterface { public printName() { console.log('this is an eraser'); } } class Student implements StudentInterface { notebook: NotebookInterface; pencil: PencilInterface; eraser: EraserInterface; constructor(notebook: NotebookInterface, pencil: PencilInterface, eraser: EraserInterface) { this.notebook = notebook; this.pencil = pencil; this.eraser = eraser; } write() { console.log('writing...'); } draw() { console.log('drawing...'); } }
用了框架,injector 與 Inject 裝飾器就不必自己寫,直接從 inversify 模組引用:
import { Inject } from "inversify"; @Inject("NotebookInterface", "PencilInterface", "EraserInterface") class Student implements StudentInterface { notebook: NotebookInterface; pencil: PencilInterface; eraser: EraserInterface; constructor(notebook: NotebookInterface, pencil: PencilInterface, eraser: EraserInterface) { this.notebook = notebook; this.pencil = pencil; this.eraser = eraser; } write() { console.log('writing...'); } draw() { console.log('drawing...'); } }
這樣就行了嗎?還記得上一節說 TypeScript 的各種概念只是語法糖嗎?不同於前面直接把建構函式引用傳給 Inject,由於 inversify.js 面向介面,而 NotebookInterface、PencilInterface 這類介面在運行時並不存在,因此宣告依賴時只能用字串形式而非引用形式。為此框架提供了 bind 機制,在介面的字串形式與具體建構函式之間搭橋:
import { TypeBinding, Kernel } from "inversify"; var kernel = new Kernel(); kernel.bind(new TypeBinding<NotebookInterface>("NotebookInterface", Notebook)); kernel.bind(new TypeBinding<PencilInterface>("PencilInterface", Pencil)); kernel.bind(new TypeBinding<EraserInterface>("EraserInterface", Eraser)); kernel.bind(new TypeBinding<StudentInterface>("StudentInterface", Student));
這裡還用上了泛型語法,以確保回傳型別與整條編譯時靜態型別檢查能順利通過。理解 new TypeBinding<NotebookInterface>("NotebookInterface", Notebook) 就很自然了:為依賴 "NotebookInterface" 這個字串的類提供 Notebook 的實例,回傳值向上溯型到 NotebookInterface。
完成這些步驟,使用起來還算順手:
var student: StudentInterface = kernel.resolve<StudentInterface>("StudentInterface"); console.log(student instanceof Student); // true student.notebook.printName(); // this is a notebook student.pencil.printName(); // this is a pencil student.eraser.printName(); // this is an eraser student.draw(); // drawing student.write(); // writing
四種做法各有其歷史脈絡與適用場景:參數名解析簡單但怕混淆、雙 Injector 是 AngularJS 的歷史包袱、TypeScript 裝飾器兼顧可讀性與反射能力,而 inversify.js 則把面向介面與 IoC 容器真正帶進了前端。