前陣子研究 HTML5 的各家 API,注意到新浪微博更換頭像時的裁切互動是用 canvas 做的,加上先前已試過 File API 的本機檔案讀取,於是想動手做一個自己的小 demo。以下把實作過程拆成五個步驟,並附上完整程式碼。
功能步驟
- 一、取得檔案、讀取內容並產生 URL
- 二、依容器尺寸用 canvas 繪製圖片
- 三、用 canvas 繪製遮罩層
- 四、用 canvas 繪製裁切後的圖片
- 五、拖曳裁切框即時重新裁切
第一步:讀取檔案並產生 URL
這裡使用 File API 的 FileReader。好處是圖片完全不必上傳到伺服器就能預覽,換圖時也不必反覆往返後端。
document.getElementById('post_file').onchange = function () {
    var fileList = this.files[0];
    var oFReader = new FileReader();
    oFReader.readAsDataURL(fileList);
    oFReader.onload = function (oFREvent) {
        postFile.paintImage(oFREvent.target.result); // 把預覽 URL 交給繪圖函式
    };
};
第二步:依容器尺寸繪製圖片
為什麼不直接插入 img 就好?因為 img 無法自適應居中,而 canvas 繪製不但能等比例縮放、置中,還能把繪製後的座標與尺寸傳給後續的遮罩層使用。
paintImage: function (url) {
    var t = this;
    var createCanvas = t.getImage.getContext("2d");
    var img = new Image();
    img.src = url;
    img.onload = function () {
        // 等比例縮放:若寬高都小於容器,維持原尺寸
        // 否則以較大的一邊對齊容器,另一邊按比例縮放
        if (img.width < t.regional.offsetWidth && img.height < t.regional.offsetHeight) {
            t.imgWidth = img.width;
            t.imgHeight = img.height;
        } else {
            var pWidth = img.width / (img.height / t.regional.offsetHeight);
            var pHeight = img.height / (img.width / t.regional.offsetWidth);
            t.imgWidth = img.width > img.height ? t.regional.offsetWidth : pWidth;
            t.imgHeight = img.height > img.width ? t.regional.offsetHeight : pHeight;
        }
        // 置中座標
        t.px = (t.regional.offsetWidth - t.imgWidth) / 2 + 'px';
        t.py = (t.regional.offsetHeight - t.imgHeight) / 2 + 'px';
        t.getImage.height = t.imgHeight;
        t.getImage.width = t.imgWidth;
        t.getImage.style.left = t.px;
        t.getImage.style.top = t.py;
        createCanvas.drawImage(img, 0, 0, t.imgWidth, t.imgHeight);
        t.imgUrl = t.getImage.toDataURL(); // 保存繪製後的圖片網址
        t.cutImage();
        t.drag();
    };
},
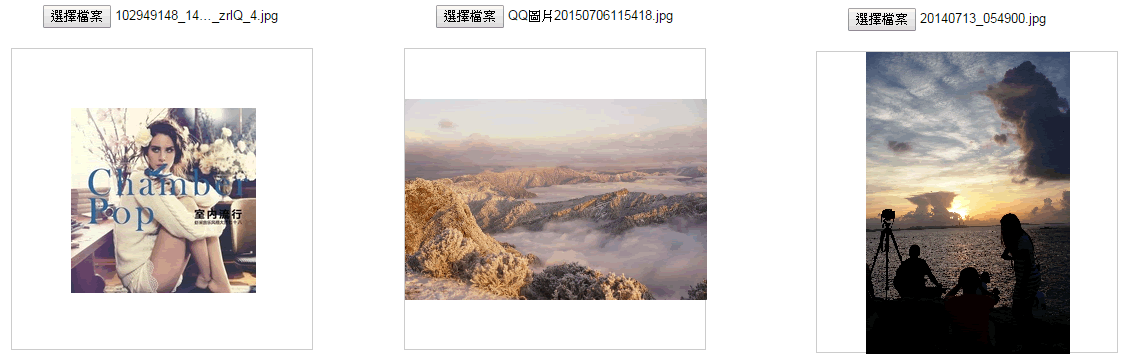
第三步:繪製遮罩層
在背景圖之上蓋一層半透明黑,再用 clearRect 清出裁切區域,形成明暗對比,讓使用者清楚看到選取範圍。
t.editBox.height = t.imgHeight;
t.editBox.width = t.imgWidth;
t.editBox.style.display = 'block';
t.editBox.style.left = t.px;
t.editBox.style.top = t.py;
var cover = t.editBox.getContext("2d");
cover.fillStyle = "rgba(0, 0, 0, 0.5)";
cover.fillRect(0, 0, t.imgWidth, t.imgHeight);
cover.clearRect(t.sx, t.sy, t.sHeight, t.sWidth);
第四步:繪製裁切後的圖片
遮罩層只負責呈現效果,不具裁切能力,因此真正的裁切要靠第三個 canvas 的 drawImage——它支援九個參數版本,可以指定「從原圖的哪個區域取、畫到目標畫布的哪個區域」。
t.editPic.height = t.sHeight;
t.editPic.width = t.sWidth;
var ctx = t.editPic.getContext('2d');
var images = new Image();
images.src = t.imgUrl;
images.onload = function () {
    ctx.drawImage(images, t.sx, t.sy, t.sHeight, t.sWidth, 0, 0, t.sHeight, t.sWidth);
    document.getElementById('show_edit').getElementsByTagName('img')[0].src = t.editPic.toDataURL();
};
第五步:拖曳裁切框
要裁出滿意的畫面,裁切框必須能跟著滑鼠移動,並限制在圖片範圍內。
drag: function () {
    var t = this;
    var draging = false;
    var startX = 0, startY = 0;
    document.getElementById('cover_box').onmousemove = function (e) {
        // 滑鼠相對於背景圖的座標
        var pageX = e.pageX - (t.regional.offsetLeft + this.offsetLeft);
        var pageY = e.pageY - (t.regional.offsetTop + this.offsetTop);

        if (pageX > t.sx && pageX < t.sx + t.sWidth &&
            pageY > t.sy && pageY < t.sy + t.sHeight) {
            this.style.cursor = 'move';
            this.onmousedown = function () {
                draging = true;
                t.ex = t.sx; t.ey = t.sy;          // 記錄拖曳前座標
                startX = e.pageX - (t.regional.offsetLeft + this.offsetLeft);
                startY = e.pageY - (t.regional.offsetTop + this.offsetTop);
            };
            window.onmouseup = function () { draging = false; };

            if (draging) {
                // 新座標 = 起始座標 + 位移量,並夾在圖片範圍內
                if (t.ex + (pageX - startX) < 0) {
                    t.sx = 0;
                } else if (t.ex + (pageX - startX) + t.sWidth > t.imgWidth) {
                    t.sx = t.imgWidth - t.sWidth;
                } else {
                    t.sx = t.ex + (pageX - startX);
                }
                if (t.ey + (pageY - startY) < 0) {
                    t.sy = 0;
                } else if (t.ey + (pageY - startY) + t.sHeight > t.imgHeight) {
                    t.sy = t.imgHeight - t.sHeight;
                } else {
                    t.sy = t.ey + (pageY - startY);
                }
                t.cutImage();
            }
        } else {
            this.style.cursor = 'auto';
        }
    };
}
效能優化:用 background-position 取代即時裁切
有讀者指出「每移動一次滑鼠就裁一張圖」很吃效能。這個建議確實有道理:拖曳過程中的預覽完全可以用 CSS 的 background-position 呈現,只在按下儲存時才真正呼叫 canvas 裁切、產生新的 URL 送往後端。以下是最終版本的關鍵程式。
CSS:
body { text-align: center; }
#label {
    border: 1px solid #ccc; background-color: #fff; text-align: center;
    height: 300px; width: 300px; margin: 20px auto; position: relative;
}
#get_image { position: absolute; }
#edit_pic { position: absolute; display: none; background: #000; }
#cover_box { position: absolute; z-index: 9999; display: none; top: 0px; left: 0px; }
#show_edit { margin: 0 auto; display: inline-block; }
#show_pic {
    height: 100px; width: 100px; border: 2px solid #000;
    overflow: hidden; margin: 0 auto; display: inline-block;
}
HTML:
<input type="file" name="file" id="post_file">
<button id="save_button">保存</button>
<div id="label">
    <canvas id="get_image"></canvas>
    <p>
        <canvas id="cover_box"></canvas>
        <canvas id="edit_pic"></canvas>
    </p>
</div>
<p>
    <span id="show_edit"></span>
    <span id="show_pic"><img src=""></span>
</p>
<script type="text/javascript" src="../../lib/seajs/sea.js"></script>
<script type="text/javascript">
seajs.use(['_example/fileAPI/index_v2.js'], function (clipFile) {
    clipFile.init({
        clipPos: { x: 15, y: 15, height: 100, width: 100 } // 裁切框預設尺寸與位置
    });
});
</script>
JavaScript:
define(function (require, exports, module) {
    'use strict';
    var postFile = {
        init: function (options) {
            var t = this;
            t.regional = document.getElementById('label');
            t.getImage = document.getElementById('get_image');
            t.clipPic = document.getElementById('edit_pic');
            t.coverBox = document.getElementById('cover_box');
            t.achieve = document.getElementById('show_edit');
            t.clipPos = options.clipPos;
            t.bgPagePos = { x: 0, y: 0, height: 0, width: 0 };

            document.getElementById('post_file').addEventListener("change", t.handleFiles, false);

            // 按下儲存才真正裁切
            document.getElementById('save_button').onclick = function () {
                t.clipPic.height = t.clipPos.height;
                t.clipPic.width = t.clipPos.width;
                var ctx = t.clipPic.getContext('2d');
                var images = new Image();
                images.src = t.imgUrl;
                images.onload = function () {
                    ctx.drawImage(images, t.clipPos.x, t.clipPos.y,
                        t.clipPos.height, t.clipPos.width, 0, 0,
                        t.clipPos.height, t.clipPos.width);
                    document.getElementById('show_pic').getElementsByTagName('img')[0].src = t.clipPic.toDataURL();
                };
            };
            t.drag();
        },
        handleFiles: function () {
            var fileList = this.files[0];
            var oFReader = new FileReader();
            oFReader.readAsDataURL(fileList);
            oFReader.onload = function (oFREvent) {
                postFile.paintImage(oFREvent.target.result);
            };
        },
        paintImage: function (url) {
            var t = this;
            var createCanvas = t.getImage.getContext("2d");
            var img = new Image();
            img.src = url;
            img.onload = function () {
                if (img.width < t.regional.offsetWidth && img.height < t.regional.offsetHeight) {
                    t.bgPagePos.width = img.width;
                    t.bgPagePos.height = img.height;
                } else {
                    var pWidth = img.width / (img.height / t.regional.offsetHeight);
                    var pHeight = img.height / (img.width / t.regional.offsetWidth);
                    t.bgPagePos.width = img.width > img.height ? t.regional.offsetWidth : pWidth;
                    t.bgPagePos.height = img.height > img.width ? t.regional.offsetHeight : pHeight;
                }
                t.bgPagePos.x = (t.regional.offsetWidth - t.bgPagePos.width) / 2 + 'px';
                t.bgPagePos.y = (t.regional.offsetHeight - t.bgPagePos.height) / 2 + 'px';
                t.getImage.height = t.bgPagePos.height;
                t.getImage.width = t.bgPagePos.width;
                t.getImage.style.left = t.bgPagePos.x;
                t.getImage.style.top = t.bgPagePos.y;
                createCanvas.drawImage(img, 0, 0, t.bgPagePos.width, t.bgPagePos.height);
                t.imgUrl = t.getImage.toDataURL();
                t.clipImg();
            };
        },
        clipImg: function () {
            var t = this;
            // 遮罩層
            t.coverBox.height = t.bgPagePos.height;
            t.coverBox.width = t.bgPagePos.width;
            t.coverBox.style.display = 'block';
            t.coverBox.style.left = t.bgPagePos.x;
            t.coverBox.style.top = t.bgPagePos.y;
            var cover = t.coverBox.getContext("2d");
            cover.fillStyle = "rgba(0, 0, 0, 0.5)";
            cover.fillRect(0, 0, t.bgPagePos.width, t.bgPagePos.height);
            cover.clearRect(t.clipPos.x, t.clipPos.y, t.clipPos.height, t.clipPos.width);

            // 預覽用 background-position,不重新裁切
            t.achieve.style.background = 'url(' + t.imgUrl + ')' +
                -t.clipPos.x + 'px ' + -t.clipPos.y + 'px no-repeat';
            t.achieve.style.height = t.clipPos.height + 'px';
            t.achieve.style.width = t.clipPos.width + 'px';
        },
        drag: function () {
            var t = this;
            var draging = false;
            var _startPos = null;
            t.coverBox.onmousemove = function (e) {
                e = e || window.event;
                // 事件座標標準化
                if (e.pageX == null && e.clientX != null) {
                    var doc = document.documentElement, body = document.body;
                    e.pageX = e.clientX + (doc && doc.scrollLeft || body && body.scrollLeft || 0)
                        - (doc && doc.clientLeft || body && body.clientLeft || 0);
                    e.pageY = e.clientY + (doc && doc.scrollTop || body && body.scrollTop);
                }
                var _mousePos = {
                    left: e.pageX - (t.regional.offsetLeft + this.offsetLeft),
                    top: e.pageY - (t.regional.offsetTop + this.offsetTop)
                };
                if (_mousePos.left > t.clipPos.x && _mousePos.left < t.clipPos.x + t.clipPos.width &&
                    _mousePos.top > t.clipPos.y && _mousePos.top < t.clipPos.y + t.clipPos.height) {
                    this.style.cursor = 'move';
                    this.onmousedown = function () {
                        draging = true;
                        t.ex = t.clipPos.x; t.ey = t.clipPos.y;
                        _startPos = {
                            left: e.pageX - (t.regional.offsetLeft + this.offsetLeft),
                            top: e.pageY - (t.regional.offsetTop + this.offsetTop)
                        };
                    };
                    if (draging) {
                        if (t.ex + (_mousePos.left - _startPos.left) < 0) {
                            t.clipPos.x = 0;
                        } else if (t.ex + (_mousePos.left - _startPos.left) + t.clipPos.width > t.bgPagePos.width) {
                            t.clipPos.x = t.bgPagePos.width - t.clipPos.width;
                        } else {
                            t.clipPos.x = t.ex + (_mousePos.left - _startPos.left);
                        }
                        if (t.ey + (_mousePos.top - _startPos.top) < 0) {
                            t.clipPos.y = 0;
                        } else if (t.ey + (_mousePos.top - _startPos.top) + t.clipPos.height > t.bgPagePos.height) {
                            t.clipPos.y = t.bgPagePos.height - t.clipPos.height;
                        } else {
                            t.clipPos.y = t.ey + (_mousePos.top - _startPos.top);
                        }
                        t.clipImg();
                    }
                    document.body.onmouseup = function () {
                        draging = false;
                        document.onmousemove = null;
                        document.onmouseup = null;
                    };
                } else {
                    this.style.cursor = 'auto';
                }
            };
        }
    };
    return postFile;
});
可以再加強的地方
這個 demo 專注在互動流程,仍有若干實務細節待補:裁切框目前固定尺寸,無法縮放;檔案格式與大小尚未驗證;document.body.onmouseup 屬於全域指派,多實例並存時會互相覆蓋,建議改用 addEventListener 並在 destroy 時移除。若要在正式專案使用,也可直接採用 CropperJS、imgareaselect 這類成熟套件,省去大量邊界處理。