用 js + canvas 畫矩形:fillRect 與 strokeRect 實戰
編輯:關於JavaScript
canvas 的入門第一課,通常就是畫一個方框。它看起來簡單,但 fillRect 與 strokeRect 在填色、線寬、重疊順序上的細節,值得一次弄清楚。
先看運行結果:
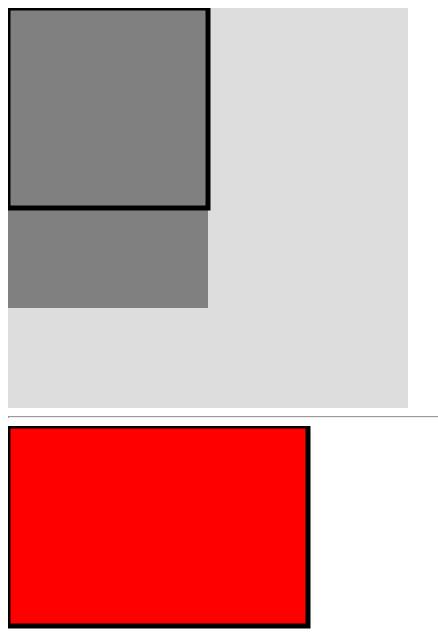
完整程式碼如下:
 <!DOCTYPE html PUBLIC "-//W3C//DTD XHTML 1.0 Transitional//EN" "https://www.w3.org/TR/xhtml1/DTD/xhtml1-transitional.dtd">
<html xmlns="https://www.w3.org/1999/xhtml">
<head>
<title>canvas繪制矩形</title>
<script type="text/javascript">
function draw(id) {
    var canvas = document.getElementById("canvas");
    if (canvas) {
        var context = canvas.getContext("2d");
        // 先鋪一層淺灰底,方便看見後續圖形
        context.fillStyle = "#DDDDDD";
        context.fillRect(0, 0, 400, 400);
        // 再畫填色矩形與描邊矩形
        context.strokeStyle = "black";
        context.fillStyle = "gray";
        context.lineWidth = 5;
        context.fillRect(0, 0, 200, 300);
        context.strokeRect(0, 0, 200, 200);
    } else {
        return;
    }
}

function drawBorder(id) {
    var canvas = document.getElementById("canvas2");
    if (canvas) {
        var context = canvas.getContext("2d");
        context.fillStyle = "red";
        context.strokeStyle = "black";
        context.lineWidth = 5;
        context.fillRect(0, 0, 300, 200);
        context.strokeRect(0, 0, 300, 200);
    } else {
        return;
    }
}

window.onload = function () {
    draw("canvas");
    drawBorder("canvas2");
}
</script>
</head>
<body>
<canvas id="canvas" width="400" style="background:red;" height="400"></canvas>
<hr />
<canvas id="canvas2" width="400" height="400"></canvas>
</body>
</html>
幾個實作時容易踩到的點:
取得 context 是前提。所有繪圖指令都得透過 canvas.getContext("2d") 取得的物件呼叫,因此先判斷 canvas 是否存在、再取 context,是比較穩健的寫法。
fillRect 與 strokeRect 是兩個獨立動作。fillRect(x, y, w, h) 只填色,strokeRect 只描邊。程式碼中我先畫了 200×300 的填色矩形,再畫 200×200 的描邊矩形,兩者重疊處會互相覆蓋——這正是 canvas 的「後畫的在上面」特性。
lineWidth 會被描邊沿用。設定一次 lineWidth = 5 之後,後續所有描邊都會使用這個線寬,直到你改回來為止。這也是為什麼第一段程式碼裡,先畫的淺灰底沒有指定線寬也不受影響——它走的是 fill 路徑。
style 屬性上的背景色不等於 canvas 內容。範例中 style="background:red;" 只是 CSS 背景,和 canvas 繪出的像素是兩層東西,正式專案裡通常不會混用,以免除錯時看錯層。
把這幾個觀念釐清之後,矩形之外的圖形——圓、多邊形、路徑——都只是同一套 API 換個組合而已。