JS 這種東西果然得常常寫,不然很容易生疏。最近雖然一直在看原型、行為委託這些觀念,但實際動手寫的量少了些。這篇就把一個拖拽元件分享出來,供大家參考。
先談原理:
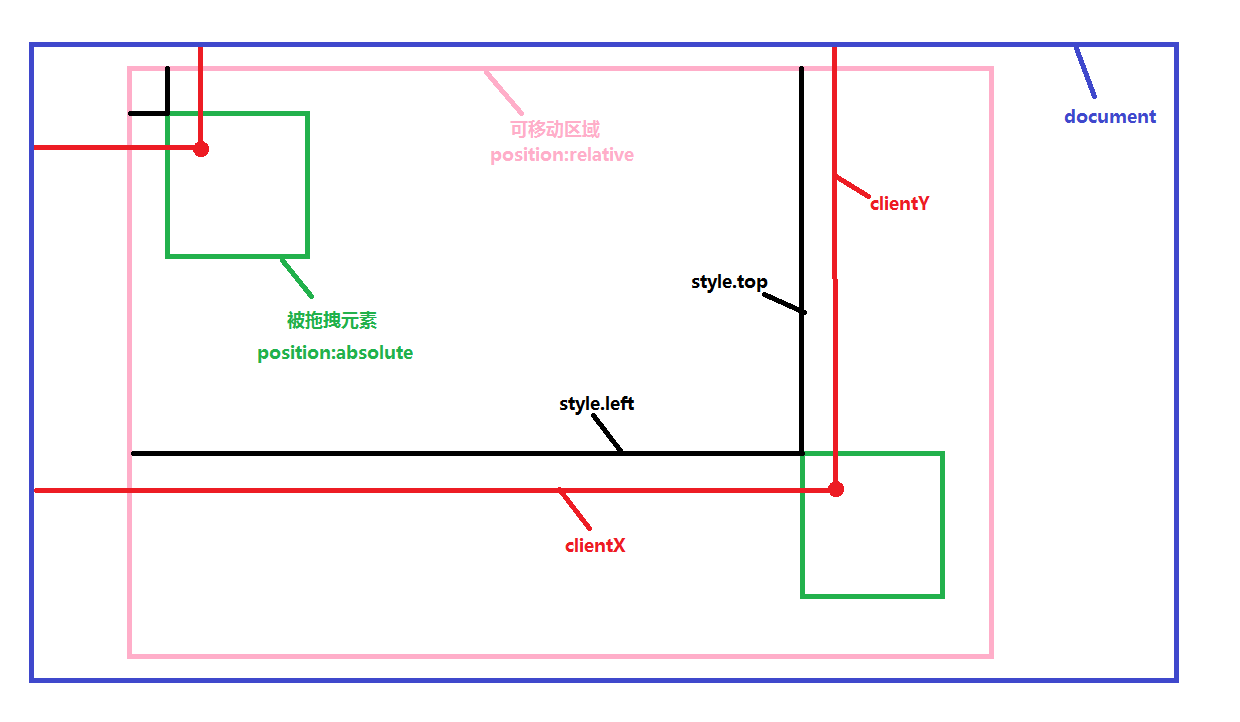
被拖曳元素的 left 變化,其實就是滑鼠水平位移量:e.clientX - 按下時的 e.clientX;top 則是垂直位移量:e.clientY - 按下時的 e.clientY。再加上一個拖曳範圍限制,上下左右都不可超出父元素區域,核心就齊了。
function Drag (config){ this.moveTarget = document.getElementById(config.id); if(config.parentId){ this.targetParent = document.getElementById(config.parentId); this.max_left = this.targetParent.clientWidth - this.moveTarget.offsetWidth; this.max_top = this.targetParent.clientHeight - this.moveTarget.offsetHeight; }else{ this.max_left = document.documentElement.clientWidth - this.moveTarget.offsetWidth - parseInt(this.getStyle(document.body, "border-width")); this.max_top = document.documentElement.clientHeight - this.moveTarget.offsetHeight- parseInt(this.getStyle(document.body, "border-width")); } this.lock = true; } Drag.prototype.getStyle = function(element, attr){ if(element.currentStyle){ return element.currentStyle[attr]; }else{ return window.getComputedStyle(element,null).getPropertyValue(attr) } } Drag.prototype.moDown = function(e){ e = e || window.event; this.clientX = e.clientX; this.clientY = e.clientY; //鼠標按下時,drag的left值,top值(寫在style中或者是css中) this.startLeft = parseInt(this.moveTarget.style.left || this.getStyle(this.moveTarget, "left")); this.startTop = parseInt(this.moveTarget.style.top || this.getStyle(this.moveTarget, "top")); //鼠標按下時,鼠標的clientX值,clientY值 this.startClientX = e.clientX; this.startClientY = e.clientY; this.lock = false; }; Drag.prototype.moMove = function(e){ e = e || window.event; if(e.which != 1){ this.lock = true; } if(!this.lock){ var realLeft = this.startLeft + e.clientX - this.startClientX;//實際的移動范圍 var realTop = this.startTop + e.clientY - this.startClientY; //left, top 取值(在可移動范圍內) var rightLeft = realLeft > this.max_left ? this.max_left : ( realLeft > 0 ? realLeft : 0 ); var rightTop = realTop > this.max_top ? this.max_top : ( realTop > 0 ? realTop : 0 ); this.moveTarget.style.left = rightLeft + "px"; this.moveTarget.style.top = rightTop + "px"; } }; Drag.prototype.moUp = function(e){ e = e || window.event; this.lock = true; }; Drag.prototype.startDrag = function(){ this.moveTarget.onmousedown = function(e){ this.moDown(e); }.bind(this); this.moveTarget.onmousemove = function(e){ this.moMove(e); }.bind(this); this.moveTarget.onmouseup = function(e){ this.moUp(e); }.bind(this); }
說明:moDown 處理滑鼠左鍵按下、moMove 處理移動、moUp 處理放開。moMove 裡刻意加了 e.which != 1 的判斷,用來解掉一個經典 bug:滑鼠拖到可拖曳範圍外再移回來時,明明沒按左鍵,元素卻還是跟著跑。加上這道判斷後,只有左鍵按住時才會移動。
使用說明:
被拖曳元素的 id 是必填參數,父元素 id(也就是可移動的範圍)是選填。不傳父元素時,預設以 documentElement 作為範圍。若傳了父元素,請別忘了把它的定位設為 position: relative 或 absolute,否則 offsetParent 會落回 body,邊界計算就會失準。
先引入元件的 JS 檔:
<!doctype html> <html lang="en"> <head> <meta charset="UTF-8"> <title>Document</title> <style> *{ margin:0px; padding:0px; } #content{ width:600px; height:500px; position:relative; border:5px solid green; } #drag{ position:absolute; height:100px; width:100px; top:50px;left:0px; background:pink; cursor:pointer; } </style> </head> <body> <div id = "content"> <div id = "drag" > </div> </div> </body> </html> <script src = "url/drag.js"></script> <script> window.onload = function(){ var drag = new Drag({id: "drag", parentId: "content"}); drag.startDrag(); } </script>
若想讓元素能在整個視窗內自由拖曳,就不要給父元素設定位,讓它相對 body 定位即可。反之,如果需要對 body 定位、又必須讓父元素的 position 不是 static,那就得對這個元件做一些擴充調整了。
實作上還有兩個可以再打磨的地方:一是 startDrag 用 bind(this) 綁上下文,若專案不支援 ES5.3 以前的環境,可改用閉包快取 _self;二是目前只支援滑鼠事件,若要支援觸控裝置,需要另外加上 touchstart、touchmove、touchend 的對應處理。希望這份元件對大家學習 JavaScript 有所幫助。
- 上一篇文章: 深入 JavaScript 自訂事件的實作
- 下一篇文章: 搞懂 JS 事件綁定的第三個參數:捕獲還是冒泡