movable-area 是微信小程序提供的移動視圖區域組件,內部可放置 movable-view。移動方向可設定為任意、垂直或水平;區域內可以包含文字、圖片、按鈕等組件,也可以綁定 touchend 等事件;movable-view 自身還支援透過參數調整動畫效果。
先認識 movable-view
movable-view 是小程序自定義組件,官方描述為「可移動的鑑視容器,在頁面中可以拖拽滑動」。官方文檔:https://mp.weixin.qq.com/debug/wxadoc/dev/component/movable-view.html
文檔中有一段關鍵備註:「當 movable-view 小於 movable-area 時,movable-view 的移動範圍是在 movable-area 內;當 movable-view 大於 movable-area 時,movable-view 的移動範圍必須包含 movable-area(x 軸方向和 y 軸方向分開考慮)」。也就是說,父容器可以比子容器小,但子容器的移動範圍必須覆蓋父容器。
官方範例
<view class="section">
  <view class="section__title">movable-view 區域小於 movable-area</view>
  <movable-area style="height: 200px;width: 200px;background: red;">
    <movable-view style="height: 50px; width: 50px; background: blue;"
      x="{{x}}" y="{{y}}" direction="all">
    </movable-view>
  </movable-area>

  <view class="btn-area">
    <button size="mini" bindtap="tap">click me to move to (30px, 30px)</button>
  </view>

  <view class="section__title">movable-view 區域大於 movable-area</view>
  <movable-area style="height: 100px;width: 100px;background: red;">
    <movable-view style="height: 200px; width: 200px; background: blue;" direction="all">
    </movable-view>
  </movable-area>
</view>
值得留意的是,官方範例中第二個 movable-area 上的 direction 屬性其實寫錯了位置,它應該掛在 movable-view 上:
<movable-area style="height: 100px;width: 100px;background: red;">
  <movable-view style="height: 200px; width: 200px; background: blue;" direction="all">
  </movable-view>
</movable-area>
兩種情況的行為差異
1)子容器小於父容器時,movable-view 只能在父容器範圍內移動。下圖效果是設定了 out-of-bounds="true" 的結果——它讓子容器到達父容器邊界時有一個「超出再回彈」的動畫,並不是真的能移到父容器以外。
2)子容器大於父容器時,子容器的移動範圍必須包含父容器。
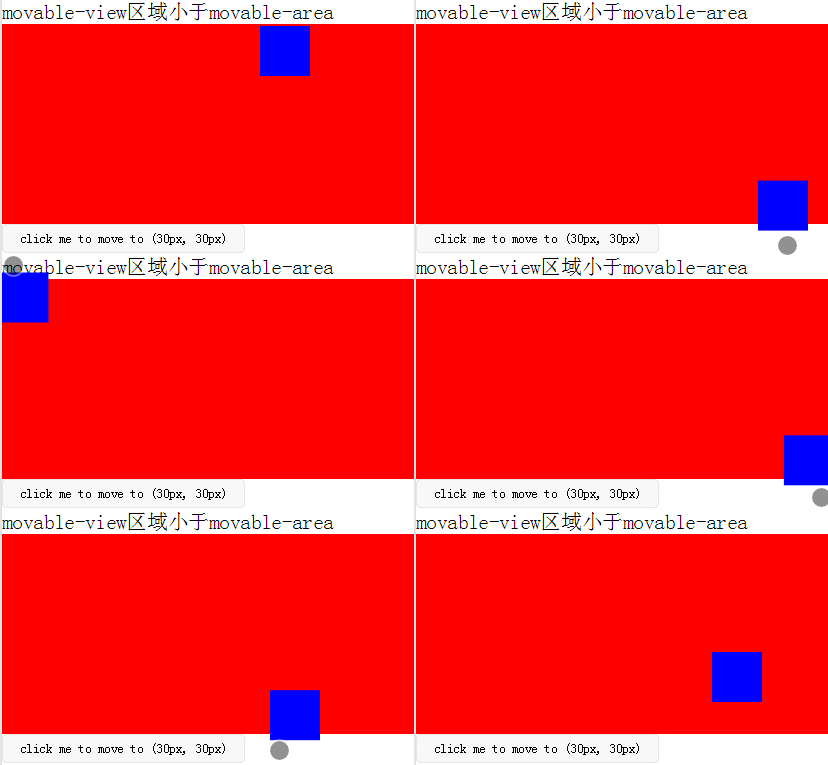
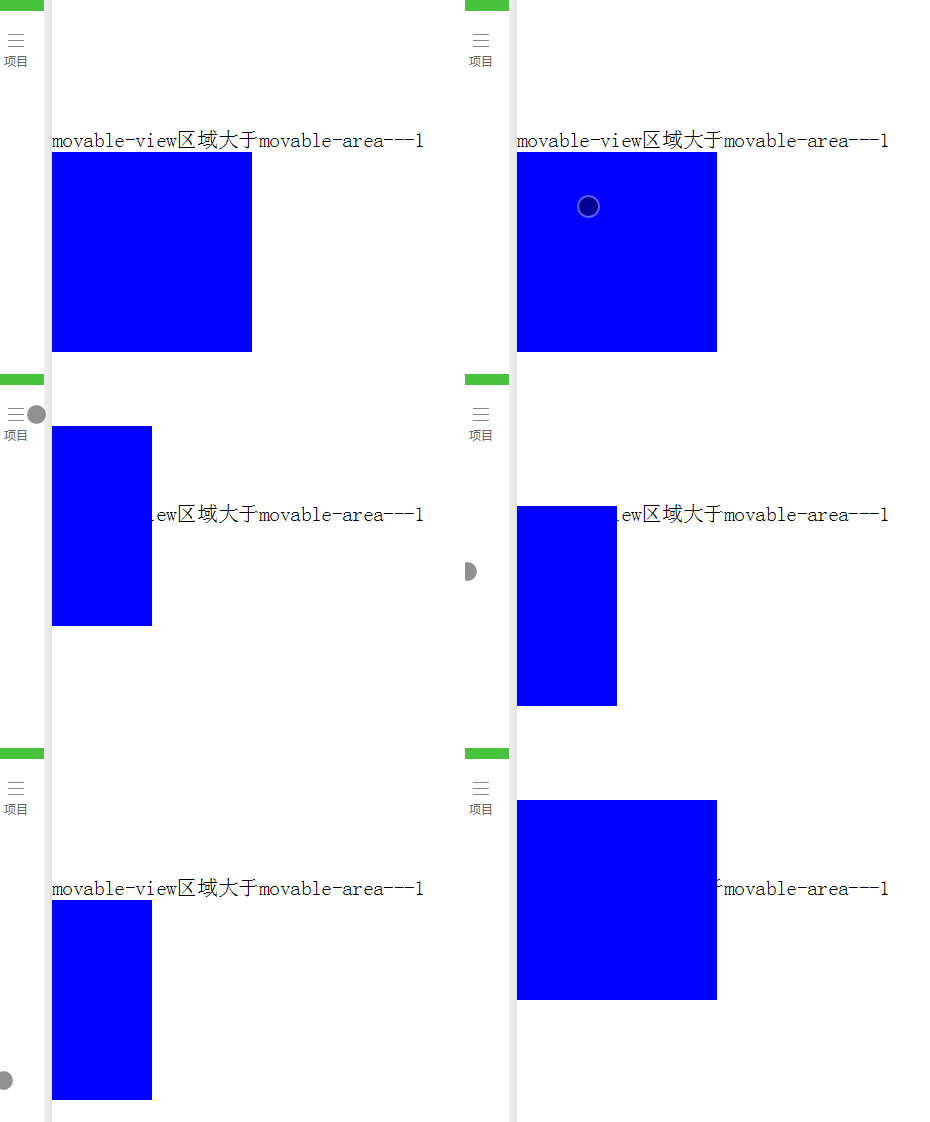
把第二種情況中的父容器當成手機螢幕的可視區域,子容器當成要檢視的長圖,就實現了「拖動看大圖」的效果。如果圖片是動態載入的,尺寸不固定,就得同時相容「圖片小於螢幕」與「圖片大於螢幕」兩種可能。
實作:點擊預覽大圖
關鍵點在於:必須在 movable 組件載入之前就設定好 movable-view 的寬高,因為組件載入完成後再改變大小,可移動區域不會跟著更新。
因此我們透過圖片的 bindload 事件取得原始寬高並存起來,使用者點擊圖片時再在 bindtap 中設定 movable-view 的尺寸,同時把彈窗標記打開。
<!-- 要查看的圖片列表 -->
<view class="flex-wrap flex-pic">
  <view class="picList">
    <image
      wx:for="{{item.imglist}}"
      wx:for-item="itemImg"
      wx:key="*this"
      id="{{'rfnd_'+index}}"
      bindload="imageOnload"
      src="{{ itemImg}}"
      bindtap="showResizeModal"
      data-src="{{itemImg}}">
    </image>
  </view>
</view>
因為要處理的是一個圖片列表,我用一個陣列存放每張圖的寬高,並透過圖片 id 建立關聯:
/**
 * 圖片載入完成,記錄原始寬高
 */
imageOnload: function (e) {
  var id = e.currentTarget.id;
  this.data.imgIdList[id] = {
    width: e.detail.width,
    height: e.detail.height
  };
}
模板頁面:
<!-- components/resizePicModal/resizePicModal.wxml -->
<template name="resizePic">
  <scroll-view class="backdrop">
    <view class="close-icon" bindtap="closeResizeModal">取消預覽</view>
    <movable-area style="width:100%;height:100%;">
      <movable-view direction="all" out-of-bounds="true" x="{{img.x}}" y="{{img.y}}">
        <image mode="widthFix" class="dtl-img" src="{{img.currentSrc}}"></image>
      </movable-view>
    </movable-area>
  </scroll-view>
</template>
點擊圖片時的處理:
/**
 * 打開彈窗
 */
showResizeModal: function (e) {
  var src = e.currentTarget.dataset.src;
  var x = 0;
  var y = 0;

  try {
    var width = this.imgIdList[e.currentTarget.id].width;   // 圖片原寬
    var height = this.imgIdList[e.currentTarget.id].height; // 圖片原高

    // 小程序預設固定寬 320px,計算 top/left 讓圖片居中
    height = height * (320 / width);
    width = 320;
    x = (app.windowWidth - width) / 2;
    y = (app.windowHeight - height) / 2;
  } catch (e) {}

  var img = {
    x: x,
    y: y,
    currentSrc: src,
  };

  this.setData({
    img: img,
    isCheckDtl: true
  });
}
部分 CSS:
.backdrop {
  background: rgba(0, 0, 0, 1);
  width: 100%;
  height: 100%;
  position: fixed;
  top: 0;
  left: 0;
}
到這裡,「點擊查看大圖並可拖動」的需求基本完成。
雙指縮放的難題
但如果還要支援雙指縮放,movable-view 就做不到。核心原因還是那句話:組件載入成功後再改變 movable-view 的大小,可移動區域不會變。縮小還好,一旦放大,可移動範圍仍停留在原始尺寸——想像一張寬度剛好等於螢幕可視寬度的圖片,放大後卻只能在 windowWidth 的範圍內移動,左右兩側超出的部分永遠看不到。
所以,若既要拖動又要縮放,就只能自己寫。過去的做法是綁 bindtouchmove,早期會觸發頁面捲軸滾動,但微信後續版本已修復這個問題,真機測試不再出現。
自定義組件:resizePicModal.wxml
<!-- 縮放 -->
<template name="resizePic">
  <scroll-view
    class="backdrop"
    catchtouchmove="bindTouchMove"
    catchtouchend="bindTouchEnd"
    bindtouchstart="bindTouchStart">

    <view class="close-icon" bindtap="closeResizeModal">取消預覽</view>

    <image
      catchtouchmove="bindTouchMove"
      bindtouchend="bindTouchEnd"
      bindtouchstart="bindTouchStart"
      style="transform: scale({{img.baseScale}});
             position: absolute;
             top: {{img.top}}px;
             left: {{img.left}}px;"
      mode="widthFix"
      class="dtl-img"
      src="{{img.currentSrc}}">
    </image>
  </scroll-view>
</template>
注意這裡用 catchtouchmove 而非 bindtouchmove,目的是阻止事件冒泡,避免同時觸發頁面滾動。
resizePicModal.js
/**
 * 使用方法:
 * 1) WXML 中要縮放的圖片必須傳入 src 並綁定 bindtap 事件,例如:
 *    <image bindtap="toggleDtl" data-src="{{item}}"
 *      wx:for="{{productCard.arrImg}}" wx:key="*this"
 *      src="{{item}}" style="width:100%" mode="widthFix"></image>
 *
 * 2) WXML 中引入 Modal 模板(isCheckDtl 無需再定義):
 *    <view wx:if="{{isCheckDtl}}">
 *      <import src="/components/resizePicModal/resizePicModal.wxml"/>
 *      <template is="resizePic" data="{{img}}"></template>
 *    </view>
 *
 * 3) 頁面 JS 引入本檔案,覆蓋當前頁面的事件:
 *    var resizePicModalService = require('../../components/resizePicModal/resizePicModal.js')
 *    var resizePicModal = {}
 *
 * 4) 在 onLoad 事件中實例化 ResizePicModal
 *    resizePicModal = new resizePicModalService.ResizePicModal()
 */
var app = getApp();

let modalEvent = {
  distanceList: [0, 0],       // 縮放時的雙指距離,第一項為舊距離,最後一項為新距離
  disPoint: { x: 0, y: 0 },   // 手指 touch 圖片時,在圖片上的位置
  imgIdList: {},

  /** 打開彈窗 */
  showResizeModal: function (e) {
    var src = e.currentTarget.dataset.src;
    var x = 0;
    var y = 0;

    try {
      var width = this.imgIdList[e.currentTarget.id].width;   // 圖片原寬
      var height = this.imgIdList[e.currentTarget.id].height; // 圖片原高

      // 固定寬 320px,換算高度並居中
      height = height * (320 / width);
      width = 320;
      x = (app.windowWidth - width) / 2;
      y = (app.windowHeight - height) / 2;
    } catch (e) {}

    var img = {
      top: y,
      left: x,
      x: x,
      y: y,
      width: '100%',
      baseScale: 1,
      currentSrc: src,
    };

    this.setData({
      img: img,
      isCheckDtl: true
    });
  },

  /** 關閉彈窗 */
  closeResizeModal: function () {
    this.setData({ isCheckDtl: false });
  },

  /** 圖片載入完成 */
  imageOnload: function (e) {
    var id = e.currentTarget.id;
    this.imgIdList[id] = {
      width: e.detail.width,
      height: e.detail.height
    };
  },

  /** bindtouchmove:拖動與縮放 */
  bindTouchMove: function (e) {
    // 單指:移動圖片
    if (e.touches.length == 1) {
      this.data.img.left = e.touches[0].clientX - this.disPoint.x;
      this.data.img.top = e.touches[0].clientY - this.disPoint.y;
      this.setData({ img: this.data.img });
    }

    // 雙指:縮放
    if (e.touches.length == 2) {
      var xMove = e.touches[1].clientX - e.touches[0].clientX;
      var yMove = e.touches[1].clientY - e.touches[0].clientY;
      var distance = Math.sqrt(xMove * xMove + yMove * yMove); // 兩指距離

      this.distanceList.shift();
      this.distanceList.push(distance);

      if (this.distanceList[0] == 0) { return; }

      // 兩次 touch 之間 distance 的變化:>0 放大,<0 縮小
      var distanceDiff = this.distanceList[1] - this.distanceList[0];

      // 以 scale 基數 1 計算:newScale = oldScale + 0.005 * distanceDiff
      var baseScale = this.data.img.baseScale + 0.005 * distanceDiff;

      if (baseScale > 0) {
        this.data.img.baseScale = baseScale;
        this.setData({ img: this.data.img });
      } else {
        this.data.img.baseScale = 0;
        this.setData({ img: this.data.img });
      }
    }
  },

  /** bindtouchend */
  bindTouchEnd: function (e) {
    if (e.touches.length == 2) {
      this.setData({ isCheckDtl: true });
    }
  },

  /** bindtouchstart */
  bindTouchStart: function (e) {
    this.distanceList = [0, 0];  // 回復初始值
    this.disPoint = { x: 0, y: 0 };

    if (e.touches.length == 1) {
      this.disPoint.x = e.touches[0].clientX - this.data.img.left;
      this.disPoint.y = e.touches[0].clientY - this.data.img.top;
    }
  }
}

function ResizePicModal() {
  let pages = getCurrentPages();
  let curPage = pages[pages.length - 1];
  Object.assign(curPage, modalEvent); // 覆蓋原生頁面事件
  this.page = curPage;
  curPage.resizePicModal = this;
  return this;
}

module.exports = {
  ResizePicModal
}
業務頁面 WXML——引入自定義組件模板:
<view class="flex-wrap flex-pic">
  <view class="picList">
    <image
      wx:for="{{item.imglist}}"
      wx:for-item="itemImg"
      wx:key="*this"
      id="{{'rfnd_'+index}}"
      bindload="imageOnload"
      src="{{ itemImg}}"
      bindtap="showResizeModal"
      data-src="{{itemImg}}">
    </image>
  </view>
</view>

<!-- 縮放 -->
<view wx:if="{{isCheckDtl}}">
  <import src="/components/resizePicModal/resizePicModal.wxml"/>
  <template is="resizePic" data="{{img}}"></template>
</view>
業務頁面 JS——引入並實例化:
var that;
var resizePicModal = {};
var app = getApp();
var resizePicModalService = require('../../components/resizePicModal/resizePicModal.js');

/**
 * 生命週期函數——監聽頁面載入
 */
onLoad: function (options) {
  that = this;
  resizePicModal = new resizePicModalService.ResizePicModal();
}
總結
如果你的需求只是「拖動看大圖」,直接用 movable-area + movable-view 最省事;一旦需要雙指縮放,就得自行處理 touch 事件、以 transform: scale() 做縮放,並自行計算拖拽邊界。這裡最容易忽略的細節是:movable-view 的尺寸必須在組件渲染前確定,否則可移動區域不會更新。
- 上一篇文章: React Native 的 ART 繪圖能力詳解
- 下一篇文章: 原生 JS + Canvas 動手做一個五子棋遊戲