動手封裝 jQuery 自訂元件:Excel 匯入元件實作教學
編輯:JQuery入門技巧
同一個後台系統裡,Excel 匯入功能往往要在十幾個頁面重複實作。每一次重複,就多一次出錯的機會。與其到處複製貼上,不如把它包成一個可設定的 jQuery 元件。本文以匯入元件為例,走一遍完整的封裝流程。
一、元件主體 JavaScript
封裝的骨架由三個部分組成:外掛入口、預設設定、以及對外開放的方法。
 (function($){
    // 擴充 String,用於去除兩端空白
    String.prototype.trim = function(){
        return this.replace(/(^\s*)|(\s*$)/g, "");
    };

    // 元件入口
    $.fn.customImport = function(methodOroptions, value){
        if (typeof methodOroptions == "string") {
            // 傳入字串時,視為呼叫方法
            return $.fn.customImport.methods[methodOroptions](this, value);
        }
        var optionsObj = methodOroptions || {};
        // 傳入物件時,視為初始化設定
        return this.each(function() {
            $.data(this, "customImport", {
                options: $.extend({}, $.fn.customImport.defaults, optionsObj)
            });
            initCustomImport(this);
        });
    };

    // 預設設定
    $.fn.customImport.defaults = {
        width: 400,
        height: 90,
        enctype: 'multipart/form-data',
        action: '',
        method: 'post',
        fileType: '.XLS,.xlsx',
        xmlName: '',
        xmlValue: '',
        filePath: '',
        uploadTemplateUrl: '',
        onSubmit: function(param){}
    };

    // 對外方法
    $.fn.customImport.methods = {
        submit: function(obj, options){
            if ($(obj).customImport("validate")) {
                var formOptions = {};
                if (options.action)    formOptions.url = options.action;
                if (options.onSubmit)  formOptions.onSubmit = options.onSubmit;
                if (options.success)   formOptions.success = options.success;
                $CommonUI.getForm("#importForm").form("submit", formOptions);
            }
        },
        clear: function(obj){
            var fileInput = $(obj).find(".real-file");
            // 克隆一個空值的新檔案框取代舊的(IE 無法直接清空 file 元件)
            fileInput.after(fileInput.clone().val(""));
            fileInput.remove();
            $(obj).find(".real-file").on("change", function(){ changeFile(obj); });
            $(obj).find(".file-pathname").val("");
            $(obj).find(".validatebox-invalid").removeClass("validatebox-invalid");
        },
        validate: function(obj){
            return $(obj).find(".file-pathname").validatebox("isValid");
        }
    };

    function initCustomImport(obj){
        var options = $.data(obj, "customImport").options;
        $(obj).width(options.width).height(options.height)
             .attr("enctype", options.enctype)
             .attr("action", options.action)
             .attr("method", options.method);

        if (!flag) {
            $(obj).append('<div class="choose-file"><div class="choose-title">瀏覽目錄</div></div>');
            $(obj).find(".choose-file").append('<input class="real-file" type="file" />');
            $(obj).find(".choose-file").append('<div class="file-path"><input class="file-pathname validatebox" type="text" readonly="readonly" data-options="required:true,missingMessage:\'請選擇匯入檔案\'" /></div>');
            $(obj).append('<div class="import-template"><a class="upload-template" href="javascript:void(0);">匯入範本下載</a></div>');
            $(obj).append('<div class="import-xml"><input class="xml-config" type="hidden" /></div>');
            $(obj).find(".real-file").on("change", function(){ changeFile(obj); });
        }

        $(obj).find(".real-file").attr("name", options.filePath).attr("accept", options.fileType).width(options.width * 0.3 - 6);
        $(obj).find(".import-xml .xml-config").attr("name", options.xmlName).val(options.xmlValue);
        $(obj).find(".upload-template").attr("href", options.uploadTemplateUrl);
    }

    // 選擇檔案後,把檔名顯示到唯讀欄位
    function changeFile(obj){
        var filePath = $(obj).find(".real-file").val();
        if (filePath && filePath.trim() != "") {
            var pos = filePath.lastIndexOf('\\');
            $(obj).find(".file-pathname").val(filePath.substring(pos + 1))
                   .removeClass("validatebox-invalid");
        }
    }

    var flag = false;
    if ($(".custom-import").length > 0) {
        $(".custom-import").customImport();
        flag = true;
    }

    // 註冊自訂驗證規則:只允許 xls / xlsx
    $(function(){
        $.extend($.fn.validatebox.defaults.rules, {
            importFormatValidate: {
                validator: function(value, param){
                    var i = value.lastIndexOf(".");
                    var ext = value.substring(i);
                    return ext == ".xls" || ext == ".xlsx";
                },
                message: '請選擇 .xls 或者 .xlsx 檔案!'
            }
        });
    });
})(jQuery);
二、元件樣式 CSS
 .choose-file{ padding:10px; }
.choose-title{ width:30%; height:30px; line-height:30px; font-size:20px; text-align:center;
    background:#337AB7; color:#fff; border-radius:6px 0 0 6px; cursor:pointer; float:left; }
.choose-title:hover{ background:#36577D; }
.real-file{ height:30px; width:27%; position:absolute; left:25px; opacity:0; filter:alpha(opacity=0); }
.file-path{ width:70%; height:30px; float:left; }
.file-pathname{ width:100%; height:26px; border-radius:0 6px 6px 0; border:1px solid #337AB7; }
.import-template{ float:right; margin:10px; background:#cbcbcc; border-radius:6px; }
.import-template:hover{ background:#BEB89D; }
.upload-template{ text-decoration:none; color:#fff; padding:7px; display:inline-block; }
.import-xml{ display:none; clear:both; }
三、頁面引用方式
HTML 部分只需要一個空的 form,其餘內容都由元件動態產生:
 <div id="importExcelWin" class="dialog">
  <form id="importForm" class="custom-import dhccform"></form>
</div>
<link rel="stylesheet" type="text/css" href="<%=request.getContextPath()%>/js/customComponent/customImport.css" />
<script type="text/javascript" src="<%=request.getContextPath()%>/js/customComponent/customImport.js"></script>
JavaScript 部分把差異化的設定傳進去即可:
 $CommonUI.getDialog("#importExcelWin").dialog({
    title: '匯入字典', width: 430, height: 185, closed: true, modal: true,
    buttons: [
        { text: '儲存', handler: function(){ importData(); } },
        { text: '取消', handler: function(){ $CommonUI.getDialog("#importExcelWin").dialog("close"); } }
    ]
});

$("#importForm").customImport({
    action: $WEB_ROOT_PATH + "/excel/excelCtrl.htm?BLHMI=importExcel",
    xmlName: 'dto.exportFileName',
    xmlValue: 'systemDictionaryImport',
    filePath: 'dto.uploadFile',
    uploadTemplateUrl: $WEB_ROOT_PATH + '/exportexcel/exportExcelCtrl!uploadExcelTemplate.htm?filename=systemDictionary'
});
四、實際效果
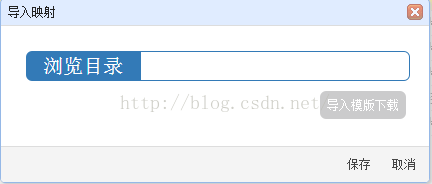
幾個實作上的關鍵細節
1. 依賴關係。元件內部用到了 easyui 的 validatebox,頁面必須一併引入該元件,否則驗證環節會出錯。
2. 定位要正確。這個元件是配合特定後端介面客製的,真正值得學習的是「如何定義元件的方法與設定」,而不是元件本身的內容。你把 action、xmlName 這些設定換成自己專案的欄位名稱,就能直接複用整套骨架。
3. 兩處為 IE 所做的妥協。一是把真正的 file 輸入框以透明方式覆蓋在「瀏覽目錄」按鈕上,因為 IE 的安全機制只接受使用者直接點擊的檔案框;二是 IE 不允許程式清空 file 元件的值,因此改用「克隆一個空值的新節點、再移除舊節點」的方式來達到清空效果。這兩個技巧在需要支援舊版 IE 的專案裡很實用。
把重複的 UI 收斂成元件,除了少寫很多 HTML,更重要的是把規則集中在一處:以後要調整檔案格式限制或新增額外參數,只改一個檔案就好。
相關文章
-
Bootstrap Fileinput 搭配 Bootstrap Table 實作 Excel 匯入全流程 把 jQuery 的類與外掛封裝成 SeaJS 模組的方法 用 jQuery 打造可重用分頁控件的完整實作 jQuery 圖片上一張/下一張連結效果(續篇) jQuery 外掛的正確寫法:用物件封裝而非散落全域 封裝可翻頁的捲動列表外掛 將取得網址 Get 參數的功能封裝成 jQuery 外掛 用 jQuery 實作 tab 選項卡切換,並封裝成可重複使用外掛 Metronic 開發框架經驗【七】資料匯入、匯出與附件預覽處理 封裝 dialog 外掛:Bootstrap 模態視窗的簡易擴充