「把商品拖進右邊的購物籃」這種互動,用 jQuery UI 的 draggable 與 droppable 兩個元件就能完成,而且程式碼量出乎意料地少。以下是一個可運作的完整範例。
效果預覽
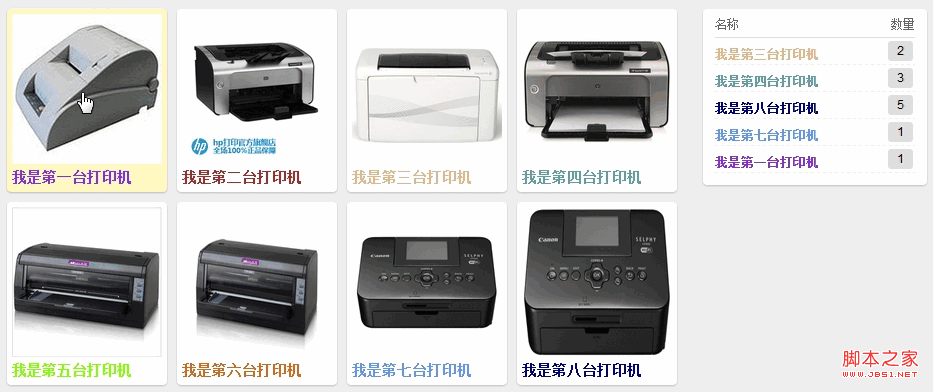
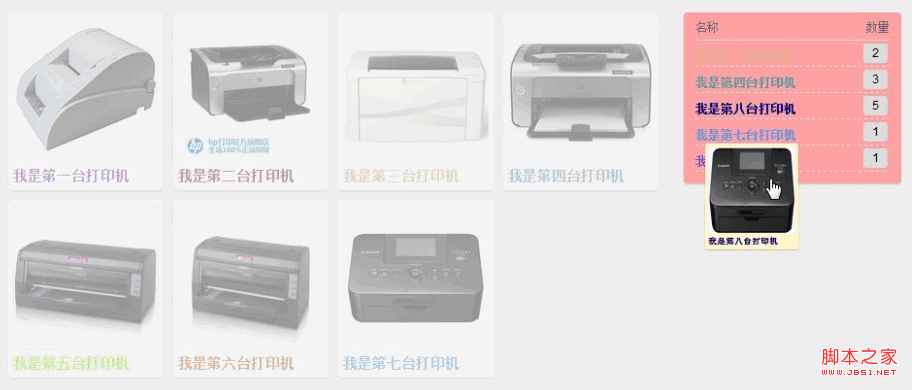
主頁面 index.html
<!doctype html>
<html lang="zh-Hant">
<head>
<meta charset="utf-8"/>
<title>Drag and drop</title>
<link rel="stylesheet" href="main.css">
<script src="jquery.min.js"></script>
<script src="jquery-ui.min.js"></script>
</head>
<body>
<div class="container">

  <section id="product">
    <ul class="clear">
      <li data-id="1">
        <a href="#">
          <img src="img/p1.jpg" alt="打印機 1" />
          <h3>我是第一台打印機</h3>
        </a>
      </li>
      <li data-id="2">
        <a href="#">
          <img src="img/p2.jpg" alt="打印機 2" />
          <h3>我是第二台打印機</h3>
        </a>
      </li>
      <!-- 其餘商品結構相同,此處省略 -->
    </ul>
  </section>

  <aside id="sidebar">
    <div class="basket">
      <div class="basket_list">
        <div class="head">
          <span class="name">名稱</span>
          <span class="count">數量</span>
        </div>
        <ul></ul>
      </div>
    </div>
  </aside>

</div>

<script>
$(function () {

    // 讓商品可以被拖動
    $("#product li").draggable({
        revert: true,   // 拖放結束後自動回到原位
        drag: function () {
            // 拖曳開始:降低其他商品的透明度
            $(this).addClass("active");
            $(this).closest("#product").addClass("active");
        },
        stop: function () {
            // 拖曳結束:還原
            $(this).removeClass("active")
                   .closest("#product").removeClass("active");
        }
    });

    // 讓購物籃成為可放置區域
    $(".basket").droppable({
        activeClass: "active",   // 有可放置物體時
        hoverClass:  "hover",    // 游標懸停在上方時
        tolerance:   "touch",
        drop: function (event, ui) {
            var basket = $(this);
            var move   = ui.draggable;
            var itemId = basket.find("ul li[data-id='" + move.attr("data-id") + "']");

            if (itemId.length) {
                // 已在購物籃中,數量 +1
                itemId.find("input").val(parseInt(itemId.find("input").val(), 10) + 1);
            } else {
                addBasket(basket, move);
                move.find("input").val(parseInt(move.find("input").val(), 10) + 1);
            }
        }
    });

    // 把商品加入購物籃
    function addBasket(basket, move) {
        basket.find("ul").append(
            '<li data-id="' + move.attr("data-id") + '">' +
            '<span class="name">' + move.find("h3").html() + '</span>' +
            '<input class="count" value="1" type="text">' +
            '<button class="delete">✕</button>' +
            '</li>'
        );
    }

    // 事件委派:刪除按鈕(購物籃內容是動態產生的,必須用委派)
    $(".basket").on("click", "li button.delete", function () {
        $(this).closest("li").remove();
    });
});
</script>
</body>
</html>
CSS
/* reset & .clear */
* { margin: 0; padding: 0; }
.clear:before, .clear:after { content: " "; display: table; }
.clear:after { clear: both; }
.clear { *zoom: 1 }

body { font: normal 12px/1.3 arial, sans-serif; background-color: #eee; }
li { list-style: none; }
a  { text-decoration: none; }

.container { position: relative; width: 920px; margin: 30px auto; }
.container #product { position: relative; z-index: 2; float: left; width: 670px; }
.container #sidebar { position: relative; z-index: 1; float: right; width: 224px; }

/* PRODUCTS */
#product ul { width: 680px; margin-left: -10px; }
#product ul li {
    position: relative;
    float: left;
    width: 150px;
    margin: 0 0 10px 10px;
    padding: 5px;
    background-color: #fff;
    border-radius: 4px;
    box-shadow: 0 1px 2px rgba(0, 0, 0, .2);
    transition: transform .1s ease;
}
#product ul li:hover { background-color: #fff8c1; }

/* 拖曳中:其他商品變淡,被拖的那個放大 */
#product.active ul li { opacity: .4; }
#product.active ul li.active {
    z-index: 2;
    opacity: 1;
    transform: scale(.6);
}
#product ul li a { display: block; color: #000; }
#product ul li a h3 { margin-top: 5px; }
#product ul li a h3, #product ul li a p {
    white-space: nowrap;
    overflow: hidden;
    text-overflow: ellipsis;
}
#product ul li a img { width: 150px; height: 150px; display: block; }

/* BASKET */
.basket { position: relative; }
.basket .basket_list {
    width: 220px;
    background-color: #fff;
    border: 2px dashed transparent;
    border-radius: 4px;
    box-shadow: 0 1px 2px rgba(0, 0, 0, .2);
    transition: border-color .2s, background-color .2s;
}
.basket.active .basket_list { background-color: #fff8c1; border-color: #ffa0a3; }
.basket.hover  .basket_list { background-color: #ffa0a3; }

.basket .head {
    overflow: hidden;
    margin: 0 10px;
    height: 26px;
    line-height: 26px;
    color: #666;
    border-bottom: 1px solid #ddd;
}
.basket .head .name  { float: left; }
.basket .head .count { float: right; }

.basket ul { padding-bottom: 10px; }
.basket ul li {
    position: relative;
    clear: both;
    overflow: hidden;
    margin: 0 10px;
    height: 26px;
    line-height: 32px;
    border-bottom: 1px dashed #eee;
}
.basket ul li:hover { border-bottom-color: #ccc; }
.basket ul li span.name {
    display: block;
    float: left;
    width: 165px;
    font-weight: bold;
    white-space: nowrap;
    overflow: hidden;
    text-overflow: ellipsis;
    transition: width .2s ease;
}
.basket ul li:hover span.name { width: 146px; }

.basket ul li input.count {
    float: right;
    margin: 3px 2px 0 0;
    width: 25px;
    line-height: 20px;
    text-align: center;
    border: 0;
    border-radius: 3px;
    background-color: #ddd;
}

.basket ul li button.delete {
    position: absolute;
    right: 30px;
    top: 3px;
    opacity: 0;
    width: 20px;
    line-height: 20px;
    height: 20px;
    text-align: center;
    font-size: 11px;
    border: 0;
    color: #EE5757;
    background-color: #eee;
    border-radius: 3px;
    cursor: pointer;
    transition: opacity .2s ease;
}
.basket ul li:hover button.delete { opacity: 1; }
.basket ul li button.delete:hover  { color: #fff; background-color: #ffa0a3; }
.basket ul li button.delete:active { color: #fff; background-color: #EE5757; }
兩個元件如何互動
draggable 讓商品可以被拖;droppable 讓購物籃成為合法的放置目標。drop 回呼裡的 ui.draggable 就是被拖的那個元素,透過它就能讀到 data-id,進而知道「拖進來的是哪一個商品」。
revert: true 讓商品在放開後自動飛回原位——購物籃裡應該是「複本」,而不是把商品從列表搬走,這個設定正是為了這個語意。
tolerance: "touch" 決定觸發放置的判定方式:touch 只要有接觸就觸發,pointer 需游標進入,fit 需完全放入,intersect 需重疊達一半以上。購物籃這種目標用 touch 最寬鬆友善。
三個該修正的地方
1. .live() 已被移除。原範例用 $(".basket ul li button.delete").live("click", ...)。這個方法在 jQuery 1.9 就廢棄、jQuery 3 完全移除。而且它的邏輯本來就有問題:購物籃裡的 li 是動態產生的,頁面載入時選擇器選不到任何元素。正確做法是用事件委派,如上方程式所示:$(".basket").on("click", "li button.delete", ...),把事件綁在永遠存在的父層上,由它辨識事件來源。
2. itemId.html() != null 判斷不可靠。jQuery 的選擇器找不到元素時回傳的是空的 jQuery 物件,不是 null。而空物件的 .html() 回傳是 null…碰巧能work,但這是很脆弱的巧合。正確寫法是檢查 .length,語意清楚也不會誤判。
3. 拼字串組 HTML 有 XSS 風險。move.find("h3").html() 直接把商品名稱的字串內容插進 HTML。若商品名稱來自使用者輸入並含標籤,就會被當成 HTML 執行。改用 .text() 或改用 createElement 建立節點再設定 textContent。
實務上的關鍵提醒
這個範例的所有狀態都存在 DOM 裡(購物籃有幾個 li、每個 input 的值是多少)。在展示用的 demo 裡沒問題,但真正做電商時,購物車的真相來源必須是後端 session 或資料庫,前端 DOM 只是畫面。使用者重新整理、換裝置、直接改 DevTools 的情況下,只有後端狀態才靠得住。
另外,拖曳對許多使用者來說並不是直覺的操作,在觸控裝置上更容易失敗。務必同時提供「點擊加入」的按鈕作為替代路徑,並在拖曳時給予清楚的視覺回饋(這個範例的 opacity 與邊框變化就是為了這個)。<li> 也應該換成有語意的清單標記並補上適當的 ARIA 描述。