jQuery 實戰:仿淘寶商城左側分類導覽效果
編輯:JQuery特效代碼
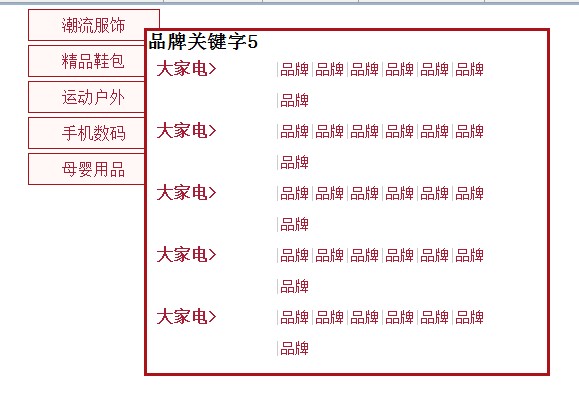
這個效果的核心在於滑過左側分類時,右側動態顯示對應的品牌關鍵字區塊。實作主要依賴 jQuery 的 .html() 方法,大幅簡化了 DOM 操作。
完整程式碼
<!DOCTYPE HTML PUBLIC "-//W3C//DTD HTML 4.01//EN" "https://www.w3.org/TR/html4/strict.dtd">
<html>
<head>
<meta http-equiv="Content-Type" content= "text/html; charset=utf-8">
<title>仿淘寶商城左側導航效果</title>
<script src="jquery-1.4.2.min.js" type="text/javascript">
</script>
<style type="text/css">
* {
margin: 0px;
padding: 0px;
}
ul{
list-style: none;
}
ul.nav li {
cursor: pointer;
width: 130px;
height: 30px;
text-align: center;
border: 1px solid #A91319;
line-height: 30px;
margin: 4px auto;
background: #FFF8F6
}
ul.nav li a {
width: 130px;
height: 30px;
display: block;
color: #A71F37;
text-decoration: none;
}
ul.nav li a:hover {
background: #A91319;
width: 130px;
height: 30px;
display: block;
color: #ffffff
}
div#showValue {
border: 3px solid #A91319; background:#ffffff; width:400px; height:auto; padding-bottom:10px;
}
ul.brand_list{ overflow:hidden; width:350px;}
ul.brand_list li{line-height:30px; height:auto;}
ul.brand_list li.brand_name{ font-weight:bolder; width:100px; float:left; margin-left:10px; color:#A71F37; margin-right:5px;}
ul.brand_list li.brand_content{ width:220px; float:right;}
ul.brand_list li.brand_content a{color:#A71F37; text-decoration:none; }
ul.brand_list li.brand_content span{ padding:0 3px; border-left:1px solid #cccccc; font-size:14px;}
</style>
</head>
<body>
<div id='guid' style=" width:200px;">
<ul class="nav" style=" border:none;">
<li><a href="#">潮流服飾</a></li>
<li><a href="#">精品鞋包</a></li>
<li><a href="#">運動戶外</a></li>
<li><a href="#">手機數碼</a></li>
<li><a href="#">母嬰用品</a></li>
</ul>
</div>
<div id="hdValue" style=" display:none; position:absolute; left:0px;">
<div>
<div class="con_st">
<h3>品牌關鍵字1</h3>
<div>
<ul class="brand_list">
<li class="brand_name">大家電<b>></b></li>
<li class="brand_content">
<span><a href="#">品牌</a></span><span><a href="#">品牌</a></span><span><a href="#">品牌</a></span><span><a href="#">品牌</a></span><span><a href="#">品牌</a></span><span><a href="#">品牌</a></span><span><a href="#">品牌</a></span>
</li>
</ul>
</div>
</div>
</div>
<!-- 其餘「品牌關鍵字2 ~ 品牌關鍵字5」區塊結構完全相同,每個 con_st 內含一至多組 brand_list,此處省略重複內容 -->
</div>
<div id="showValue" style=" z-index:22; display:none; position:fixed; top:-77px; left:130px; margin-left:20px; margin-top:100px;">
</div>
<script type="text/javascript">
$(document).ready(function(){//加載 DOM
if (!$("#guid").is(":animated")) {//首先判斷是否處於動畫狀態
var lis = $("#guid ul.nav li");
//遍歷文檔樹
lis.each(function(i){
$(this).bind("mouseover", i, function(){
$("#showValue").show();
var hv = $("#hdValue").children().eq(i);
$("#showValue").html(hv.html());
$("#showValue").bind("mouseover", function(){
$("#showValue").show();
})
});
});
//控制鼠標移除事件
$("#guid,#showValue").mouseleave(function(){
$("#showValue").hide();
});
}
});
</script>
</body>
</html>
幾個設計細節值得注意:所有面板內容先放在隱藏的 #hdValue 裡,滑過時用 .html() 複製到顯示區,好處是 HTML 與邏輯分離,內容修改不必動程式;把 mouseleave 綁在 #guid,#showValue 兩者上,是為了讓滑鼠能從左側分類移動到右側面板而不中斷顯示;另外用 is(":animated") 做動畫狀態判斷,可避免連續觸發造成的閃爍。
(原始程式碼中品牌關鍵字 2~5 的區塊結構與關鍵字 1 完全相同,為避免大量重複,此處僅保留一組作為代表。)
- 上一篇文章: 用 jQuery 監控表單資料是否被修改(改良版)
- 下一篇文章: 用 jQuery UI 做出漂亮的網頁對話框,其實只要幾行