定義 XML Schema
W3C XML Schema 本身其實也是一份 XML 文件,卻又是一種用來描述文法的文件。除此之外,Schematron 與 Relax NG 也是兩種 XML 驗證語言。這裡只聚焦於 W3C XML Schema;另外那兩種語言較為簡潔、也很受歡迎,讀者不妨自行了解。
相較於 DTD,設計 XML Schema 能對文件施加更嚴格的約束。舉例來說,XML Schema 文法可以規定:作為 basket 元素直接子元素的 apple,有且只能有四個。此外,還能在字串型別的基礎上定義複雜型別——譬如要求 zipcode 元素的值必須符合「ddddd-dddd」這個樣板(facet),於是「95123-4823」有效,而「abcde-fghi」或「27703」則無效。
那麼,「樣板(facet)」這個詞究竟是什麼意思呢?在 XML Schema 裡,樣板指的是某個簡單資料型別可能取值的一個面向。表 5 列出了 XML Schema 的各種樣板。
表 5. XML W3C Schema 樣板
樣板/說明——length:規定具體的長度;minLength:規定字串衍生型別的最小長度;maxLength:規定字串衍生型別的最大長度;maxExclusive:必須小於該型別適用的最大值;maxInclusive:必須小於或等於該型別的最大值;minExclusive:必須大於該型別的最小值;minInclusive:必須大於或等於該型別的最小值;enumeration:值必須是所定義清單中的一員;totalDigits:規定總位數(不含正負號與小數點);fractionDigits:規定小數部分的位數;whiteSpace:用於保留、替換或壓縮文件中的空白。
這裡先讓你對能施加多細的控制有個概念,但首要之務,是先做出一份能實現 DTD 功能的 XML Schema,稍後再談如何進一步細化,以彰顯模式的優勢。
首先要宣告 XML Schema 所採用的模式。暫且先別在文法中使用名稱空間;模式本身則使用了一個名稱空間,按慣例通常以「xs」作為前綴。前綴固然可用任何字串(例如「radish」),但又何苦違反慣例呢?
xmlns:xs="https://www.w3.org/2001/XMLSchema"
接著,宣告你自己定義的元素與屬性為非限定(unqualified):
 elementFormDefault="unqualifIEd"
 attributeFormDefault="unqualifIEd"
下面是 XML Schema 的根元素:
<xs:schema xmlns:xs="https://www.w3.org/2001/XMLSchema"
 elementFormDefault="unqualifIEd"
 attributeFormDefault="unqualifIEd">
接下來,就能指定 publications,以及 book、title、author、copyright、publisher 與 isbn 等元素的宣告了。可以像下面這樣指定根元素:
<xs:element name="publications">
publications 根是一個複雜型別,包含一連串其他元素,也就是若干個 book 元素;該元素出現的次數並無上限:
<xs:element name="publications">
 <xs:complexType>
 <xs:sequence>
 <xs:element name="book" maxOccurs="unbounded">
而 book 同樣是複雜型別,內含自己的一串序列:title、author、copyright、publisher 與 isbn 元素宣告。
<xs:element name="publications">
 <xs:complexType>
 <xs:sequence>
 <xs:element name="book" maxOccurs="unbounded">
 <xs:complexType>
 <xs:sequence>
 <xs:element name="title"/>
 <xs:element name="author"/>
 <xs:element name="copyright"/>
 <xs:element name="publisher"/>
 <xs:element name="isbn"/>
 </xs:sequence>
 ...
是不是忘了替 book 元素加上 id 與 image 屬性?並沒有——這些留到包在 book 元素外那層複雜型別定義的最後再補上即可。
XML Schema 的規則(文法)要求:屬性必須宣告在其所屬元素的複雜型別定義之末尾。屬性是形如 <xs:attribute … /> 的模式元素。
因此,可以這樣加上 id 與 image 屬性:
<xs:element name="publications">
 <xs:complexType>
 <xs:sequence>
 <xs:element name="book" maxOccurs="unbounded">
 <xs:complexType>
 <xs:sequence>
 <xs:element name="title"/>
 <xs:element name="author"/>
 <xs:element name="copyright"/>
 <xs:element name="publisher"/>
 <xs:element name="isbn"/>
 </xs:sequence>
 <xs:attribute name="id" type="xs:string" use="required"/>
 <xs:attribute name="image" type="xs:string"/>
 </xs:complexType>
其中 id 屬性是必填的,而 image 屬性採用預設值,也就是非必填。
請留意型別 xs:string。你也可以指定以 string 為基礎的複雜型別——對 XML 而言它仍是字串,但對 XML Schema 來說則是一種特殊型別的字串。稍後我們會進一步探討使用者自訂的複雜型別。
至此,模式大致已完成。把尚未關閉的元素補上結束標記,就得到如清單 11 所示、功能與 DTD 相當的模式。
清單 11. 與 DTD 功能相當的模式
<?XML version="1.0" encoding="UTF-8"?>
<xs:schema xmlns:xs="https://www.w3.org/2001/XMLSchema"
 elementFormDefault="qualifIEd"
 attributeFormDefault="unqualifIEd">
<xs:element name="publications">
 <xs:complexType>
 <xs:sequence>
 <xs:element name="book" maxOccurs="unbounded">
 <xs:complexType>
 <xs:sequence>
 <xs:element name="title"/>
 <xs:element name="author"/>
 <xs:element name="copyright"/>
 <xs:element name="publisher"/>
 <xs:element name="isbn"/>
 </xs:sequence>
 <xs:attribute name="id" type="xs:string" use="required"/>
 <xs:attribute name="image" type="xs:string"/>
 </xs:complexType>
 </xs:element>
 </xs:sequence>
 </xs:complexType>
</xs:element>
</xs:schema>
你可以在 XMLSpy 中打開 publication3.xsd,然後按 F8,針對 https://www.w3.org/2001/XMLSchema 對它進行驗證——就把它當成一份 XML 文件來看待,因為它本就是 XML 文件。
把 XML Schema 關聯到文件
模式唯有套用到 XML 文件上才有意義。那要如何把模式與文件關聯起來呢?應用程式固然可以直接拿 publications3.xsd 去驗證 publications3.xml,但我們更希望把模式與 XML 文件隱含地綁在一起。
方法之一是改寫文件的根元素,透過專門的屬性連接到模式。由於目前模式還沒用到名稱空間,我們必須替 publications 根元素加上一個屬性,告訴解析器要到哪裡去找這份不帶名稱空間的模式:
<publications xmlns:xsi="https://www.w3.org/2001/XMLSchema-instance"
 xsi:noNamespaceSchemaLocation="publications3.xsd">
就這麼簡單!請參見清單 12 所示的 publications3.XML 文件。它的內容與清單 8 相同,只是多了模式的關聯。
清單 12. 連接到 W3C XML Schema 的 publication3.XML
<?XML version="1.0" encoding="UTF-8"?>
<publications xmlns:xsi="https://www.w3.org/2001/XMLSchema-instance"
xsi:noNamespaceSchemaLocation="publications3.xsd">
 <book id="_1001">
 <title>Building J2EE Applications With IBM WebSphere</title>
 <author>Nilsson and Mauget</author>
 <copyright>2003</copyright>
 <publisher>Wiley</publisher>
 <isbn>0471281573</isbn>
 </book>
 <book id="_3042">
 <title>Linux and Windows InterOperability Guide</title>
 <author>Bradford and Mauget</author>
 <copyright>2001</copyright>
 <publisher>Pearson Education</publisher>
 <isbn>0130324779</isbn>
 </book>
 <book id="_9593" image="edir.jpg">
 <title>e - DirectorIEs</title>
 <author>House,Hahn,Mauget,Daugherty</author>
 <copyright>2000</copyright>
 <publisher>Pearson Education</publisher>
 <isbn>0471281573</isbn>
 </book>
</publications>
加入名稱空間
為什麼要在文件中加入名稱空間呢?DTD 根本沒有名稱空間的概念,它會直接忽略限定元素或屬性的冒號(:)。這意味著,任何消歧義都是靠冒號前面的前綴來完成,而不是透過前綴所代表的 URI。兩個文件用相同的前綴關聯到不同的名稱空間是合法的,但這可能造成命名衝突的問題。
在文件中使用下面的名稱空間:
https://rogers60.com/XMLtutorial/2
前綴採用 pub——其實文件與模式中任何唯一且合法的字串都能當作前綴。對 DTD 來說,pub:book 與 pubbook 並無二致;而在 XML Schema 名稱空間的支持下,它在概念上相當於 https://rogers60.com/XMLtutorial/2book。
DTD 的行為未必能防止名稱空間衝突。反之,只要正確宣告,XML Schema 便能防止名稱空間衝突,因為基於 DNS 的 URI 是獨一無二的。模式演進的下一步,是設定預設名稱空間,前綴用 pub:
xmlns:pub="https://rogers60.com/XMLtutorial/2"
要同時指定一個名稱空間並使用預設名稱空間,需要用到兩個屬性。一般慣例是:不帶前綴的元素被視為屬於預設名稱空間,而不帶前綴的屬性則不屬於任何名稱空間:
elementFormDefault="qualifIEd"
attributeFormDefault="unqualifIEd"
還記得前面那個不使用名稱空間的文法裡,宣告的是 elementFormDefault="unqualifIEd" 吧。對於這個具體的模式而言,改用名稱空間限定的文法並不需要額外增加什麼,詳見清單 13。
清單 13. 使用預設名稱空間的模式
<?XML version="1.0" encoding="UTF-8"?>
<xs:schema xmlns:xs="https://www.w3.org/2001/XMLSchema"
 xmlns:pub="https://rogers60.com/XMLtutorial/2"
 targetNamespace="https://rogers60.com/XMLtutorial/2"
 elementFormDefault="qualifIEd"
 attributeFormDefault="unqualifIEd">
<xs:element name="publications">
 <xs:complexType>
 <xs:sequence>
 <xs:element name="book" maxOccurs="unbounded">
 <xs:complexType>
 <xs:sequence>
 <xs:element name="title"/>
 <xs:element name="author"/>
 <xs:element name="copyright"/>
 <xs:element name="publisher"/>
 <xs:element name="isbn"/>
 </xs:sequence>
 <xs:attribute name="id" type="xs:string" use="required"/>
 <xs:attribute name="image" type="xs:string" use="optional"/>
 </xs:complexType>
 </xs:element>
 </xs:sequence>
 </xs:complexType>
</xs:element>
</xs:schema>
此外,還得對 XML 文件做個小手術,把它連接到名稱空間。所幸工程很小,因為整份文件都在預設名稱空間之中。publications 根元素裡不必再指定那個「不帶名稱空間的模式位置」屬性,改成:
xsi:schemaLocation="https://rogers60.com/XMLtutorial/2 publicationsNS4.xsd"
這裡可要當心——尤其是那對用引號括起來、以空格分隔的值。第一部分是名稱空間 URI,第二部分則是模式檔案的位置,一般來說應該是一個 URL。此外,還需要加上預設名稱空間,並為它指定 pub 前綴:
 xmlns="https://rogers60.com/XMLtutorial/2"
 xmlns:pub="https://rogers60.com/XMLtutorial/2"
如此一來,非限定的元素便預設屬於 URI https://rogers60.com/XMLtutorial/2,而明確標上前綴 pub 的元素同樣屬於該名稱空間。舉例來說,<book> 與 <pub:book> 宣告的是同一個元素。加入名稱空間後的測試文件如清單 14 所示。請注意,作為示範,最後一個 book 元素被明確限定為 pub:book;這份文件對於前述清單 13 的模式而言是有效的。
清單 14. 使用預設名稱空間的 XML 文件
<?XML version="1.0" encoding="UTF-8"?>
<publications
 xmlns:xsi="https://www.w3.org/2001/XMLSchema-instance"
 xsi:schemaLocation="https://rogers60.com/XMLtutorial/2
 publicationsNS4.xsd"
 xmlns="https://rogers60.com/XMLtutorial/2"
 xmlns:pub="https://rogers60.com/XMLtutorial/2">
 <book id="_1001">
 <title>Building J2EE Applications With IBM WebSphere</title>
 <author>Nilsson and Mauget</author>
 <copyright>2003</copyright>
 <publisher>Wiley</publisher>
 <isbn>0471281573</isbn>
 </book>
 <book id="_3042">
 <title>Linux and Windows InterOperability Guide</title>
 <author>Bradford and Mauget</author>
 <copyright>2001</copyright>
 <publisher>Pearson Education</publisher>
 <isbn>0130324779</isbn>
 </book>
 <pub:book id="_9593" image="edir.jpg">
 <title>e - DirectorIEs</title>
 <author>House,Hahn,Mauget,Daugherty</author>
 <copyright>2000</copyright>
 <publisher>Pearson Education</publisher>
 <isbn>0471281573</isbn>
 </pub:book>
</publications>
內建的簡單資料型別
W3C XML Schema 規範定義了一組簡單的內建資料型別。表 6 列出了內建的 XML Schema 簡單型別及其說明。本教程的測試用例預設採用字串型別,只有 book 元素的 image 與 id 屬性明確規定了型別。
表 6. 內建的 W3C Schema 簡單資料型別
型別/說明——anyURI:統一資源標識符;base64Binary:以 base64 編碼的二進位值;boolean:true..false 或 0..1;byte:帶符號的位元組,不大於 128、不小於 -127;dateTime:絕對日期與時間;ID、IDREF、IDREFS、ENTITY、ENTITIES、NOTATION、NMTOKEN、NMTOKENS:與表 4 中的定義相同;integer:帶符號整數;language:XML 1.0 推薦標準中的「XML:lang」值;name:XML 名稱;string:Unicode 字串。
在複雜的應用程式中,數據文件的模式可能膨脹得難以維護,除非把它改造成某種規範化的形式。目前這個模式是在使用它們的結構點上就地宣告元素與屬性,文件的結構與用來建構該結構的元素、屬性宣告混雜在一起。這種做法會讓試圖理解與維護它的人覺得模式失之清晰,也削弱了型別重用的可能,日後需要修改時,維護者很難找到想要的型別。
那何不把所有型別宣告集中到一處,再讓模式中負責數據結構的部分去引用這些型別呢?如此一來,你甚至能把大型模式拆成不同檔案,一個放型別部分,另一個放結構部分。
我們就來試試。改寫模式,把宣告部分從結構中抽離出來:在文件開頭宣告所有元素,接著宣告屬性,最後才定義文件結構。結構部分則以 ref 屬性搭配元素或屬性名稱,去引用前面宣告的元素或屬性。屬性的引用必須帶上名稱空間前綴,因為所有的屬性都不知道名稱空間。
這種規範化的模式布局,有時反而讓大型文件更易讀——你能把宣告從不算精簡的結構中抽離出來單獨檢視,同時也有利於型別重用。
清單 15 展示了一個採用這種規範化形式的小模式。它實際上比原本的模式更長,但因為宣告與結構分開,有些東西只需宣告一次而非多次,反而更好維護。
清單 15. 規範化的 W3C Schema
<?XML version="1.0" encoding="UTF-8"?>6
 <xs:schema xmlns:xs="https://www.w3.org/2001/XMLSchema"
 xmlns:pub="https://rogers60.com/XMLtutorial/2"
 targetNamespace="https://rogers60.com/XMLtutorial/2"
 elementFormDefault="qualifIEd"
 attributeFormDefault="qualifIEd">
 <!-- Simple elements -->
 <xs:element name="title"/>
 <xs:element name="author"/>
 <xs:element name="copyright"/>
 <xs:element name="publisher"/>
 <xs:element name="isbn"/>
 <!-- Attributes -->
 <xs:attribute name="id" type="xs:string"/>
 <xs:attribute name="image" type="xs:string"/>
 <!-- Complex elements -->
 <xs:element name="publications">
 <xs:complexType>
 <xs:sequence>
 <xs:element name="book" maxOccurs="unbounded">
 <xs:complexType>
 <xs:sequence>
 <xs:element ref="pub:title"/>
 <xs:element ref="pub:author"/>
 <xs:element ref="pub:copyright"/>
 <xs:element ref="pub:publisher"/>
 <xs:element ref="pub:isbn"/>
 </xs:sequence>
 <xs:attribute ref="pub:id" use="required"/>
 <xs:attribute ref="pub:image" use="optional"/>
 </xs:complexType>
 </xs:element>
 </xs:sequence>
 </xs:complexType>
 </xs:element>
</xs:schema>
把測試文件連接到這個模式後,它與先前一樣有效,這裡就不再贅述。現在從 XMLSpy 打開該模式,點擊 Schema/WSDL 頁籤,就會看到圖 7 所示的圖示。請留意序列的連接線、加了名稱空間限定的標籤,以及一連串的 pub:book 元素。
圖 7. W3C XML Schema 圖示
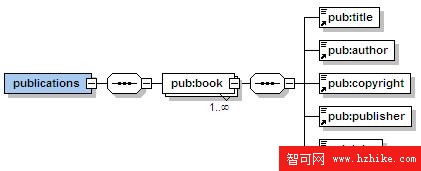
這個模式其實藏著一處細微的破綻。你本想允許 publications 清單為空,卻發現這裡至少要求有一個 pub:book,空白的 publications 清單反而成了無效文件。堅持測試邊界條件是個好習慣;只要替該元素加上 minOccurs 屬性即可解決:
<xs:element name="book" maxOccurs="unbounded" minOccurs="0">
這樣一來,就容許空白的 publications 清單了。
W3C XML Schema 固然內建了簡單型別,但它真正的魅力,部分來自於能用更細粒度的使用者自訂簡單型別來約束取值。這裡我們要建立兩種簡單型別,分別用於 isbn 元素與 copyright 元素:它們的基礎型別都是 xs:string,但各自套用不同的限制樣板。先來看版權格式——要確保它是一個四位數字。這樣的簡單限制雖有多種寫法(例如指定長度),但這裡採用「dddd」的樣板,其中每個「d」代表一個數字:
<xs:simpleType name="year">
 <xs:restriction base="xs:string">
 <xs:pattern value="dddd"/>
 </xs:restriction>
</xs:simpleType>
同樣地,把 ISBN 編號限制成「d-dddd-dddd-d」的形式,其中每個「d」也是一個數字。要留意,這並非真正權威的格式——由於號碼逐漸耗盡,ISBN 近期已從 10 位數改為 13 位數;但對本教程而言,這種形式足以拿來測試文件中的 ISBN 編號。
<xs:simpleType name="isbn">
 <xs:restriction base="xs:string">
 <xs:pattern value="d-dddd-dddd-d"/>
 </xs:restriction>
</xs:simpleType>
把這兩小段 XML 插入到規範化模式中、元素與屬性宣告之前,之後就能在需要的地方以 ref 屬性指向這些新型別來引用它們了:
<xs:attribute ref="pub:id" use="required"/>
<xs:attribute ref="pub:image" use="optional"/>
ref 的值之所以帶上名稱空間前綴,是因為屬性引用預設不帶名稱空間,正如該模式中 attributeFormDefault="unqualifIEd" 所規定的那樣。清單 16 展示了使用自訂型別後的最新 XML Schema 版本。這裡不再列出 XML 文件,因為除了模式名稱之外並無變動。
清單 16. 宣告自訂型別的模式
<?XML version="1.0" encoding="UTF-8"?>
 <xs:schema xmlns:xs="https://www.w3.org/2001/XMLSchema"
 xmlns:pub="https://rogers60.com/XMLtutorial/2"
 targetNamespace="https://rogers60.com/XMLtutorial/2"
 elementFormDefault="qualifIEd"
 attributeFormDefault="unqualifIEd">
<!-- Simple types -->
<xs:simpleType name="isbn">
 <xs:restriction base="xs:string">
 <xs:pattern value="d-dddd-dddd-d"/>
 </xs:restriction>
</xs:simpleType>
<xs:simpleType name="year">
 <xs:restriction base="xs:string">
 <xs:pattern value="dddd"/>
 </xs:restriction>
</xs:simpleType>
<!-- Simple elements -->
<xs:element name="title" type="xs:string"/>
<xs:element name="author" type="xs:string"/>
<xs:element name="copyright" type="pub:year"/>
<xs:element name="publisher" type="xs:string"/>
<xs:element name="isbn" type="pub:isbn"/>
<!-- Attributes -->
<xs:attribute name="id" type="xs:string"/>
<xs:attribute name="image" type="xs:string"/>
<!-- Complex elements -->
<xs:element name="publications">
 <xs:complexType>
 <xs:sequence>
 <xs:element name="book" maxOccurs="unbounded">
 <xs:complexType>
 <xs:sequence>
 <xs:element ref="pub:title"/>
 <xs:element ref="pub:author"/>
 <xs:element ref="pub:copyright"/>
 <xs:element ref="pub:publisher"/>
 <xs:element ref="pub:isbn"/>
 </xs:sequence>
 <xs:attribute ref="pub:id" use="required"/>
 <xs:attribute ref="pub:image" use="optional"/>
 </xs:complexType>
 </xs:element>
 </xs:sequence>
 </xs:complexType>
</xs:element>
</xs:schema>
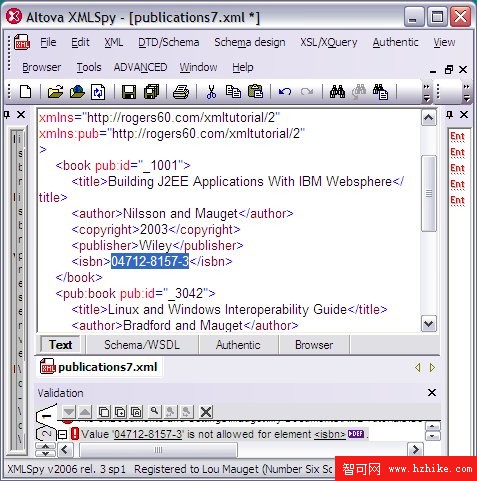
用 XMLSpy 測試,文件仍然有效。現在把第一個 isbn 元素裡的第一個橫線去掉再驗證,就會導致驗證失敗,結果如圖 8 所示。
圖 8. 自訂型別驗證失敗
可以採取分而治之的策略,讓模式更易理解、更易維護——借用程式設計的思維,把模式拆解到各自獨立的檔案裡。首先,建立一個只包含前面重構模式中那些簡單型別、元素與屬性宣告的模式,如清單 17 所示。
清單 17. 獨立模式檔案中的宣告
<?XML version="1.0" encoding="UTF-8"?>
 <xs:schema xmlns:xs="https://www.w3.org/2001/XMLSchema"
 xmlns:pub="https://rogers60.com/XMLtutorial/2"
 targetNamespace="https://rogers60.com/XMLtutorial/2"
 elementFormDefault="qualifIEd"
 attributeFormDefault="unqualifIEd">
<!-- Simple types -->
<xs:simpleType name="isbn">
 <xs:restriction base="xs:string">
 <xs:pattern value="d-dddd-dddd-d"/>
 </xs:restriction>
</xs:simpleType>
<xs:simpleType name="year">
 <xs:restriction base="xs:string">
 <xs:pattern value="dddd"/>
 </xs:restriction>
</xs:simpleType>
<!-- Simple elements -->
<xs:element name="title" type="xs:string"/>
<xs:element name="author" type="xs:string"/>
<xs:element name="copyright" type="pub:year"/>
<xs:element name="publisher" type="xs:string"/>
<xs:element name="isbn" type="pub:isbn"/>
<!-- Attributes -->
<xs:attribute name="id" type="xs:string"/>
<xs:attribute name="image" type="xs:string"/>
</xs:schema>
接著,把這些內容從原始模式的副本裡刪掉,替換成下面這段標記:
<xs:include schemaLocation="publicationsRedefine8.xsd"/>
最終得到的結構模式如清單 18 所示。其中的 ref 屬性會引用被包含進來的模式。你會發現,拆成兩個檔案後,兩邊都更好讀了:一個負責元素、屬性與型別的宣告,另一個則把它們組織進文件結構。若把測試 XML 文件裡的連結改為指向 publications8.xsd,在 XMLSpy 中它依然是有效的。
清單 18. 結構性 W3C Schema
<?XML version="1.0" encoding="UTF-8"?>
 <xs:schema xmlns:xs="https://www.w3.org/2001/XMLSchema"
 xmlns:pub="https://rogers60.com/XMLtutorial/2"
 targetNamespace="https://rogers60.com/XMLtutorial/2"
 elementFormDefault="qualifIEd"
 attributeFormDefault="unqualifIEd">
<xs:include schemaLocation="publicationsRedefine8.xsd"/>
<!-- Complex elements -->
<xs:element name="publications">
 <xs:complexType>
 <xs:sequence>
 <xs:element name="book" maxOccurs="unbounded">
 <xs:complexType>
 <xs:sequence>
 <xs:element ref="pub:title"/>
 <xs:element ref="pub:author"/>
 <xs:element ref="pub:copyright"/>
 <xs:element ref="pub:publisher"/>
 <xs:element ref="pub:isbn"/>
 </xs:sequence>
 <xs:attribute ref="pub:id" use="required"/>
 <xs:attribute ref="pub:image" use="optional"/>
 </xs:complexType>
 </xs:element>
 </xs:sequence>
 </xs:complexType>
</xs:element>
</xs:schema>
在 XML Schema 中,可以用 xs:include、xs:redefine 或 xs:import 引入外部檔案,並透過 xs:extension 或 xs:restriction 元素派生出新的型別。這些主題足以各自獨立成篇,這裡就不再展開。
該選 DTD 還是 W3C XML Schema?
本教程介紹了 DTD 與 W3C XML Schema,現在就把兩者擺在一起比較。
表 7 列出了 DTD 的基本驗證特性。對於控制元素值與屬性值的格式與型別,它能提供的粒度相當有限——不過對於敘述風格的文件而言,這通常已經足夠。事實上,各類面向產業的敘述性交換文件,存在著數量多得驚人的標準 DTD。
表 7. DTD 驗證
DTD 有效性約束:元素嵌套、元素頻次、允許的元素數據、屬性型別與預設值。
類數據記錄的文件,則構成了 XML 應用的另一個主要分支。物件與 XML 之間的雙向轉換,需要精確的內容規範,這正是 W3C XML Schema 大顯身手之處。表 8 簡要描述了模式的約束特性。要留意,XML Schema 與 DTD 有部分重疊,但 XML Schema 還能為文法組建全新的數據型別。重疊的特性容易造成誤解——XML Schema 支持更精確的控制,例如元素的頻次。比方說,你可以要求 publication 清單必須恰好包含 10 本書,這在 DTD 中是做不到的。
表 8. W3C Schema 特性
W3C XML Schema 特性:元素頻次約束、名稱空間限定的元素與屬性宣告、簡單與複雜數據型別、型別派生與繼承。
就定義面向數據的文法而言,XML Schema 似乎無論哪個方面都勝過 DTD,不過 DTD 有一件事做得比 XML Schema 好。還記得實體(entity)嗎?這些類似巨集的宣告,能替換文件中的命名項。在 DTD 中定義實體輕而易舉,可要在 XML Schema 中重現這種功能卻頗為困難。一般實體常見於敘述性文法,在這個領域裡,DTD 的地位依舊穩固。
XML Schema 也是 XML 的一種應用——事實上,它還受到自己的 XML Schema 約束。DTD 則不是 XML,而是一種獨立的標記語言。有人視此為 DTD 的缺點;也有人認為 XML Schema 太過冗長、可讀性差。你已經看到,把模式規範化地拆成不同部分,能在一定程度上緩解這種感覺。相較於 DTD,模式從零寫起確實更費力,好在現代化工具能在輸入時提供提示性的協助,多少舒緩了這個痛點。
「一定要用模式」這種說法並不正確。最終仍得依具體應用來權衡取捨,這裡就把兩方面的意見整理給你參考。
總結
本系列第 1 部分談的是 XML 體系結構。身為第二篇教程,本文探討了數據文件與敘述性文件各自的特點,並透過一個簡單的案例研究,以 XML 建模,說明了文法的迭代演進過程。第 3 部分將介紹如何在應用程式中處理 XML;第 4 部分聚焦於如何把 XML 文件轉換成新文件;第 5 部分則談測試與優化 XML,以及常見的相關技術。
學完本系列教程後,你將具備足夠的背景知識,從容備考 IBM 認證考試 142「XML 及相關技術」,邁向 IBM Certified Solution Developer —— XML and Related Technologies 認證。