KML 檔案本身並不難做。在 Google Earth(以下簡稱 GE)中選好自己或別人的標記、圖層,另存成靜態的 kmz 或 kml 檔,寄給朋友,對方用 GE 打開就能看到你想標註的內容。
但靜態檔案終究有個天花板:地標是死的,資料不會更新。真正有意思的做法是做一個動態的地標來源,讓 GE 或網頁地圖在每次瀏覽時都向伺服器索取最新資料。本文就來拆解它的運作原理與實作步驟。
先釐清幾個概念
Google Maps API 是以 JavaScript 為主、搭配 XML 資料的瀏覽器端技術;另一個產品 Google Earth API 則建立在 ActiveX 插件之上,能做出接近桌面版 GE 的效果(視角、街景等),但因為需要額外安裝插件,普及度一直有限。本文採用的是 Google Maps API。
關於 API Key:為了避免介面被濫用,你的網站必須申請一把 Key 才能使用 Google Maps API。這把 Key 基本上就是網域名稱對應的一個值,官方說法是以同一個網域重新申請也會拿到同一把 Key,申請後長期閒置也不會有任何影響。只有在你的網站流量大到誇張時,Google 才會希望你跟他們聯絡。值得一提的是,在本機除錯(例如 https://localhost:8080/demo.aspx)時並不受 Key 限制,可以正常使用。
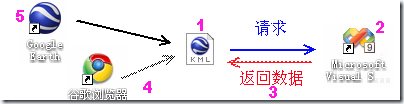
本文的整體流程,對應以下五個部分:
- 如何用 KML 把動態資料串起來
- 如何撰寫提供資料的 aspx 頁面
- 應該回傳什麼樣的 XML 資料
- 如何在網頁上載入顯示(HTML)
- 在 GE 中的呈現效果
一、用 KML 串起動態資料
上面那張流程圖把工作階段交代得很清楚。這裡的 KML 檔並不是一般意義下塞滿座標的檔案,而是一個「中介檔」:它同時能被 Google Maps API 呼叫,也能被 GE 直接開啟。內容大致如下:
<?xml version="1.0" encoding="UTF-8"?>
<kml xmlns="https://earth.google.com/kml/2.0">
  <NetworkLink>
    <name>OMGSOFT</name>
    <open>1</open>
    <description>火車運行圖 - 鷗盟軟件 - www.omgsoft.com.cn</description>
    <Url>
      <href>https://huoche.omgsoft.com.cn/ge/test.aspx</href>
      <viewRefreshMode>onStop</viewRefreshMode>
      <viewRefreshTime>2</viewRefreshTime>
    </Url>
  </NetworkLink>
</kml>
關鍵在 <href> 這個節點,它指向真正的資料來源,也就是我們自己寫的應用程式介面,角色有點像 Web Service。當這個 KML 被載入後,每次地圖停止操作滿 2 秒,GE 或網頁就會以 GET 方式向這個位址送出目前視野的邊界座標,例如:
https://huoche.omgsoft.com.cn/ge/test.aspx?BBOX=81.9140625,21.69826549685252,130.25390625,49.66762782262192預設的參數順序是西、南、東、北:BBOX=[west],[south],[east],[north]。除此之外也可以傳送視角與海拔等參數(主要給 GE 使用),細節可參考文末的文件。
實測有個限制值得注意:這個 href 似乎不支援相對路徑或本機路徑,寫成 <href>/ge/test.aspx</href> 或指向 localhost 都無法正常運作,只能把檔案上傳到空間上才能除錯,這一點在開發階段頗不方便。
二、撰寫資料來源頁面
接著看 test.aspx。它的任務是回傳一段 XML 格式的資料,所以前端必須清掉所有 HTML 標籤(更推薦直接用 ashx 一般 HTTP 處理常式來做)。資料採集與入庫的部分不在本文範圍內。
test.aspx:
<%@ Page Language="C#" AutoEventWireup="true" CodeBehind="test.aspx.cs" Inherits="huoche.ge.test" %>test.aspx.cs(已省略部分不相關的程式碼):
using System;
using System.Collections.Generic;
using System.Linq;
using System.Web;
using System.Web.UI;
using System.Web.UI.WebControls;
using System.Text;
using System.Data;
using System.Configuration;

namespace huoche.ge
{
    public partial class test : System.Web.UI.Page
    {
        protected void Page_Load(object sender, EventArgs e)
        {
            // 取出視野邊界
            string bbox = (string)Request.Params["BBOX"];
            string[] _ary = bbox.Split(',');
            var west  = Convert.ToDouble(_ary[0]);
            var south = Convert.ToDouble(_ary[1]);
            var east  = Convert.ToDouble(_ary[2]);
            var north = Convert.ToDouble(_ary[3]);

            // 這裡可以加上過濾邏輯:範圍太大或太小,或落在服務區域之外

            string ConnectionString =
                ConfigurationManager.ConnectionStrings["trainConnectionString"].ToString();
            TrainDataClassesDataContext ctx =
                new TrainDataClassesDataContext(ConnectionString);

            // 撈出落在目前視野內的資料
            var StationMarkerlist = (from c in ctx.StationMain
                                     where c.Latitude  < north && c.Latitude  > south
                                        && c.Longitude < east  && c.Longitude > west
                                     select c).Take(20);

            StringBuilder str = new StringBuilder();
            str.Append("<?xml version=\"1.0\" encoding=\"UTF-8\" ?>\r\n");
            str.Append("<kml xmlns=\"https://earth.google.com/kml/2.2\">\r\n");
            str.Append("<Document>\r\n");
            str.Append("\t<Style id=\"myStationStyles\"><IconStyle><scale>1</scale>"
                     + "<Icon><href>/School/UploadFiles_7810/201103/20110325105216297.png</href>"
                     + "</Icon></IconStyle></Style>");

            foreach (var mystation in StationMarkerlist)
            {
                str.Append("<Placemark>\r\n");
                str.Append(string.Format("\t<name><![CDATA[{0}]]></name>\r\n",
                                         mystation.StationName));
                str.Append(string.Format("\t<description><![CDATA[{0}]]></description>\r\n",
                                         mystation.StationName));
                str.Append("<styleUrl>#myStationStyles</styleUrl>");
                str.Append(string.Format("\t<Point><coordinates>{0}</coordinates></Point>\r\n",
                                         mystation.Longitude + "," + mystation.Latitude + ",0"));
                str.Append("</Placemark>\r\n");
            }

            str.Append("</Document>\r\n");
            str.Append("</kml>");

            ctx.Dispose();

            Response.Clear();
            Response.ContentType = "application/vnd.google-earth.kml+xml";
            Response.Write(str.ToString());
            Response.End();
        }
    }
}
由於使用者每停止操作一次就會重新請求這個頁面,限制回傳筆數(這裡用 Take(20))對節省頻寬很有效果——等使用者放大到某個區域時,自然就能看到細節。當然也可以改以重要度或地圖層級作為取捨依據。
三、回傳的資料長什麼樣子
直接在瀏覽器中拜訪 https://huoche.omgsoft.com.cn/ge/test.aspx?BBOX=81.9140625,21.69826549685252,130.25390625,49.66762782262192 就能模擬一次請求,確認輸出是否正確。為節省篇幅,以下只列出兩個地標:
<?xml version="1.0" encoding="UTF-8" ?>
<kml xmlns="https://earth.google.com/kml/2.2">
  <Document>
    <Style id="myStationStyles">
      <IconStyle><scale>1</scale><Icon>
        <href>/School/UploadFiles_7810/201103/20110325105216297.png</href>
      </Icon></IconStyle>
    </Style>
    <Placemark>
      <name><![CDATA[口前火車站]]></name>
      <description><![CDATA[<img src="" /><a href="https://huoche.omgsoft.com.cn/Station/Show.aspx?s=1162">口前站</a>]]></description>
      <styleUrl>#myStationStyles</styleUrl>
      <Point><coordinates>126.495208740234,43.66364961298,0</coordinates></Point>
    </Placemark>
    <Placemark>
      <name><![CDATA[章黨火車站]]></name>
      <description><![CDATA[<img src="" /><a href="https://huoche.omgsoft.com.cn/Station/Show.aspx?s=1178">章黨站</a>]]></description>
      <styleUrl>#myStationStyles</styleUrl>
      <Point><coordinates>124.070148468018,41.9063653897096,0</coordinates></Point>
    </Placemark>
  </Document>
</kml>
各標籤的含義可對照文末的 KML 參考文件。要留意的是,部分設定節在網頁端是看不到效果的——例如 scale(圖示比例)和 LookAt(視角)這類參數,只有在 GE 裡才會真正生效。
四、在網頁上載入
網頁端的呼叫程式碼如下:
<!DOCTYPE html PUBLIC "-//W3C//DTD XHTML 1.0 Strict//EN"
"https://www.w3.org/TR/xhtml1/DTD/xhtml1-strict.dtd">
<html xmlns="https://www.w3.org/1999/xhtml" xmlns:v="urn:schemas-microsoft-com:vml">
<head>
<meta http-equiv="content-type" content="text/html; charset=utf-8"/>
<title>動態地標範例</title>
<script src="https://maps.google.com/maps?file=api&v=2&key=YOUR_KEY"
type="text/javascript"></script>
<script type="text/javascript">
var map;
var geoXML;
function initialize() {
if (GBrowserIsCompatible()) {
geoXML = new GGeoXML("https://huoche.omgsoft.com.cn/ge/omg.kml");
map = new GMap2(document.getElementById("map_canvas"));
map.setCenter(new GLatLng(36.94, 106.08), 4);
map.addControl(new GLargeMapControl());
map.addOverlay(geoXML);
}
}
</script>
</head>
<body onload="initialize()">
<div id="map_canvas" style="width: 640px; height: 480px; float:left; border: 1px solid black;"></div>
</body>
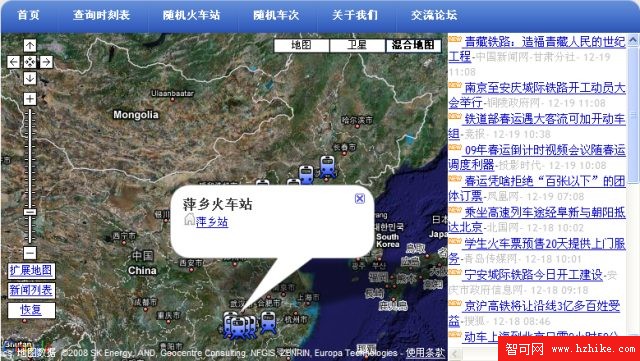
</html>由於網頁會被下載到用戶端,這段 JavaScript 是在瀏覽器裡執行的。實務上常踩到的一個坑是:部分伺服器(例如 Windows Server 2003 SP2)預設不提供 kml 檔的下載。解法是在 IIS 中開啟「網際網路資訊服務」下的本機電腦,按右鍵選「內容」→「MIME 類型」→「新增」,在「副檔名」填 .kml,「MIME 類型」填 application/vnd.google-earth.kml+xml,確定後重啟 IIS 即可。完成後的效果如下:
五、在 Google Earth 中使用
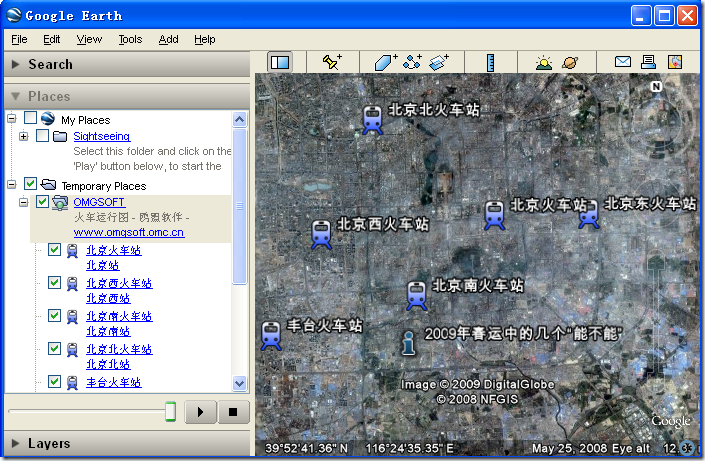
直接用 GE 開啟那個 KML 檔,就能在地球軟體裡看到同一份資料源呈現出來的樣子。這也是動態地標最吸引人的地方:同一個資料來源,網頁與桌面軟體各自取用,資料永遠是即時的。
結語
把 NetworkLink、BBOX 參數與自寫的資料端點這三塊拼起來,一個會自己更新的地標服務就成形了。這個模式不限於車站資料,任何帶經緯度的內容都能套用。希望這篇拆解對你的開發有所幫助,祝編程愉快!