上一篇已經做過效果展示與整體概述,從這一篇開始,我會把整個實作過程一步步還原出來。希望讀者跟著這些步驟走一遍,就能掌握用 XAML 排版網頁的基本思路。
先設定頁面屬性
我們從定義頁面的基本屬性開始:
<Page
 XMLns="https://schemas.microsoft.com/winfx/2006/xaml/presentation"
 XMLns:x="https://schemas.microsoft.com/winfx/2006/xaml"
 WindowTitle="MailMail"
 FontFamily="微軟雅黑"
 Background="#FF424242"
 SnapsToDevicePixels="True"></Page>
其中 WindowTitle 就是頁面的標題。
SnapsToDevicePixels 這個屬性相當關鍵,它會讓圖形自動對齊到裝置像素,消除模糊的邊緣,使畫面看起來更接近我們熟悉的傳統網頁。
加上捲動檢視方塊
接下來是個容易被忽略、卻很有意思的細節:我們得在頁面裡放一個 ScrollViewer,否則內容超出螢幕時不會出現捲動條,這些都得自己動手處理:
<ScrollViewer HorizontalScrollBarVisibility="Auto" VerticalScrollBarVisibility="Auto"></ScrollViewer>把水平和垂直捲動條的顯示方式都設為 Auto 是比較好的做法,這樣在不需要時它們會自動隱藏。
用 Grid 做整體佈局
ScrollViewer 裡面要放一個 Grid 來負責整體佈局:
<Grid MinHeight="900" MinWidth="1000">
 <Grid.ColumnDefinitions>
 <ColumnDefinition Width="8*"/>
 <ColumnDefinition Width="84*"/>
 <ColumnDefinition Width="8*"/>
 </Grid.ColumnDefinitions>
</Grid>
這裡定義了三欄,左右兩側各留 8% 當作留白,中間 84% 是頁面主體。
用 DockPanel 細分區塊
接著在 Grid 裡放一個 DockPanel 來做更細的佈局:
<DockPanel Background="#FFF" Grid.Column="1"></DockPanel>DockPanel 裡裝的就是頁面的各個區塊了:
<DockPanel x:Name="Head" DockPanel.Dock="Top" Background="#FF4A4A4A" Height="115"></DockPanel>
<Border x:Name="HeadLine" Background="#888" BorderThickness="0,1" DockPanel.Dock="Top" Height="15"></Border>
<Grid x:Name="Show" Background="#EEE" DockPanel.Dock="Top" Height="135" ClipToBounds="True"></Grid>
<Border x:Name="Channel" DockPanel.Dock="Top" Height="50" Background="#FF8E45" BorderThickness="0,1,0,0" BorderBrush="#FFF"></Border>
<Border x:Name="Footer" Background="#666" BorderBrush="#888" BorderThickness="0,4,0,0" DockPanel.Dock="Bottom" Height="55"></Border>
<DockPanel x:Name="Body" Background="#FFFFFCD1"></DockPanel>
只要透過 DockPanel.Dock 屬性,就能把各個區塊精準地放到它該在的位置。實務上的應用可以比這複雜得多,但實作起來一樣輕鬆簡單。
順帶一提:一旦真正掌握了 WPF 的佈局方式,再回頭用其他環境排版,真的會有想捶墙的衝動~
目前的成果
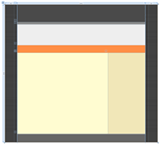
現在,我們的介面長這樣:

我把每個區塊都命名並對應到上圖,這只是為了方便理解,並非必要。
接著在 Body 中加入兩個區塊,也就是側欄與內容:
<DockPanel x:Name="Side" Background="#1E874900" DockPanel.Dock="Right" Width="245"></DockPanel>
<StackPanel x:Name="Content"></StackPanel>
其實不用 Body,直接把這兩個元素放到上層也沒問題;我這麼做,只是想讓它們共用同一個背景。
到目前為止的完整程式碼如下:
<Page
 XMLns="https://schemas.microsoft.com/winfx/2006/xaml/presentation"
 XMLns:x="https://schemas.microsoft.com/winfx/2006/xaml"
 WindowTitle="MailMail"
 FontFamily="微軟雅黑"
 Background="#FF424242"
 SnapsToDevicePixels="True">
 <ScrollViewer HorizontalScrollBarVisibility="Auto" VerticalScrollBarVisibility="Auto">
 <Grid MinHeight="900" MinWidth="1000">
 <Grid.ColumnDefinitions>
 <ColumnDefinition Width="8*"/>
 <ColumnDefinition Width="84*"/>
 <ColumnDefinition Width="8*"/>
 </Grid.ColumnDefinitions>
 <DockPanel Background="#FFF" Grid.Column="1">
 <DockPanel x:Name="Head" DockPanel.Dock="Top" Background="#FF4A4A4A" Height="115"></DockPanel>
 <Border x:Name="HeadLine" Background="#888" BorderThickness="0,1" DockPanel.Dock="Top" Height="15"></Border>
 <Grid x:Name="Show" Background="#EEE" DockPanel.Dock="Top" Height="135" ClipToBounds="True"></Grid>
 <Border x:Name="Channel" DockPanel.Dock="Top" Height="50" Background="#FF8E45" BorderThickness="0,1,0,0" BorderBrush="#FFF"></Border>
 <Border x:Name="Footer" Background="#666" BorderBrush="#888" BorderThickness="0,4,0,0" DockPanel.Dock="Bottom" Height="55"></Border>
 <DockPanel x:Name="Body" Background="#FFFFFCD1">
 <DockPanel x:Name="Side" DockPanel.Dock="Right" Width="245"></DockPanel>
 <StackPanel x:Name="Content"></StackPanel>
 </DockPanel>
 </DockPanel>
 </Grid>
 </ScrollViewer>
</Page>
這時它只包含了頁面的框架結構,以及一點最基本的樣式。
開始美化:製作背景填滿圖
接下來進行一些美化。開啟 Microsoft Expression Design,先做頁面的背景填滿圖:

新增一個名為 back 的圖層,隨手畫幾條平行線,顏色設為黑色,再給它們各自不同的粗細與極低的不透明度——低到你幾乎看不見它們。
接著選取它們,按右鍵 >「從選取範圍建立切片」,然後這樣設定切片屬性:

之後執行:檔案 > 匯出…
在「要匯出的項目」欄中選取「切片」:

選取我們的切片,點擊「全部匯出」按鈕右側的箭頭,選擇「匯出選取切片」選單項目:

這一系列操作能讓我們把每個切片分別存成獨立檔案,並自行決定要匯出哪些切片,之後的匯出都建議採用這種方式。
匯出的 XAML 內容如下:
<?XML version="1.0" encoding="utf-8"?>
<ResourceDictionary xmlns="https://schemas.microsoft.com/winfx/2006/xaml/presentation" XMLns:x="https://schemas.microsoft.com/winfx/2006/xaml">
<DrawingBrush x:Key="back" Stretch="Uniform">
<DrawingBrush.Drawing>
<DrawingGroup ClipGeometry="F1 M 0,0L 395.017,0L 395.017,466L 0,466L 0,0">
<DrawingGroup.Children>
<GeometryDrawing Geometry="F1 M 64,5.5L 331.017,5.5">
<GeometryDrawing.Pen>
<Pen Thickness="11" LineJoin="Round" Brush="#08000000"/>
</GeometryDrawing.Pen>
</GeometryDrawing>
<GeometryDrawing Geometry="F1 M 64,122.5L 331.017,122.5">
<GeometryDrawing.Pen>
<Pen Thickness="128" LineJoin="Round" Brush="#06000000"/>
</GeometryDrawing.Pen>
</GeometryDrawing>
<GeometryDrawing Geometry="F1 M 64,428.501L 331.017,428.501">
<GeometryDrawing.Pen>
<Pen Thickness="75" LineJoin="Round" Brush="#06000000"/>
</GeometryDrawing.Pen>
</GeometryDrawing>
<GeometryDrawing Geometry="F1 M 64,275.5L 331.017,275.5">
<GeometryDrawing.Pen>
<Pen Thickness="35" LineJoin="Round" Brush="#0B000000"/>
</GeometryDrawing.Pen>
</GeometryDrawing>
</DrawingGroup.Children>
</DrawingGroup>
</DrawingBrush.Drawing>
</DrawingBrush>
</ResourceDictionary>
我們需要幫「<DrawingBrush x:Key="back" Stretch="Uniform">」加上幾個屬性:
ViewportUnits="Absolute" Viewport="0,0,55,145" TileMode="FlipXY"這些屬性控制圖形的填滿方式。
現在回到主文件,準備載入這個背景,先以資源字典的形式將它引用進來:
<Page.Resources>
 <ResourceDictionary>
 <ResourceDictionary.MergedDictionaries>
 <ResourceDictionary Source="back.xaml"/>
 </ResourceDictionary.MergedDictionaries>
 </ResourceDictionary>
</Page.Resources>
然後為 Grid 加上背景屬性設定:
<Grid MinHeight="900" MinWidth="1000" Background="{StaticResource back}">這樣就完成了頁面背景樣式的設定。
用偽陰影凸顯主體
你會發現,頁面主體的區塊與背景之間的邊界不夠明顯:

我們可以用偽陰影來突出主體,也就是在頁面主題的兩側各加一段從黑色到透明的漸層,做法是往 Grid 裡放兩個矩形:
<Rectangle Width="20" Grid.Column="0" HorizontalAlignment="Right" Margin="0,0,0,0">
 <Rectangle.Fill>
 <LinearGradientBrush StartPoint="1,0" EndPoint="0,0">
 <GradientStop Color="#00000000" Offset="1" />
 <GradientStop Color="#20000000" Offset="0" />
 </LinearGradientBrush>
 </Rectangle.Fill>
</Rectangle>
<Rectangle Width="20" Grid.Column="3" HorizontalAlignment="Left" Margin="0,0,0,0">
 <Rectangle.Fill>
 <LinearGradientBrush StartPoint="1,0" EndPoint="0,0">
 <GradientStop Color="#00000000" Offset="0" />
 <GradientStop Color="#20000000" Offset="1" />
 </LinearGradientBrush>
 </Rectangle.Fill>
</Rectangle>
下面兩張圖分別是設計效果與實際效果:


至此,我們完成了基本的框架設計,此時設計檢視中的效果如下:

到目前為止的全部程式碼:
<Page
 XMLns="https://schemas.microsoft.com/winfx/2006/xaml/presentation"
 XMLns:x="https://schemas.microsoft.com/winfx/2006/xaml"
 WindowTitle="MailMail"
 FontFamily="微軟雅黑"
 Background="#FF424242"
 SnapsToDevicePixels="True">
 <Page.Resources>
 <ResourceDictionary>
 <ResourceDictionary.MergedDictionaries>
 <ResourceDictionary Source="back.xaml"/>
 </ResourceDictionary.MergedDictionaries>
 </ResourceDictionary>
 </Page.Resources>
 <ScrollViewer HorizontalScrollBarVisibility="Auto" VerticalScrollBarVisibility="Auto">
 <Grid MinHeight="900" MinWidth="1000" Background="{StaticResource back}">
 <Grid.ColumnDefinitions>
 <ColumnDefinition Width="8*"/>
 <ColumnDefinition Width="84*"/>
 <ColumnDefinition Width="8*"/>
 </Grid.ColumnDefinitions>
 <Rectangle Width="20" Grid.Column="0" HorizontalAlignment="Right" Margin="0,0,0,0">
 <Rectangle.Fill>
 <LinearGradientBrush StartPoint="1,0" EndPoint="0,0">
 <GradientStop Color="#00000000" Offset="1" />
 <GradientStop Color="#20000000" Offset="0" />
 </LinearGradientBrush>
 </Rectangle.Fill>
 </Rectangle>
 <Rectangle Width="20" Grid.Column="3" HorizontalAlignment="Left" Margin="0,0,0,0">
 <Rectangle.Fill>
 <LinearGradientBrush StartPoint="1,0" EndPoint="0,0">
 <GradientStop Color="#00000000" Offset="0" />
 <GradientStop Color="#20000000" Offset="1" />
 </LinearGradientBrush>
 </Rectangle.Fill>
 </Rectangle>
 <DockPanel Background="#FFF" Grid.Column="1">
 <DockPanel x:Name="Head" DockPanel.Dock="Top" Background="#FF4A4A4A" Height="115"></DockPanel>
 <Border x:Name="HeadLine" Background="#888" BorderThickness="0,1" DockPanel.Dock="Top" Height="15"></Border>
 <Grid x:Name="Show" Background="#EEE" DockPanel.Dock="Top" Height="135" ClipToBounds="True"></Grid>
 <Border x:Name="Channel" DockPanel.Dock="Top" Height="50" Background="#FF8E45" BorderThickness="0,1,0,0" BorderBrush="#FFF"></Border>
 <Border x:Name="Footer" Background="#666" BorderBrush="#888" BorderThickness="0,4,0,0" DockPanel.Dock="Bottom" Height="55"></Border>
 <DockPanel x:Name="Body" Background="#FFFFFCD1">
 <DockPanel x:Name="Side" Background="#1E874900" DockPanel.Dock="Right" Width="245"></DockPanel>
 <StackPanel x:Name="Content"></StackPanel>
 </DockPanel>
 </DockPanel>
 </Grid>
 </ScrollViewer>
</Page>
本篇就到這裡結束,後續篇章會繼續說明頁面主體中各個區塊的製作方式。
文中有任何不妥之處,都歡迎隨時指正。我不介意聽到不同意見,分歧正是交流與進步的起點,我需要向各位學習的東西還多得是:)
- 上一篇文章: XAML 網頁製作教學:頁頭視覺與資源整合
- 下一篇文章: 用 XAML 打造網頁(一):一場對抗 HTML 的實驗