用 HTML5 + CSS3 打造一個會自我驗證的註冊表單
編輯:HTML5詳解
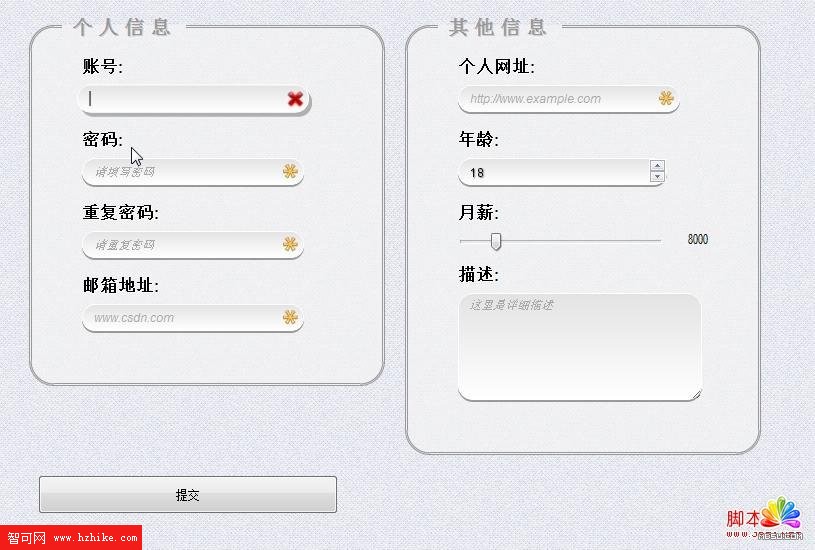
註冊表單是每個網站都少不了的元件,也是最能體現 HTML5 與 CSS3 威力的地方。這個範例示範了如何用幾乎零 JavaScript 的寫法,做出兼具視覺質感與即時驗證回饋的表單。
HTML 結構
表單分成兩個 fieldset:一組放帳號密碼等必要資訊,另一組放個人檔案。透過 HTML5 的 required、type、pattern 與 placeholder,驗證工作幾乎全交給瀏覽器處理。
<!DOCTYPE html>
<html>
<head>
  <meta http-equiv="Content-Type" content="text/html; charset=utf-8" />
  <link rel="stylesheet" href="css/style.css" />
</head>
<body>
<div id="wrapper">
  <div id="lbl"></div>
  <form>
    <fieldset id="account">
      <legend>個人資訊</legend>
      <label for="username">帳號:</label>
      <input id="username" class="textbox" type="text" name="username"
             required placeholder="請填寫帳號" />

      <label for="password1">密碼:</label>
      <input id="password1" class="textbox" type="password" name="password1"
             required placeholder="請填寫密碼" />

      <label for="password2">重複密碼:</label>
      <input id="password2" class="textbox" type="password" name="password2"
             required placeholder="請重複密碼" />

      <label for="email">郵箱地址:</label>
      <input id="email" class="textbox" type="email" name="email"
             required placeholder="name@example.com" />
    </fieldset>

    <fieldset id="personal">
      <legend>其他資訊</legend>
      <label for="website">個人網址:</label>
      <input id="website" class="textbox" type="url" name="website"
             required placeholder="https://www.example.com" />

      <label for="age">年齡:</label>
      <input id="age" class="textbox" type="number" name="age"
             min="18" step="2" placeholder="請填寫年齡" />

      <label for="salary">月薪:</label>
      <input id="salary" class="textbox" type="range" name="salary"
             min="0" max="50000" step="500" value="10000"
             onchange="showValue(this.value)" />
      <span id="rangevalue">10000</span>>

      <label for="description">描述:</label>
      <textarea id="description" name="description" cols="30" rows="5"
                placeholder="這裡是詳細描述"></textarea>
    </fieldset>

    <fieldset id="confirm">
      <input type="submit" value="提交" />
      <div class="clearfix"></div>
    </fieldset>
  </form>
</div>

<script>
  function showValue(value) {
    document.getElementById('rangevalue').innerHTML = value;
  }
</script>
</body>
</html>這裡有幾個細節值得注意:type="email" 與 type="url" 會觸發瀏覽器的格式驗證,type="range" 直接變成滑桿,onchange 則即時把目前數值同步到旁邊的 span 上。min="18" 加上 step="2" 還能限制只能填寫 18 以上的偶數年齡。
CSS 樣式
樣式部分的重點在於幾個 CSS3 技巧的組合運用:
- 用
rgba()疊加半透明背景,讓底圖隱約透出。 - 用
border-radius做出圓角卡片與膠囊狀輸入框。 - 用
:required、:valid、:invalid三個虛擬類別,依驗證狀態切換不同的背景圖示。 - 用
transition搭配transform: scale(),讓輸入框在聚焦時平滑放大。 - 用
::-webkit-input-placeholder與:-moz-placeholder客製提示文字的樣式。
body {
  background: url(bg.jpg) repeat;
  font-family: 'Arial Narrow', Arial, sans-serif;
  margin: 0;
  padding: 0;
}

header, section, footer { display: block; }

#wrapper {
  width: 770px;
  margin: 0 auto;
  text-align: center;
}

*:focus { outline: none; }

label, input, textarea, fieldset { display: block; }

/* 兩個資訊區塊並排,半透明圓角卡片 */
fieldset#account, fieldset#personal {
  width: 250px;
  padding: 0 50px 50px;
  margin: 10px;
  float: left;
  background: rgba(244, 244, 244, 0.7);
  border-radius: 25px;
  border: 3px double #999;
}

fieldset#confirm {
  padding-top: 10px;
  clear: both;
  border: none;
  line-height: 15px;
  margin: 10px 0;
}

legend {
  font-size: 20px;
  font-weight: bold;
  letter-spacing: 5px;
  color: #999;
  margin-left: -20px;
  text-align: left;
  padding: 0 10px;
  text-shadow: 1px 1px 0 #ccc;
}

label {
  font-size: 17px;
  font-weight: bold;
  margin: 17px 0 7px;
  text-align: left;
  text-shadow: 1px 1px 0 #fff;
}

/* 膠囊狀輸入框 + 漸層背景 + 下方陰影 */
input.textbox, textarea {
  padding: 5px 10px;
  border-radius: 15px;
  border: 1px solid #fff;
  width: 200px;
  text-shadow: 1px 1px 1px #777;
  box-shadow: 0 2px 0 #999;
  transition: all 0.5s ease-in-out;
  background: url(required.png) no-repeat 200px 5px, #F0F0EF;
  background: url(required.png) no-repeat 200px 5px,
              linear-gradient(to bottom, #E3E3E3, #FFFFFF);
}

textarea { resize: both; max-width: 230px; }

/* 聚焦時放大並加深陰影 */
input.textbox:focus, textarea:focus {
  transform: scale(1.1);
  box-shadow: 7px 7px 2px #ccc;
  text-shadow: 1px 1px 3px #777;
}

/* 依驗證狀態切換提示圖示 */
input.textbox:required          { /* 未填:required.png */ }
input.textbox:required:valid    { background-image: url(valid.png); }
input.textbox:focus:invalid,
input.textbox:not(:required):invalid { background-image: url(invalid.png); }

input[type=submit] {
  padding: 10px;
  margin: 0 10px;
  width: 300px;
}

#rangevalue {
  display: block;
  text-align: right;
  margin-top: -25px;
}

input::-webkit-input-placeholder,
textarea::-webkit-input-placeholder,
input:-moz-placeholder,
textarea:-moz-placeholder {
  color: #aaa;
  font-style: italic;
  text-shadow: 1px 1px 0 #fff;
}

.clearfix { clear: both; }
幾點實務提醒
第一,範例中的 -webkit- 與 -moz- 前綴在今日已大致可以省略,現代瀏覽器普遍支援無前綴的 border-radius、box-shadow、linear-gradient 與 transition。
第二,:required、:valid、:invalid 這組選擇器在舊版 IE 完全不支援,因此那個「依狀態變圖示」的效果在 IE9 以下會失效——但表單本身仍然可用,因為驗證邏輯是由瀏覽器負責,不支援時就退化成沒有提示,不會出錯。
第三,前端驗證只是使用者體驗,絕不能取代伺服器端驗證。任何欄位在寫入資料庫之前都必須在後端重新檢查一次,否則對方只要停用 JavaScript 或直接送出手工的 HTTP 請求就能繞過所有限制。
- 上一篇文章: HTML5 元素擴展(上):新增標籤與使用要點總覽
- 下一篇文章: 純 HTML5 + CSS3 打造下拉式導航選單