官方 IDE 更新到 0.11.112301 版後移除了對 Promise 的支援,原本的事項助手因此跑不起來。解法是在專案裡引入 Bluebird 這個第三方相容庫把 Promise 補回來,相關改動已整合進範例碼中。
距離上一篇小程序隨筆已有一段時間,說穿了是不知道該寫什麼:豆瓣圖書與知乎日報把基礎部分講得差不多,而進階 API 有些在 IDE 裡還無法完整除錯。之前發表知乎日報範例後,有網友問有沒有能顯示完整月曆的元件,翻了一輪發現官方並沒有提供,於是決定拿這個功能來練手。準備期間開發者工具又升了幾版,舊寫法出現不相容,只能邊改邊寫。既然官方腳步不停,我也只好跟著更新,這次改用 IDE 已支援的 ES6 語法與新 API。
要做的東西叫「事項助手」,其實和正經的待辦清單沾不上太多邊——資料層只有新增與刪除,真正的主角是日曆。日曆元件在 Web 世界裡 plugins 一大堆,但小程序不吃傳統 plugin 那套,一切以資料驅動。
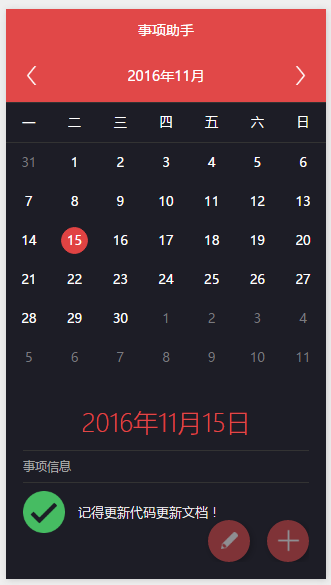
市面上的月曆選擇器大同小異:顯示西元與月份、可切換年月、可點選某一天。版面我做得中規中矩,頭部放當前年月與左右翻頁鈕,下半部是日期格;由於每月天數不同而格數固定,非本月日期以灰色呈現,本月日期高亮。
先熱身:這個案例用到的 ES6 語法
以下整理幾個在案例中實際出現的寫法。我也還在學,範例中難免夾雜舊式寫法。
let 與 const
let version = '1.0.0';
const weekday = 7;
version = '2.0.0';   // OK
weekday = 8;         // 錯誤:const 宣告的常數不可重新賦值
我的習慣是用全大寫加底線命名全域常數,例如 const CONFIG_COLOR = '#FAFAFA';。
物件方法屬性簡寫
每個頁面對應的 js 檔裡少不了 Page 函式,過去要寫成 key: function() 的形式:
Page({
  data: { userAvatar: './images/avatar.png', userName: 'Oopsguy' },
  onLoad: function () { /* ... */ },
  onReady: function () { /* ... */ }
});
ES6 之後可以直接省略 function 關鍵字:
Page({
  data: { userAvatar: './images/avatar.png', userName: 'Oopsguy' },
  onLoad() { /* ... */ },
  onReady() { /* ... */ }
});
類別
class Animal {
  constructor() { }
  eat() { }
  static doSomething(param) { /* ... */ }
}
module.exports = Animal;

let animal = new Animal();
animal.eat();
Animal.doSomething('param');   // 靜態方法
對照以前的原型寫法就能看出差別:
var Animal = function () { };
Animal.prototype.eat = function () { };
Animal.doSomething = function (param) { };
module.exports = Animal;
解構賦值
把陣列元素或物件屬性直接拆出來用,是我最喜歡的新語法之一:
let obj = { fullName: 'Xiao Ming', gender: 'male', role: 'admin' };
let arr = ['elem1', 1, 30, 'arrayElem3'];
let { fullName, role } = obj;
let [elem1, elem2] = arr;
console.log(fullName, role, elem1, elem2);   // Xiao Ming admin elem1 1
以前要從頁面資料裡取三個欄位得這樣寫:
let year = this.data.year, month = this.data.month, day = this.data.day;
用解構只要一行:
let { year, month, day } = this.data;引入模組時同理,可以只挑需要的成員:
import { log } from '../../utils/util';
log('Application initialized !!');
import…from… 等同小程序原本的 require,但多了「只取我要的部分」這個能力。
箭頭函數
我第一次看到箭頭函數時心想:這不就是 lambda 運算式嗎。它確實精簡了函式寫法,但和普通 function 有一個關鍵差異——作用域。
wx.request({
  url: 'url',
  header: { 'Content-Type': 'application/json' },
  success: (res) => { console.log(res.data) }
});
看到這裡千萬不要急著全面改用箭頭函數。取裝置視窗高度是很典型的場景:
Page({
  data: { windowHeight: 0 },
  onLoad() {
    let _this = this;
    wx.getSystemInfo({
      success: function (res) {
        _this.setData({ windowHeight: res.windowHeight });
      }
    });
  }
});
傳統寫法之所以要宣告 _this,是因為 success 回呼的作用域與 onLoad 不同,直接寫 this.setData 會指向錯誤的物件。箭頭函數不綁定自己的 this,會沿作用域鏈往外找,因此下面這種寫法也完全可行:
Page({
  data: { windowHeight: 0 },
  onLoad() {
    wx.getSystemInfo({
      success: (res) => {
        this.setData({ windowHeight: res.windowHeight });
      }
    });
  }
});
個人習慣上,不論用哪種寫法我都會宣告 _this 指向需要的 this。層數一深,箭頭函數的 this 反而更難追,本案例也沿用這個習慣。
Promise 告別回呼地獄
寫 JS 除了陣列物件,最常打交道的就是回呼函式。多層嵌套時那些回呼堆得像樓梯一樣壯觀,Promise 就是為了解決這件事而生。
new Promise((resolve, reject) => {
  // 成功:resolve();
  // 失敗:reject();
});
resolve 與 reject 可以理解為 success 與 fail 的狀態切換。鏈式 then 的兩個參數同樣是 resolve 與 reject 回呼,而 catch 用來攔截流程中拋出的異常:
let ret = true;
let pro = new Promise((resolve, reject) => {
  ret ? resolve('true') : reject('false');
})
.then((res) => { console.log(res); return 'SUCCESS'; },
      (rej) => { console.log(rej); return 'ERROR'; })
.then((success) => { console.log(success); })
.catch((ex) => { console.log(ex); });
對比傳統的巢狀寫法,差距很明顯:
$.get('/user/1/avatar', (data) => {
  $('#avatar img').attr('src', data['avatar']);
  setTimeout(() => {
    console.log('SUCCESS');
    setTimeout(() => {
      alert('ERROR');
      setTimeout(() => { console.log('ERROR'); }, 1000);
    }, 3000)
  }, 2000);
});
改用 Promise 之後:
function sleep(time) {
  return new Promise((resolve) => { setTimeout(resolve, time); });
}
new Promise((resolve) => { $.get('/user/1/avatar', resolve); })
  .then((avatar) => { $('#avatar img').attr('src', avatar); })
  .then(() => sleep(2000))
  .then(() => { console.log('SUCCESS'); return sleep(3000); })
  .then(() => { alert('ERROR'); return sleep(1000); })
  .then(() => { console.log('ERROR'); });
程式碼行數說不定還變多了,但可讀性提升很明顯:不必再寫一堆嵌套回呼,用同步的寫法拿到異步的效果。
小程序 app.js 裡常見的取得使用者資訊寫法,就是個適合改寫的對象:
App({
  getUserInfo: function (cb) {
    var that = this
    if (this.globalData.userInfo) {
      typeof cb == "function" && cb(this.globalData.userInfo)
    } else {
      wx.login({
        success: function () {
          wx.getUserInfo({
            success: function (res) {
              that.globalData.userInfo = res.userInfo
              typeof cb == "function" && cb(that.globalData.userInfo)
            }
          })
        }
      })
    }
  }
});
wx.login 與 wx.getUserInfo 都有 success 與 fail,可以抽成通用的 Promise 包裝:
function promiseHandle(func, options) {
  options = options || {};
  return new Promise((resolve, reject) => {
    if (typeof func !== 'function') reject();
    options.success = resolve;
    options.fail = reject;
    func(options);
  });
}

App({
  getUserInfo(cb) {
    if (typeof cb !== "function") return;
    let that = this;
    if (that.globalData.userInfo) {
      cb(that.globalData.userInfo);
    } else {
      promiseHandle(wx.login)
        .then(() => promiseHandle(wx.getUserInfo))
        .then((res) => {
          that.globalData.userInfo = res.userInfo;
          cb(that.globalData.userInfo);
        })
        .catch((err) => { log(err); });
    }
  }
});
層次淺了、意圖清楚了,這就是 Promise 的價值。本案例中的回呼嵌套其實不多,但只要出現,我都盡量用 Promise 處理,順便把 ES6 新特性練一遍。
動手前的思路整理
日期計算
日期相關一律靠 Date 物件:
let date = new Date();
let day = date.getDate();          // 當月第幾天
let month = date.getMonth() + 1;   // 月份從 0 起算
let year = date.getFullYear();
求某月天數有個小技巧——把「日」設為 0 就會回落到上個月的最後一天:
let dayCount = new Date(currentYear, currentMonth, 0).getDate();
除了當月,翻頁時還需要上一頁與下一頁的年月,而 1 月與 12 月要額外處理跨年:
data = {
  currentDate: currentDateObj.getDate(),      // 今天幾號
  currentYear: currentDateObj.getFullYear(),  // 今年
  currentDay: currentDateObj.getDay(),        // 今天星期幾
  currentMonth: currentDateObj.getMonth() + 1,
  showMonth: showMonth,   // 目前顯示月份
  showDate: showDate,     // 目前顯示月份的第幾天
  showYear: showYear,     // 目前顯示月份的年份
  beforeYear: beforeYear, // 上一頁年份
  beforMonth: beforMonth, // 上一頁月份
  afterYear: afterYear,   // 下一頁年份
  afterMonth: afterMonth, // 下一頁月份
  selected: selected      // 使用者選中的日期
};
有了顯示還不夠,還要能選。年月用 picker 元件解決,選每一天則得在每個格子綁 tap 事件;使用者翻頁後仍要記得選了哪天,所以 selected 必須妥善保存。
資料緩存
官方提供的緩存 API 不少,這裡只用到兩個:
// 寫入
let allData = [{ id: 1, title: 'title1' }, { id: 2, title: 'title2' }];
wx.setStorageSync({ key: Config.ITEMS_SAVE_KEY, data: allData });

// 讀取
wx.getStorage({
  key: Config.ITEMS_SAVE_KEY,
  success: allData => {
    let obj1 = allData[0];
    console.log(obj1.title);
  }
});
日曆的結構與事件
首頁的 wxml 切成 header、week、body 三段。header 放翻頁鈕與年月資訊,下面兩塊放星期表頭與日期格。分欄我用的是最樸素的百分比(100/7),想講究一點可以改用 flex。
<view class="og-calendar">
  <view class="header">
    <view class="btn month-pre" bindtap="changeDateEvent"
          data-year="{{data.beforeYear}}" data-month="{{data.beforMonth}}">
      <image src="../../images/prepage.png" />
    </view>
    <view class="date-info">
      <picker mode="date" fields="month" value="{{pickerDateValue}}"
              bindchange="datePickerChangeEvent">
        <text>{{data.showYear}}年{{data.showMonth > 9 ? data.showMonth : ('0' + data.showMonth)}}月</text>
      </picker>
    </view>
    <view class="btn month-next" bindtap="changeDateEvent"
          data-year="{{data.afterYear}}" data-month="{{data.afterMonth}}">
      <image src="../../images/nextpage.png" />
    </view>
  </view>
  <view class="week row">
    <view class="col"><text>一</text></view>
    <!-- 二 ~ 日 同理 -->
  </view>
  <view class="body row">
    <block wx:for="{{data.dates}}" wx:key="_id">
      <view bindtap="dateClickEvent"
            data-year="{{item.year}}" data-month="{{item.month}}" data-date="{{item.date}}"
            class="col {{data.showMonth == item.month ? '' : 'old'}} ...">
        <text>{{item.date}}</text>
      </view>
    </block>
  </view>
</view>
左右翻頁鈕各自帶著 data-year 與 data-month,點擊時才知道該往哪翻:
changeDateEvent(e) {
  const { year, month } = e.currentTarget.dataset;
  changeDate.call(this, new Date(year, parseInt(month) - 1, 1));
}
日期格上的 class 綁了一串判斷:old 代表非本月(灰色)、current 代表今天(實心底色)、active 代表目前選中。點格子時除了更新畫面,還要把選中結果寫回 selected:
dateClickEvent(e) {
  const { year, month, date } = e.currentTarget.dataset;
  const { data } = this.data;
  data['selected']['year'] = year;
  data['selected']['month'] = month;
  data['selected']['date'] = date;
  this.setData({ data: data });
  changeDate.call(this, new Date(year, parseInt(month) - 1, date));
}
核心的 changeDate 有點長,但大部分是變數宣告與計算,真正的業務邏輯並不多:
function changeDate(targetDate) {
  let date = targetDate || new Date();
  let currentDateObj = new Date();
  let showMonth, showYear, showDay, showDate,
      showMonthFirstDateDay, showMonthLastDateDay, showMonthDateCount;
  let data = [];

  showDate = date.getDate();
  showMonth = date.getMonth() + 1;
  showYear = date.getFullYear();
  showDay = date.getDay();
  showMonthDateCount = new Date(showYear, showMonth, 0).getDate();

  date.setDate(1);
  showMonthFirstDateDay = date.getDay();     // 本月 1 號是星期幾
  date.setDate(showMonthDateCount);
  showMonthLastDateDay = date.getDay();      // 本月最後一天是星期幾

  let beforeDayCount = 0, beforeYear, beforMonth,
      afterYear, afterMonth, afterDayCount = 0, beforeMonthDayCount = 0;

  beforMonth = showMonth === 1 ? 12 : showMonth - 1;
  beforeYear = showMonth === 1 ? showYear - 1 : showYear;
  afterMonth = showMonth === 12 ? 1 : showMonth + 1;
  afterYear  = showMonth === 12 ? showYear + 1 : showYear;

  // 前面要補幾格、後面要補幾格
  if (showMonthFirstDateDay != 0) beforeDayCount = showMonthFirstDateDay - 1;
  else beforeDayCount = 6;
  if (showMonthLastDateDay != 0) afterDayCount = 7 - showMonthLastDateDay;
  else showMonthLastDateDay = 0;

  // 不足 6 列就補滿,固定 42 格
  let tDay = showMonthDateCount + beforeDayCount + afterDayCount;
  if (tDay <= 35) afterDayCount += (42 - tDay);

  // 翻頁不能弄丟使用者選中的日期
  let selected = this.data.data['selected'] || { year: showYear, month: showMonth, date: showDate };
  let selectDateText = selected.year + '年' + formatNumber(selected.month)
                     + '月' + formatNumber(selected.date) + '日';

  data = {
    currentDate: currentDateObj.getDate(),
    currentYear: currentDateObj.getFullYear(),
    currentDay: currentDateObj.getDay(),
    currentMonth: currentDateObj.getMonth() + 1,
    showMonth, showDate, showYear,
    beforeYear, beforMonth, afterYear, afterMonth,
    selected, selectDateText
  };

  let dates = [];
  let _id = 0;
  if (beforeDayCount > 0) {
    beforeMonthDayCount = new Date(beforeYear, beforMonth, 0).getDate();
    for (let fIdx = 0; fIdx < beforeDayCount; fIdx++) {
      dates.unshift({ _id: _id, year: beforeYear, month: beforMonth,
                      date: beforeMonthDayCount - fIdx });
      _id++;
    }
  }
  for (let cIdx = 1; cIdx <= showMonthDateCount; cIdx++) {
    dates.push({
      _id: _id,
      active: (selected['year'] == showYear && selected['month'] == showMonth
               && selected['date'] == cIdx),
      year: showYear, month: showMonth, date: cIdx
    });
    _id++;
  }
  if (afterDayCount > 0) {
    for (let lIdx = 1; lIdx <= afterDayCount; lIdx++) {
      dates.push({ _id: _id, year: afterYear, month: afterMonth, date: lIdx });
      _id++;
    }
  }
  data.dates = dates;
  this.setData({ data: data, pickerDateValue: showYear + '-' + showMonth });
  loadItemListData.call(this);
}
歸納起來就是三件事:算出本月資訊、算出上下頁資訊、把 42 個格子填滿。
年月選擇器
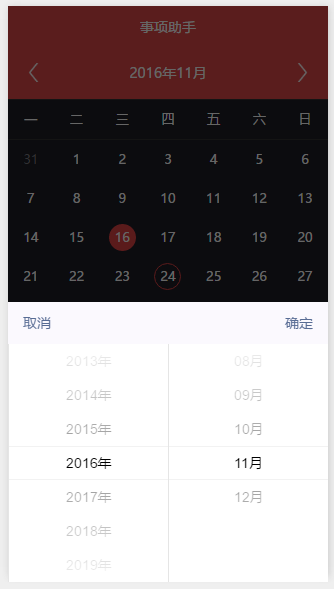
newer 版本的 picker 已支援 mode="date" 的原生日期選擇風格,觸發區就掛在日曆 header 上:
<view class="date-info">
  <picker mode="date" fields="month" value="{{pickerDateValue}}"
          bindchange="datePickerChangeEvent">
    <text>{{data.showYear}}年...月</text>
  </picker>
</view>
fields="month" 表示精度只到月,選完觸發事件後重新計算日曆:
datePickerChangeEvent(e) {
  const date = new Date(Date.parse(e.detail.value));
  changeDate.call(this, new Date(date.getFullYear(), date.getMonth(), 1));
}
事項的存取層
說是待辦,其實就是個功能不全的 TODO:標題、內容、等級三個欄位。既然要落地儲存,就得操作緩存。我借鑑 Java 的思維分了兩層:DataRepository 負責 CRUD,DataService 負責業務,設定則放進 Config。
先在 util 裡準備三個共用工具:guid 產生唯一 id、log 記錄日誌、promiseHandle 把小程序的異步 API 統一包成 Promise。
function guid() {
  return 'xxxxxxxx-xxxx-4xxx-yxxx-xxxxxxxxxxxx'.replace(/[xy]/g, function (c) {
    let r = Math.random() * 16 | 0, v = c == 'x' ? r : (r & 0x3 | 0x8);
    return v.toString(16);
  });
}
function log(msg) {
  if (!msg) return;
  if (getApp().settings['debug']) console.log(msg);
  let logs = wx.getStorageSync('logs') || [];
  logs.unshift(msg)
  wx.setStorageSync('logs', logs)
}
function promiseHandle(func, options) {
  options = options || {};
  return new Promise((resolve, reject) => {
    if (typeof func !== 'function') reject();
    options.success = resolve;
    options.fail = reject;
    func(options);
  });
}
module.exports = { guid: guid, log: log, promiseHandle: promiseHandle }
設定檔很單純:
module.exports = {
  ITEMS_SAVE_KEY: 'todo_item_save_Key',
  LEVEL: { normal: 1, warning: 2, danger: 3 }
};
倉儲層把每個操作都串成 Promise 鏈,讀→改→寫一氣呵成:
import Config from 'Config';
import { guid, log, promiseHandle } from '../utils/util';

class DataRepository {
  static addData(data) {
    if (!data) return false;
    data['_id'] = guid();
    return DataRepository.findAllData().then(allData => {
      allData = allData || [];
      allData.unshift(data);
      wx.setStorage({ key: Config.ITEMS_SAVE_KEY, data: allData });
    });
  }
  static removeData(id) {
    return DataRepository.findAllData().then(data => {
      if (!data) return;
      for (let idx = 0, len = data.length; idx < len; idx++) {
        if (data[idx] && data[idx]['_id'] == id) { data.splice(idx, 1); break; }
      }
      wx.setStorage({ key: Config.ITEMS_SAVE_KEY, data: data });
    });
  }
  static findAllData() {
    return promiseHandle(wx.getStorage, { key: Config.ITEMS_SAVE_KEY })
      .then(res => res.data ? res.data : [])
      .catch(ex => { log(ex); });
  }
  static findBy(predicate) {
    return DataRepository.findAllData().then(data => {
      if (data) { data = data.filter(item => predicate(item)); }
      return data;
    });
  }
}
module.exports = DataRepository;
業務層負責把「日期」翻譯成查詢條件,並在新增前做必填檢查:
import DataRepository from 'DataRepository';

class DataService {
  constructor(props) {
    props = props || {};
    this.id = props['_id'] || 0;
    this.content = props['content'] || '';
    this.date = props['date'] || '';
    this.month = props['month'] || '';
    this.year = props['year'] || '';
    this.level = props['level'] || '';
    this.title = props['title'] || '';
  }
  save() {
    if (this._checkProps()) {
      return DataRepository.addData({
        title: this.title, content: this.content,
        year: this.year, month: this.month, date: this.date,
        level: this.level, addDate: new Date().getTime()
      });
    }
  }
  static findAll() {
    return DataRepository.findAllData().then(data => data.data ? data.data : []);
  }
  static findById(id) {
    return DataRepository.findBy(item => item['_id'] == id)
      .then(items => (items && items.length > 0) ? items[0] : null);
  }
  delete() { return DataRepository.removeData(this.id); }
  static findByDate(date) {
    if (!date) return [];
    return DataRepository.findBy(item => {
      return item && item['date'] == date.getDate()
          && item['month'] == date.getMonth()
          && item['year'] == date.getFullYear();
    }).then(data => data);
  }
  _checkProps() {
    return this.title && this.level && this.date && this.year && this.month;
  }
}
module.exports = DataService;
我對陣列操作還不算熟,這部分程式碼略顯臃腫,僅供參考。
事項列表
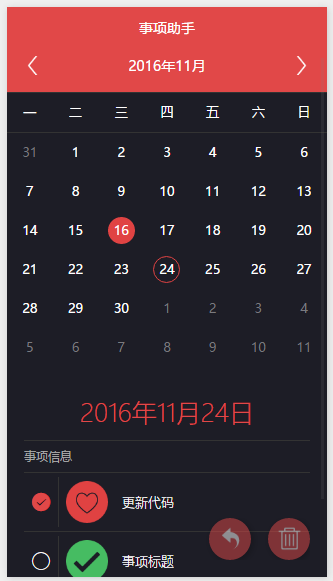
列表放在日曆下方,等級用不同顏色圖示區分,一眼就能看出輕重:
<view class="common-list">
  <block wx:for="{{itemList}}" wx:key="id">
    <view class="item" bindtap="listItemClickEvent" data-id="{{item._id}}"
          bindlongtap="listItemLongTapEvent">
      <view class="inner {{isEditMode ? 'with-check' : ''}}">
        <image wx:if="{{item.level == 1}}" class="icon" src="../../images/success.png" />
        <image wx:if="{{item.level == 2}}" class="icon" src="../../images/notice.png" />
        <image wx:if="{{item.level == 3}}" class="icon" src="../../images/fav-round.png" />
        <view class="content"><text class="title">{{item.title}}</text></view>
      </view>
    </view>
  </block>
  <view class="header text-center" wx:if="{{!itemList || itemList.length <= 0}}">
    <text>當前日期沒有事項記錄</text>
  </view>
</view>
載入列表時,傳入目前選中的日期即可:
function loadItemListData() {
  const { year, month, date } = this.data.data.selected;
  let _this = this;
  DataService.findByDate(new Date(Date.parse([year, month, date].join('-'))))
    .then((data) => { _this.setData({ itemList: data }); });
}
新增面板與動畫
首頁右下角有浮動操作鈕,點它就展開新增面板,日期預設帶入目前選中那天。面板平時藏在螢幕下方,用 animation API(本質仍是 CSS3 動畫)做出上滑效果:
function showUpdatePanel() {
  let animation = wx.createAnimation({ duration: 600 });
  animation.translateY('-100%').step();
  this.setData({ updatePanelAnimationData: animation.export() });
}
function closeUpdatePanel() {
  let animation = wx.createAnimation({ duration: 600 });
  animation.translateY('100%').step();
  this.setData({ updatePanelAnimationData: animation.export() });
}
進頁時抓一次螢幕高度,讓面板高度等於視窗高度,上滑 100% 剛好覆蓋整個畫面。儲存的邏輯很直白:
saveDataEvent() {
  const { todoInputValue, todoTextAreaValue, levelSelectedValue } = this.data;
  const { year, month, date } = this.data.data.selected;
  if (todoInputValue !== '') {
    let promise = new DataService({
      title: todoInputValue,
      content: todoTextAreaValue,
      level: levelSelectedValue,
      year: year, month: parseInt(month) - 1, date: date
    }).save();
    promise && promise.then(() => {
      this.setData({ todoTextAreaValue: '', levelSelectedValue: '', todoInputValue: '' });
      loadItemListData.call(this);
    })
    closeUpdatePanel.call(this);
  } else {
    showModal.call(this, '請填寫事項內容');
  }
}
剩下的刪除與檢視邏輯 similarly 簡單,這裡不再展開,畢竟本文主角是小程序的 ES6 開發方式。
寫完這篇時,小程序已公測一段時間。我還只是個人開發者,拿不到公測資格,熱情難免打了折扣。接觸小程序一個多月、寫了三個範例,至少能交出點東西,也算不辜負這番折騰。
實際效果

源碼可於文章附錄的 demo 位址下載。希望對想在小程序裡試用 ES6 的朋友有參考價值。
相關文章
-
微信小程序實作換膚功能(夜間模式) JavaScript ES6:const、let 與 var 的完整對比 微信小程序上下滾動公告通知實作(swiper 元件) 微信小程序實作:豆瓣電影影評小程序完整程式碼 微信小程序串接 WebSocket:SpringMVC + Spring + MyBatis 實作 微信小程序 rich-text 元件用法完整解析 微信小程序自訂提示框實作教學(取代 wx.showToast) ES6 新增的 Math 與 Number 方法整理 微信小程序 movable-view 實現圖片拖動與雙指縮放 微信小程序中如何渲染 HTML 富文本內容(wxParse 實操)