微信小程序在剛推出那段時間討論度極高,我也抱著試水的心態裝上了官方的 Web 開發者工具。整體第一印象是簡潔——甚至略顯「素」:功能不算多,個性化設定幾乎沒有。把工具摸熟之後,再翻一遍官方開發文件,大致就掌握了專案的生命週期與常用 API。
看完文件,手癢的念頭就冒出來了。既然要練手,就得有資料;而我又不想為了個 demo 去搭後端,於是上網找可以免費提供測試資料的服務,最後選定了豆瓣圖書。豆瓣的開放程度有限,加上不再受理 appkey 申請,涉及使用者資料的功能基本無望,能做的就是書籍搜尋與詳情展示。所以這個 demo 只有兩個頁面,簡單得近乎樸素。
只用到兩個介面
整個專案只需要兩個豆瓣 API:一個搜尋,一個取詳情。
搜尋圖書
GET https://api.douban.com/v2/book/search
參數說明:q 為查詢關鍵字,tag 為標籤查詢,兩者必須至少傳一個;start 是結果偏移量,預設 0;count 是回傳筆數,預設 20、上限 100。請求成功時 status 為 200,回傳結構如下:
{
  "start": 0,
  "count": 10,
  "total": 30,
  "books": [ Book, ... ]
}
取得圖書詳情
GET https://api.douban.com/v2/book/:id
只需傳入書籍 id,回傳的詳細資料中,demo 真正用到的其實只有標題、封面、作者、出版社、出版日期、評分與簡介這幾項:
{
  "id": "1003078",
  "title": "小王子",
  "image": "https://img3.doubanio.com/mpic/s1001902.jpg",
  "author": [ "(法)聖埃克蘇佩裡" ],
  "publisher": "中國友誼出版公司",
  "pubdate": "2000-9-1",
  "rating": { "max": 10, "numRaters": 9438, "average": "9.1", "min": 0 },
  "author_intro": "聖埃克蘇佩裡(1900-1944)……",
  "catalog": "序言:法蘭西玫瑰\n小王子\n聖埃克蘇佩裡年表\n"
}
專案結構
專案取名 DouBanBookApp,目錄沿用小程序的預設組織方式,另外多開了一個 requests 資料夾集中管理網路請求:
DouBanBookApp
  pages
    index        首頁:index.js / index.wxml / index.wxss
    detail       詳情頁:detail.js / detail.wxml / detail.wxss
  requests
    api.js       API 位址集中管理
    request.js   網路請求封裝
  utils
    util.js      通用工具函式
  app.js / app.json / app.wxss
主色調參考豆瓣 App,採用偏綠的色系(#42BD56),頁面底色則用豆瓣典型的米灰 #F2F1EE。
首頁:搜尋框加上拉載入
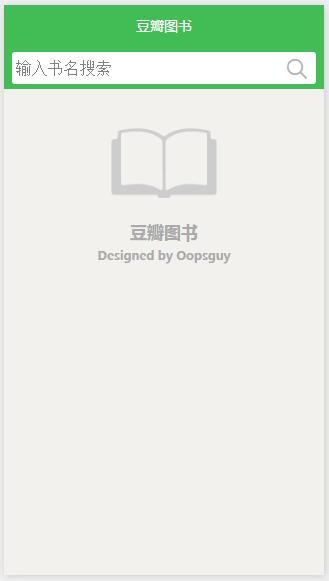
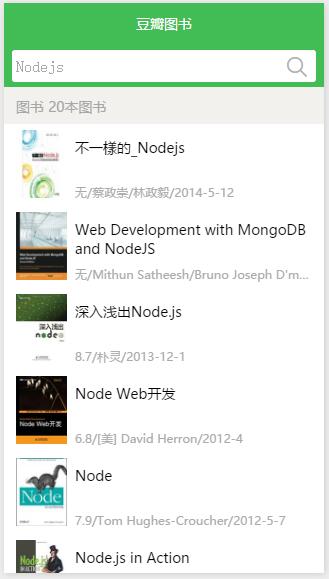
首頁頂部固定一個搜尋框,輸入書名點擊搜尋後,下方列表呈現結果。搜尋結果可能很多,一次全塞進去體驗很差,因此需要分頁。App 裡最常見的作法就是上拉載入,而小程序的 scroll-view 元件正好提供了 bindscrolltolower 事件,滑到底自動觸發,堪稱為這個場景量身訂做。
我的習慣是先把靜態版面做出來,再接 API。老實說我對視覺設計並不敏感,所以版面只求看得過去:
<view class="search-container">
  <input type="text" placeholder="輸入書名搜索" />
  <icon type="search" size="20" />
</view>
<scroll-view scroll-y="true" style="width:100%;position:relative;top:40px;height:200px">
  <!-- 無結果時的空狀態 -->
  <view style="text-align:center;padding-top:50rpx;">
    <icon type="cancel" color="red" size="40" />
    <view><text>沒有找到相關圖書</text></view>
  </view>
  <view class="header"><text>圖書 10本圖書</text></view>
  <view class="common-list">
    <view class="list-item">
      <view class="index-list-item">
        <view class="cover"><image class="cover-img" src="images/demo.png" /></view>
        <view class="content">
          <view class="title">圖書標題</view>
          <text class="desc">9.0/oopsguy/2016-07-08</text>
        </view>
      </view>
    </view>
  </view>
  <view class="refresh-footer"><icon type="waiting" size="30" /></view>
</scroll-view>
樣式部分,重點是讓搜尋列固定在頂部、列表項用浮動排版封面與文字,並用 text-overflow 處理過長的副標:
page { background: #F2F1EE; }
.search-container {
  position: fixed; top: 0; right: 0; left: 0;
  background-color: #42BD56; color: #FFF;
  height: 40px; padding: 0 10rpx; z-index: 100;
}
.search-container input {
  background: #FFF; color: #AAA; margin-top: 5px;
  padding: 5px 10rpx; height: 20px; border-radius: 8rpx;
}
.search-container icon { position: absolute; top: 10px; right: 20rpx; }
.index-list-item { background: #FFF; padding: 15rpx 30rpx; overflow: hidden; }
.index-list-item .cover { float: left; width: 120rpx; height: 160rpx; }
.index-list-item .content { margin-left: 140rpx; }
.index-list-item .desc {
  display: block; font-size: 30rpx; color: #AAA;
  white-space: nowrap; overflow: hidden; text-overflow: ellipsis;
}
詳情頁
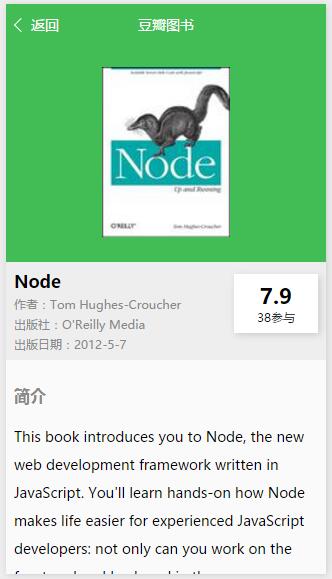
詳情頁負責把單本書的資訊攤開來看。首頁點擊某本書時帶著 id 跳頁,詳情頁再依 id 請求資料;由於網路往返難免有延遲,過渡期間需要一個 loading 佔位。
<view>
  <view class="cover-container"><image src="images/demo.png" /></view>
  <view class="book-meta">
    <view class="meta-info">
      <text class="book-title">圖書標題</text>
      <text class="other-meta">作者:作者名稱</text>
      <text class="other-meta">出版社:xxx出版社</text>
      <text class="other-meta">出版日期:2010-05-07</text>
    </view>
    <view class="range">
      <text class="score">0</text>
      <text class="viewers">0</text>
    </view>
  </view>
  <view class="book-intro">
    <view class="intro-header"><text>簡介</text></view>
    <text class="intro-content">這是圖書簡介</text>
  </view>
  <loading>加載中...</loading>
</view>
評分區塊用絕對定位浮在資訊右側,是這個頁面唯一稍有設計感的地方:
.cover-container { background: #42BD56; text-align: center; padding: 50rpx 0; }
.cover-container image { display: inline-block; width: 300rpx; height: 400rpx; }
.book-meta { position: relative; padding: 20rpx; overflow: hidden; }
.book-meta .range {
  position: absolute; top: 30rpx; right: 20rpx; width: 180rpx;
  background: #FFF; padding: 20rpx 10rpx; text-align: center;
  box-shadow: 2px 2px 10px #CCC;
}
.book-meta .meta-info { margin-right: 200rpx; }
.book-title { font-weight: bold; font-size: 50rpx; }
.other-meta { padding-top: 10rpx; color: #888; font-size: 30rpx; }
請求封裝與資料處理
API 位址集中放一處,日後要換來源或加版本就不必全專案搜尋:
const API_BASE = "https://api.douban.com/v2/book";
module.exports = {
  API_BOOK_SEARCH: API_BASE + "/search",
  API_BOOK_DETAIL: API_BASE + "/:id"
};
小程序提供的 wx.request 用法和 jQuery 的 ajax 相當接近。為了讓呼叫端乾淨一點,我把它包成一層,並針對兩個業務 separately 開了具名方法:
var api = require('./api.js');
var utils = require('../utils/util.js');

function request(url, data, successCb, errorCb, completeCb) {
  wx.request({
    url: url,
    method: 'GET',
    data: data,
    success: function (res) {
      utils.isFunction(successCb) && successCb(res.data);
    },
    error: function () {
      utils.isFunction(errorCb) && errorCb();
    },
    complete: function () {
      utils.isFunction(completeCb) && completeCb();
    }
  });
}

function requestSearchBook(data, successCb, errorCb, completeCb) {
  request(api.API_BOOK_SEARCH, data, successCb, errorCb, completeCb);
}

function requestBookDetail(id, data, successCb, errorCb, completeCb) {
  request(api.API_BOOK_DETAIL.replace(':id', id), data, successCb, errorCb, completeCb);
}

module.exports = {
  requestSearchBook: requestSearchBook,
  requestBookDetail: requestBookDetail
};
資料驅動的思維轉換
小程序沒有 DOM 操作這回事,畫面上的一切變化都得靠資料變化帶動,所以要在 Page 的 data 裡預先宣告好所有會被渲染的欄位。這點和 React、Vue 的思路其實同源。
使用者輸入時,input 綁定的事件把值寫進 searchKey:
searchInputEvent: function (e) {
  this.setData({ searchKey: e.detail.value });
}
點擊搜尋按鈕時,先清空分頁狀態再重新請求:
searchClickEvent: function (e) {
  if (!this.data.searchKey) return;
  this.setData({ pageIndex: 0, pageData: [] });
  requestData.call(this);
}
真正的請求邏輯獨立成一個函式,注意 pageIndex 的累加與 total 為 0 的處理:
function requestData() {
  var _this = this;
  var q = this.data.searchKey;
  var start = this.data.pageIndex;
  this.setData({ loadingMore: true, isInit: false });
  updateRefreshBall.call(this);
  requests.requestSearchBook({ q: q, start: start }, function (data) {
    if (data.total == 0) {
      _this.setData({ totalRecord: 0 });
    } else {
      _this.setData({
        pageData: _this.data.pageData.concat(data.books),
        pageIndex: start + 1,
        totalRecord: data.total
      });
    }
  }, function () {
    _this.setData({ totalRecord: 0 });
  }, function () {
    _this.setData({ loadingMore: false });
  });
}
上拉載入的提示做得很陽春:一個持續變色的小球,靠定時器輪播顏色,載入結束就 clearInterval。
var iconColor = [ '#353535', '#888888' ];

function updateRefreshBall() {
  var cIndex = 0;
  var _this = this;
  var timer = setInterval(function () {
    if (!_this.data['loadingMore']) { clearInterval(timer); }
    if (cIndex >= iconColor.length) cIndex = 0;
    _this.setData({ footerIconColor: iconColor[cIndex++] });
  }, 100);
}
頁間傳值用 wx.navigateTo,把 id 拼在 query string 上,目標頁就能在 onLoad 拿到:
toDetailPage: function (e) {
  var bid = e.currentTarget.dataset.bid;
  wx.navigateTo({ url: '../detail/detail?id=' + bid });
}

// detail.js
onLoad: function (option) {
  this.setData({ id: option.id });
}
寫完之後的心得
做過一輪會發現,小程序的頁面開發和以往的 HTML+CSS 相差不遠,差別在於標籤換成了官方自訂元件、CSS 支援有邊界(哪些寫法不相容,踩過一次就懂),以及互動全靠資料驅動。這個 demo 涉及的知識點其實很基礎:資料綁定、事件綁定、模板語法與網路請求 API。把文件讀一遍,做出個小東西完全不成問題。
最終效果如下,介面確實醜得有個性,就當作我的小程序入門第一課吧。
源碼可於文章附錄的 demo 下載處取得,希望對正在入門小程序的朋友有幫助。