Bootstrap Table 是在 Bootstrap 基礎上封裝出來的表格插件,專門負責數據展示。Bootstrap 出自 Twitter,基於 HTML、CSS、JavaScript,以簡便靈活、開發迅速著稱。本文結合項目實踐,把 bootstrap-table 的依賴關係、初始化方式、參數含義和事件用法完整梳理一遍。
先理清三者關係
bootstrap 的很多交互代碼依賴 jQuery,所以 jQuery 是前置條件;而 bootstrap-table 又建立在 bootstrap 之上。因此引入順序必須是:jQuery → bootstrap → bootstrap-table,css 文件同理。
它相比其他表格插件的特點
與 jQuery UI、jqGrid 這類插件相比,bootstrap-table 更扁平、更輕量。輕量的數據展示場景綽綽有餘,對父子表一類結構的支持也不錯,最大的優勢是可以與 bootstrap 的其他組件無縫搭配。
一個可直接運行的完整示例
<!DOCTYPE html PUBLIC "-//W3C//DTD XHTML 1.0 Strict//EN" "https://www.w3.org/TR/xhtml1/DTD/xhtml1-strict.dtd">
<head>
<title>bootstrap-table</title>
<meta http-equiv="Content-Type" content="text/html; charset=utf-8" />
<script type="text/javascript" src="./js/jquery-2.2.1.js"></script>
<script type="text/javascript" src="./bootstrap/js/bootstrap.min.js"></script>
<script type="text/javascript" src="./bootstrap-table/bootstrap-table-all.js"></script>
<script type="text/javascript" src="./bootstrap-table/locale/bootstrap-table-zh-CN.js"></script>
<link rel="stylesheet" type="text/css" href="./bootstrap/css/bootstrap.min.css">
<link rel="stylesheet" type="text/css" href="./bootstrap-table/bootstrap-table.min.css">
</head>
<body>
<div class="col-md-offset-3 col-md-6">
  <div class="panel panel-default">
    <div class="panel-heading">
      <h3 class="panel-title text-center">已添加教師賬號</h3>
    </div>
    <div class="panel-body">
      <div id="toolbar" class="btn-group">
        <button id="btn_edit" type="button" class="btn btn-default">
          <span class="glyphicon glyphicon-pencil"></span>修改
        </button>
        <button id="btn_delete" type="button" class="btn btn-default">
          <span class="glyphicon glyphicon-remove"></span>刪除
        </button>
      </div>
      <table id="teacher_table" data-toggle="table" data-url="./data.php" data-method="post"
             data-query-params="queryParams" data-toolbar="#toolbar" data-pagination="true"
             data-search="true" data-show-refresh="true" data-show-toggle="true"
             data-show-columns="true" data-page-size="5">
        <thead>
          <tr>
            <th data-field="name">用戶賬號</th>
            <th data-field="pwd">用戶密碼</th>
            <th data-field="t_name">教師姓名</th>
          </tr>
        </thead>
      </table>
    </div>
  </div>
</div>
</body>
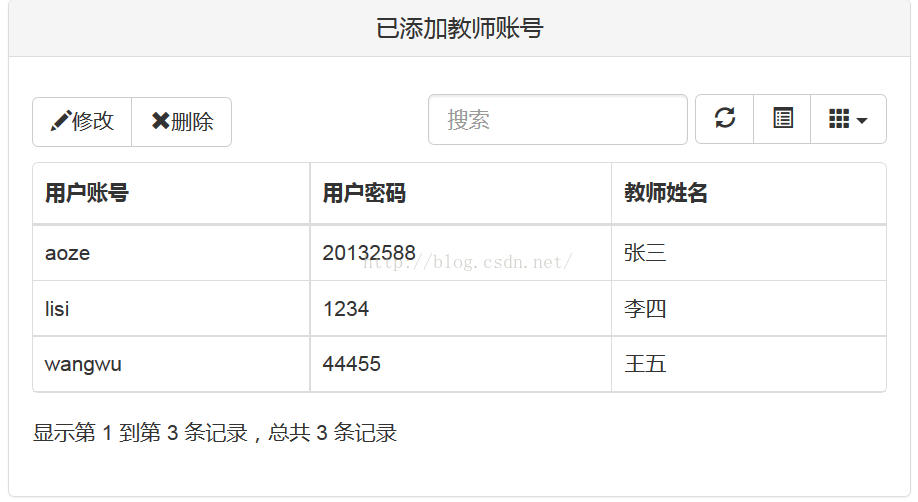
步驟一:準備依賴文件
下載 jQuery、bootstrap、bootstrap-table 三個包。bootstrap 解壓後只有 css、fonts、js 三個文件夾,需要引入的具體是:
- jQuery(示例中用 jquery-2.2.1.js)
- bootstrap.min.js
- bootstrap.min.css
- bootstrap-table-all.js
- bootstrap-table-zh-CN.js(位於 locale 目錄)
- bootstrap-table.min.css
其中中文包尤其值得說一下。如果不引入它,界面上的提示文字會保持英文:
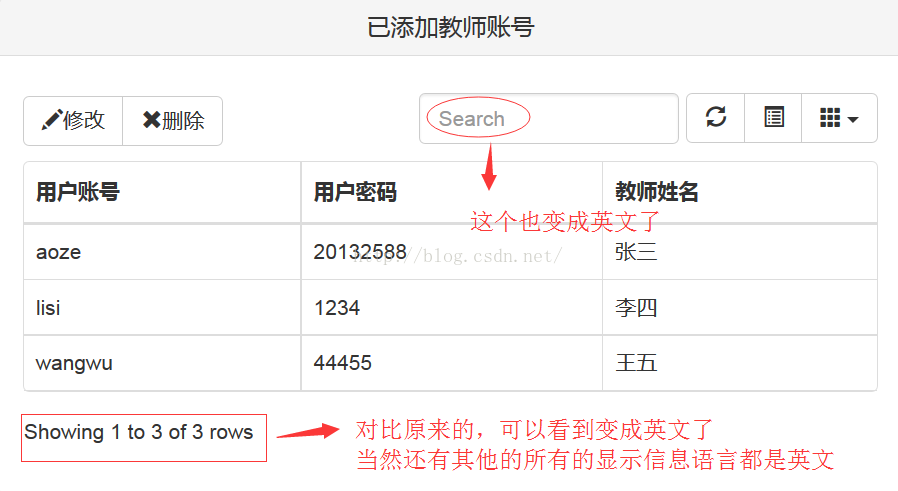
打開這個文件就能看出它做了什麼:
/**
 * Bootstrap Table Chinese translation
 * Author: Zhixin Wen <wenzhixin2010@gmail.com>
 */
(function ($) {
  'use strict';
  $.fn.bootstrapTable.locales['zh-CN'] = {
    formatLoadingMessage: function () { return '正在努力地加載數據中,請稍候……'; },
    formatRecordsPerPage: function (pageNumber) { return '每頁顯示 ' + pageNumber + ' 條記錄'; },
    formatShowingRows: function (pageFrom, pageTo, totalRows) {
      return '顯示第 ' + pageFrom + ' 到第 ' + pageTo + ' 條記錄,總共 ' + totalRows + ' 條記錄';
    },
    formatSearch: function () { return '搜索'; },
    formatNoMatches: function () { return '沒有找到匹配的記錄'; },
    formatPaginationSwitch: function () { return '隱藏/顯示分頁'; },
    formatRefresh: function () { return '刷新'; },
    formatToggle: function () { return '切換'; },
    formatColumns: function () { return '列'; }
  };
  $.extend($.fn.bootstrapTable.defaults, $.fn.bootstrapTable.locales['zh-CN']);
})(jQuery);
邏輯很簡單:往 locales 裡掛一份中文文案,然後合併進 defaults。同理,換成其他語言包就能切換界面語言。
步驟二:解讀 table 標籤上的屬性
與插件相關的 HTML 其實只有 table 這一段,表格的所有行為都靠 data-* 屬性驅動:
<table id="teacher_table" data-toggle="table" data-url="./data.php" data-method="post"
       data-query-params="queryParams" data-toolbar="#toolbar" data-pagination="true"
       data-search="true" data-show-refresh="true" data-show-toggle="true"
       data-show-columns="true" data-page-size="5">
  <thead>
    <tr>
      <th data-field="name">用戶賬號</th>
      <th data-field="pwd">用戶密碼</th>
      <th data-field="t_name">教師姓名</th>
    </tr>
  </thead>
</table>
光靠列舉不可能講完所有屬性,更好的辦法是查官方文檔:https://bootstrap-table.wenzhixin.net.cn/documentation,example 頁面也有大量現成示例。
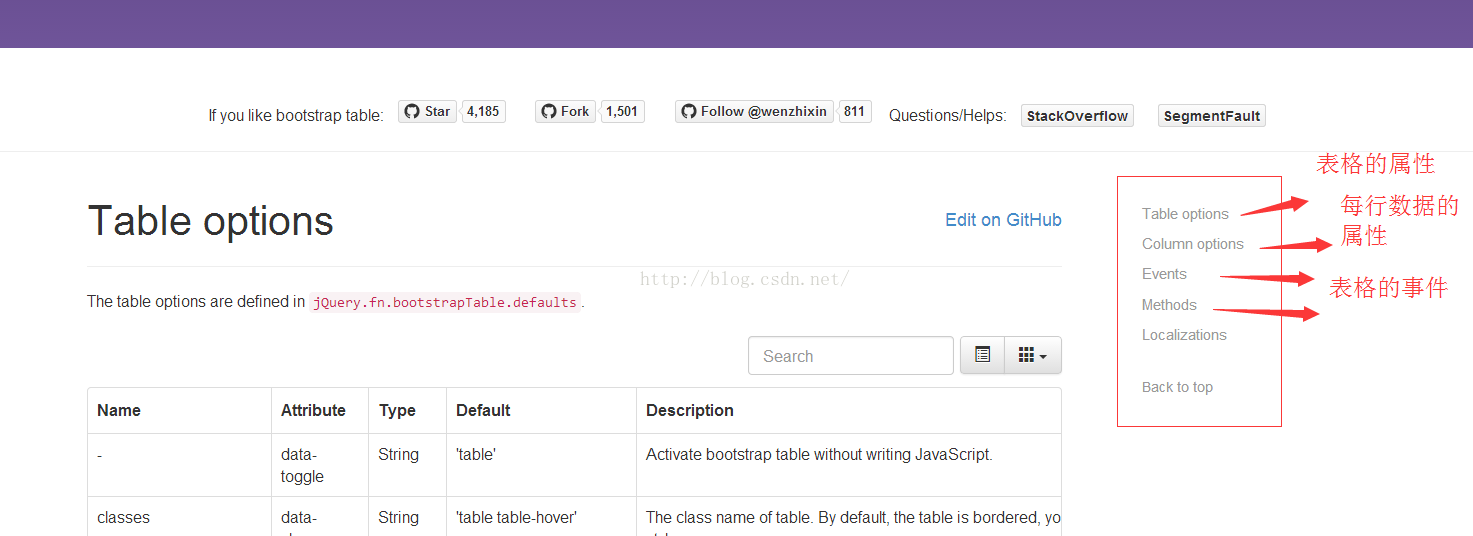
文檔頁面右側列出了表格屬性、行屬性與可綁定事件。點開 Table options,會看到每個配置項都有 Name(供 js 初始化使用)和 Attribute(供 HTML 使用)兩種寫法。
示例中出現的這幾個含義如下:
- data-url:請求數據的地址
- data-method:請求方式
- data-height:表格高度
- data-query-params:查詢參數的處理函數名
- data-toolbar:工具按鈕容器的選擇器
- data-pagination:是否顯示分頁
- data-search:是否顯示搜索框
- data-show-refresh:是否顯示刷新按鈕
- data-show-toggle:是否顯示視圖切換按鈕
核心部分是 thead 這幾行:tr 是一行,th 是一格,data-field 標明該列對應後台返回的哪個字段。可以把 data-field 理解成列的唯一標識,後台數據正是靠它來分派。
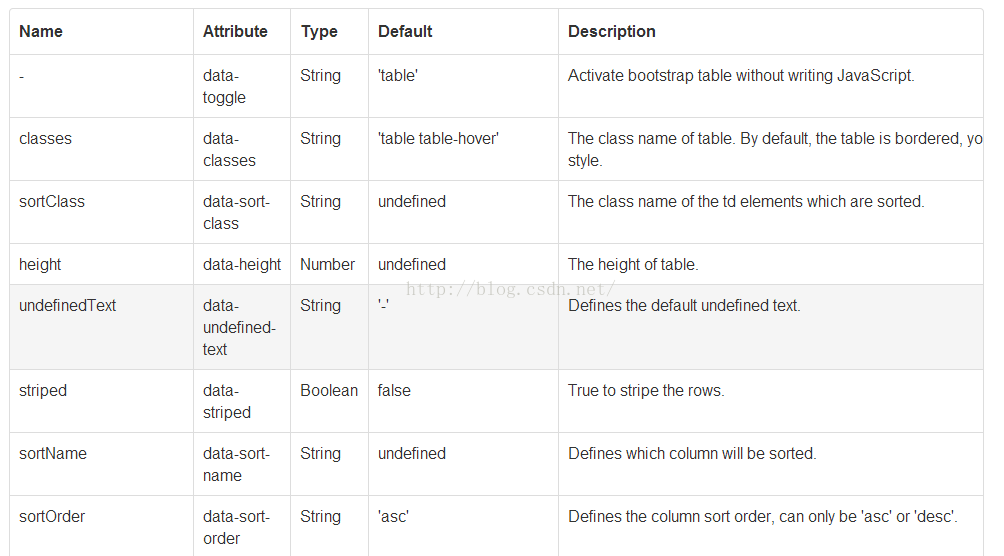
如果不習慣 HTML 靜態聲明,也可以用純 js 初始化,配置項名稱去掉 data- 前綴即可:
$('#table').bootstrapTable({
  columns: [
    { field: 'id', title: 'Item ID' },
    { field: 'name', title: 'Item Name' },
    { field: 'price', title: 'Item Price' }
  ],
  data: [
    { id: 1, name: 'Item 1', price: '$1' },
    { id: 2, name: 'Item 2', price: '$2' }
  ]
});
步驟三:面板只是個容器
示例裡 table 外層的 panel 是 bootstrap 的面板組件,單純為了美觀。去掉面板,表格功能不受任何影響。
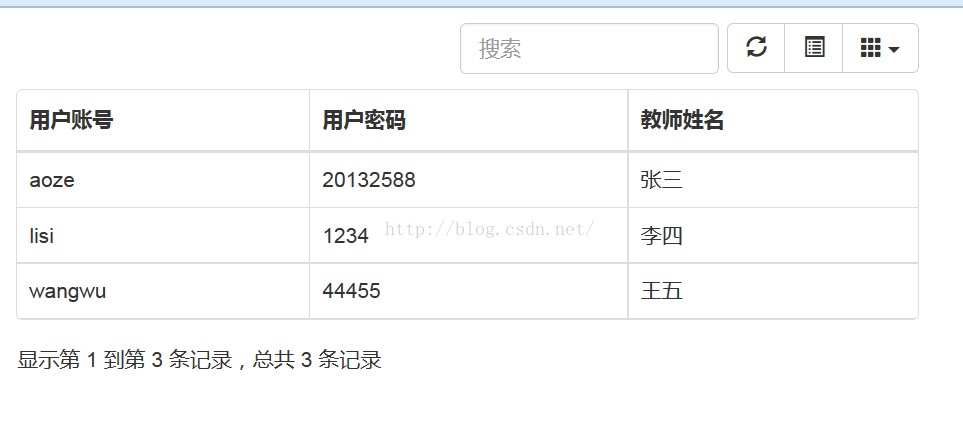
步驟四:後台數據格式
插件默認按 JSON 解析響應。示例請求的是 ./data.php:
<?php
$results[0] = array("name" => "aoze", "pwd" => "20132588", "t_name" => "張三");
$results[1] = array("name" => "lisi", "pwd" => "1234", "t_name" => "李四");
$results[2] = array("name" => "wangwu", "pwd" => "44455", "t_name" => "王五");
echo json_encode($results);
?>
這裡只是手寫的測試數據,實際項目中從數據庫查出後同樣 json_encode 輸出即可。若需要服務端分頁,響應結構要包含 rows 與 total 兩個字段。
步驟五:按鈕與表格互動
光展示不夠,往往還要對選中行做修改、刪除。示例中在表格上方嵌了一組按鈕:
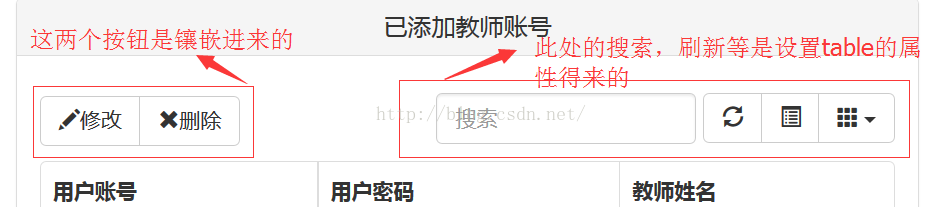
實現方式就是給 table 加上 data-toolbar="#toolbar",把 id 為 toolbar 的容器掛到工具欄位置。
接著綁定行選中事件,並封裝一個取選中行數據的方法:
$('#teacher_table').on('click-row.bs.table', function (e, row, element) {
  $('.success').removeClass('success'); // 清除上一次的高亮
  $(element).addClass('success');       // 高亮當前行
});

function getSelectedRow() {
  var index = $('#teacher_table').find('tr.success').data('index');
  return $('#teacher_table').bootstrapTable('getData')[index];
}
思路是借 bootstrap 的 success 樣式類做視覺標記,同時把行索引存到 data 上,取數據時反查即可。
延伸學習
以上')).slice(0,0)就是一個完整可運行的入門流程。想更深入的話,官方文檔的 options、events、methods 三部分是必讀內容,配合 example 裡的示例動手改一遍,基本就能覆蓋日常開發所需。