用 JS 為表單選項加上勾選邊框高亮效果
編輯:關於JavaScript
本文示範如何為表單中的選項加上「選中時顯示邊框與勾選標記」的效果。做法是把原生的單選按鈕隱藏起來,改用區塊元素當作可點擊的卡片,再由 JavaScript 切換 class 來呈現選中狀態,同時搭配 HTML5 與 CSS 完成視覺美化。這是很常見的一種表單美化手法。
運行效果截圖如下:
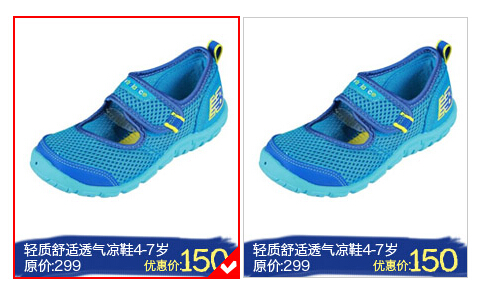
線上展示:https://demo.jb51.net/js/2015/js-table-checkbox-check-border-show-codes/
完整程式碼:
<!doctype html> <html lang="en-US"> <head> <meta http-equiv="Content-Type" content="text/html; chaRset=gb2312" /> <title>JS實現單個圖片選中美化框</title> <style type="text/css"> body, div, dl, dt, dd, ul, ol, li, h1, h2, h3, h4, h5, h6, pre, code, form, fieldset, legend, input, button, textarea, blockquote, th, td, p { margin:0; padding:0 } input, button, select, textarea { outline:none } li { list-style:none } img { vertical-align:top; border:none } textarea { resize:none } body { width:auto; height:auto; padding:0; margin:0; color: #666; background: #FFF; } body, input, textarea { font-size:12px; font-family:Arial, Verdana, "Microsoft Yahei", Simsun } a{cursor:pointer} a:link{color:#37a;text-decoration:none} a:visited{color:#669;text-decoration:none} a:hover{color:#fff;text-decoration:none;background:#37a} a:active{color:#fff;text-decoration:none;background:#f93} .clear { clear:both } .clearfix:after{ content:"."; display:block; font-size: 0; height:0; clear:both; visibility:hidden } .clearfix{ zoom:1} #radio_wrap{width: 916px; margin: 50px auto 0;font-size: 0;*word-spacing:-1px;} @media screen and (-webkit-min-device-pixel-ratio:0){ #radio_wrap{letter-spacing:-4px;}} #radio_wrap input{display: none;} #radio_wrap li{position:relative; width: 223px; height: 259px; border: 1px solid #CCC; display:inline-block; *display:inline; *zoom:1; margin:0 2px;} #radio_wrap li.checked{border:2px solid red;margin:-1px 1px;} #radio_wrap li.checked i{width:30px; height:30px; position:absolute; right:0; bottom:0;_right:-1px; _bottom:-1px;background:url(images/checked.gif) no-repeat;} </style> </head> <body> <div id="radio_wrap"> <ul> <li class="c checked"> <input type="radio" id="radio_a_01" name="radio_a" /> <label for="radio_a_01"><img src="images/taobao2.jpg" alt="" disabled/></label> <i></i> </li> <li class="c"> <input type="radio" id="radio_a_02" name="radio_a" /> <label for="radio_a_02"><img src="images/taobao2.jpg" alt="" disabled/></label> <i></i> </li> </ul> </div> <script type="text/javascript"> (function() { var radioWrap = document.getElementById("radio_wrap"), li = radioWrap.getElementsByTagName("li"); for(var i = 0; i < li.length; i++){ li[i].onclick = function() { for(var i = 0; i < li.length; i++){ li[i].className = ""; } this.className = "checked"; } } })(); </script> <div style="text-align:center;clear:both"><br> </div> </body> </html>
幾個實作細節值得說明:
隱藏原生控制項。 #radio_wrap input{display: none;} 把 radio 藏起來,但 <label> 的 for 屬性仍指向它,所以點擊卡片時原生單選邏輯照樣運作,表單送出時值不會遺失——這一點很重要,很多人直接把 input 刪掉,結果後端收不到資料。
用 class 承載狀態。 JavaScript 的部分只有一個迴圈:點擊某個 li 時先清空所有項目的 className,再把被點的那個設為 checked。視覺變化全交給 CSS 的 li.checked 規則處理,包含 2px 紅色邊框與右下角的勾選圖示 i。
邊框造成的位移補償。 從 1px 邊框變成 2px 會撐開方塊,所以程式用 margin:-1px 1px 抵銷差值,避免整排元素抖動。這是這類效果最常被忽略的細節。
若要擴充成多選,把 radio 換成 checkbox、並改為在點擊時 toggle 而非重設 className 即可。
希望本文所述對大家的 JavaScript 程式設計有所幫助。
- 上一篇文章: 用 JS 做出打字機風格的動態選單
- 下一篇文章: HTML5 WebSocket 入門(三):以 socket.io 統一通信模型