微信 JS-SDK 實作:叫起相機、預覽與圖片上下傳
編輯:JavaScript技巧
先前那篇談微信 JS-SDK 授權的文章已經把分享介面跑通了,接著該處理更實用的需求:在微信裡叫起原生相機拍照或從相簿選圖,然後上傳、下載。以下依序拆解。
1. 設定介面清單
頁面引入 jssdk 並取得授權後傳入 wx 物件,接著用 wx.config 宣告本次要用到的介面:
wx.config({
  /* debug: true, */
  appId: appid,
  timestamp: timestamp,
  nonceStr: nonceStr,
  signature: signature,
  jsApiList: [
    'chooseImage',   // 拍照或從手機相冊中選圖
    'previewImage',  // 預覽圖片
    'uploadImage',   // 上傳圖片
    'downloadImage'  // 下載圖片
  ]
});
2. 叫起相機/相簿
把下面的方法放進需要觸發的點擊回呼裡:
wx.chooseImage({
  count: 1,                       // 張數,預設 9
  sizeType: ['compressed'],       // 建議壓縮
  sourceType: ['album', 'camera'] // 來源:相冊或相機
  ,success: function (res) {
    // res.localIds 是所選照片的本地 ID 陣列
    // localId 可直接作為 img 標籤的 src 顯示圖片
    $('.driver-card img').prop('src', res.localIds[0]);
    uploadPhoto.uploadToWeixinServer(res.localIds[0], 'car');
  }
});
執行後會看到如下效果,代表叫起成功:
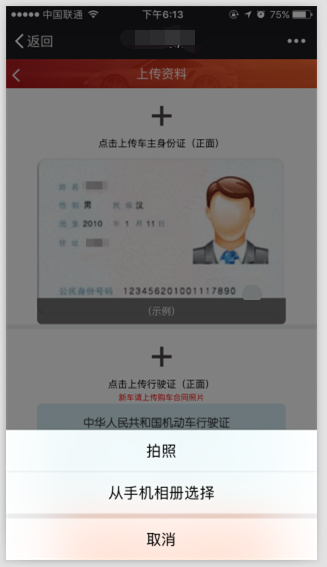
在 success 回呼中,我把選取的照片直接賦值給目標 img 的 src(這裡只有一張,多張的話用迴圈賦值即可),於是剛拍好或剛選好的照片立刻顯示出來。
3. 上傳照片
接著呼叫 wx.uploadImage,把圖片先傳到微信伺服器,取回 serverId:
uploadToWeixinServer: function (localId, type) {
  wx.uploadImage({
    localId: localId,
    isShowProgressTips: 1, // 預設 1,顯示進度提示
    success: function (res) {
      // res.serverId 即圖片在微信伺服器端的 ID
      uploadPhoto.uploadToOwnerServer(res.serverId, type); // 非同步傳到自己的伺服器
    }
  });
},
拿到 serverId 後,再用 ajax 把它傳到自家伺服器,後端透過微信提供的「取得臨時素材」介面把檔案抓回來。當然不是選完照片就一定要立刻上傳,實際做法要看業務需求:有靜默上傳(不顯示進度提示)的,也有等到最後提交表單時才一起送的。
前端:
uploadToOwnerServer: function (serverId, type) {
  $.ajax({
    data: { serverId: serverId, type: type },
    type: "POST",
    url: WX_ROOT + "wechat/uploadPhoto",
    success: function (json) {
      if (json) {
        var data = JSON.parse(json.data);
        if ('car' == type)
          uploadPhoto.options.carImage = data.path + data.name;
        else
          uploadPhoto.options.idCardImage = data.path + data.name;
      }
    }
  });
},
Controller:
@RequestMapping(value = "/uploadPhoto", method = RequestMethod.POST)
public @ResponseBody HttpResult uploadPhoto(@RequestParam String serverId,
                                            @RequestParam String type) throws Exception {
  LOGGER.info("RestFul of uploadPhoto parameters serverId:{}, type:{}", serverId, type);
  try {
    /** 將圖片保存到本地伺服器 **/
    String photoName = type + new Date().getTime() + UUID.randomUUID().toString();
    // 檔案路徑不存在則建立
    File saveFile = new File(PIC_PATH + type);
    if (!saveFile.mkdir()) saveFile.mkdir();
    wechatService.saveImageToDisk(serverId, photoName, PIC_PATH + type + "/");
    JSONObject data = new JSONObject();
    data.put("name", type + "/" + photoName + ".jpg");
    data.put("path", PIC_SERVER + "/");
    HttpResult rs = new HttpResult();
    rs.setCode(200);
    rs.setData(data.toJSONString());
    return rs;
  } catch (Exception e) {
    LOGGER.error("Download the picture from weixin server is error", serverId);
    return null;
  }
}
檔名規則我用 UUID 搭配「型別 + 時間戳 + 唯一字串」,避免同名覆蓋。上傳成功後,把自家伺服器的圖片網址回傳給前端。
getInputStream:把遠端檔案變成串流
呼叫微信的臨時素材介面,把還在微信伺服器上的圖片下載回來,參數是前端送上的 mediaId,最終轉為輸入串流物件:
/**
 * 依檔案 id 下載檔案
 * @return 檔案串流物件
 */
public InputStream getInputStream(String accessToken, String mediaId) {
  InputStream is = null;
  String url = "https://file.api.weixin.qq.com/cgi-bin/media/get?access_token="
             + accessToken + "&media_id=" + mediaId;
  try {
    URL urlGet = new URL(url);
    HttpURLConnection http = (HttpURLConnection) urlGet.openConnection();
    http.setRequestMethod("GET"); // 必須是 get 方式請求
    http.setRequestProperty("Content-Type", "application/x-www-form-urlencoded");
    http.setDoOutput(true);
    http.setDoInput(true);
    System.setProperty("sun.net.client.defaultConnectTimeout", "30000"); // 連線逾時 30 秒
    System.setProperty("sun.net.client.defaultReadTimeout", "30000");    // 讀取逾時 30 秒
    http.connect();
    is = http.getInputStream();
  } catch (Exception e) {
    LOGGER.error("Failed to convert inputStream from weixin server, accessToken:{}, mediaId:{}",
                 accessToken, mediaId);
  }
  return is;
}
service:把串流寫進自己的磁碟
public void saveImageToDisk(String mediaId, String picName, String picPath) throws Exception {
  String accessToken = getBaseAccessToken();
  InputStream inputStream = getInputStream(accessToken, mediaId);
  byte[] data = new byte[1024];
  int len = 0;
  FileOutputStream fileOutputStream = null;
  try {
    fileOutputStream = new FileOutputStream(picPath + picName + ".jpg");
    while ((len = inputStream.read(data)) != -1) {
      fileOutputStream.write(data, 0, len);
    }
    LOGGER.info("Write the fileInputStream is successful");
  } catch (IOException e) {
    LOGGER.error("Write the fileInputStream is error");
  } finally {
    if (inputStream != null) {
      try { inputStream.close(); }
      catch (IOException e) { LOGGER.error("Close the fileInputStream is error"); }
    }
    if (fileOutputStream != null) {
      try { fileOutputStream.close(); }
      catch (IOException e) { LOGGER.error("Close the fileOutputStream is error"); }
    }
  }
}
4. 小結
到這裡,拍照、顯示、上傳、下載四件事就都串起來了。整個流程其實很像一場接力:chooseImage 拿到 localId → uploadImage 換到微信的 serverId → 後端用 serverId 換回檔案串流 → 落地存檔並回傳自家網址。搞懂這條「ID 換 ID 換檔案」的鏈條,其餘的 jssdk 介面都能比照辦理。微信開放的 jssdk 還有很多有趣的功能,值得繼續動手實作。
- 上一篇文章: 微信小程序開發:大轉盤 仿天貓超市抽獎實例
- 下一篇文章: 淺談 JavaScript 的閉包函式
相關文章
-
wx.onMenuShareTimeline分享不生效?config與ready的正確順序 微信 JS-SDK 完整指南:權限配置、介面清單與簽名演算法 WeixinJSBridge API 大盤點:預覽、支付、定位、表情與地址 微信 JS-SDK 介面總整理與使用流程詳解 WeixinJSBridge API 使用整理(微信內 H5 頁面) 微信 JSSDK 在 iframe 頁面中失效的解決辦法 微信 JS-SDK 定位坐標轉換為百度地圖坐標的完整實作 微信 JS-SDK 接入與分享介面整理 手機 Web App 多平台分享實作:超連結、微信 JS-SDK 與社群元件 微信 JS-SDK 接口大全與使用說明