微信小程序實現帶刻度尺的滑塊功能
編輯:JavaScript技巧
與自帶的 slider 不同,這裡要實現的是一種透過滑動標尺來取值的互動效果,而非直接拖動滑塊本身。下面記錄完整的實現思路與代碼。
效果預覽
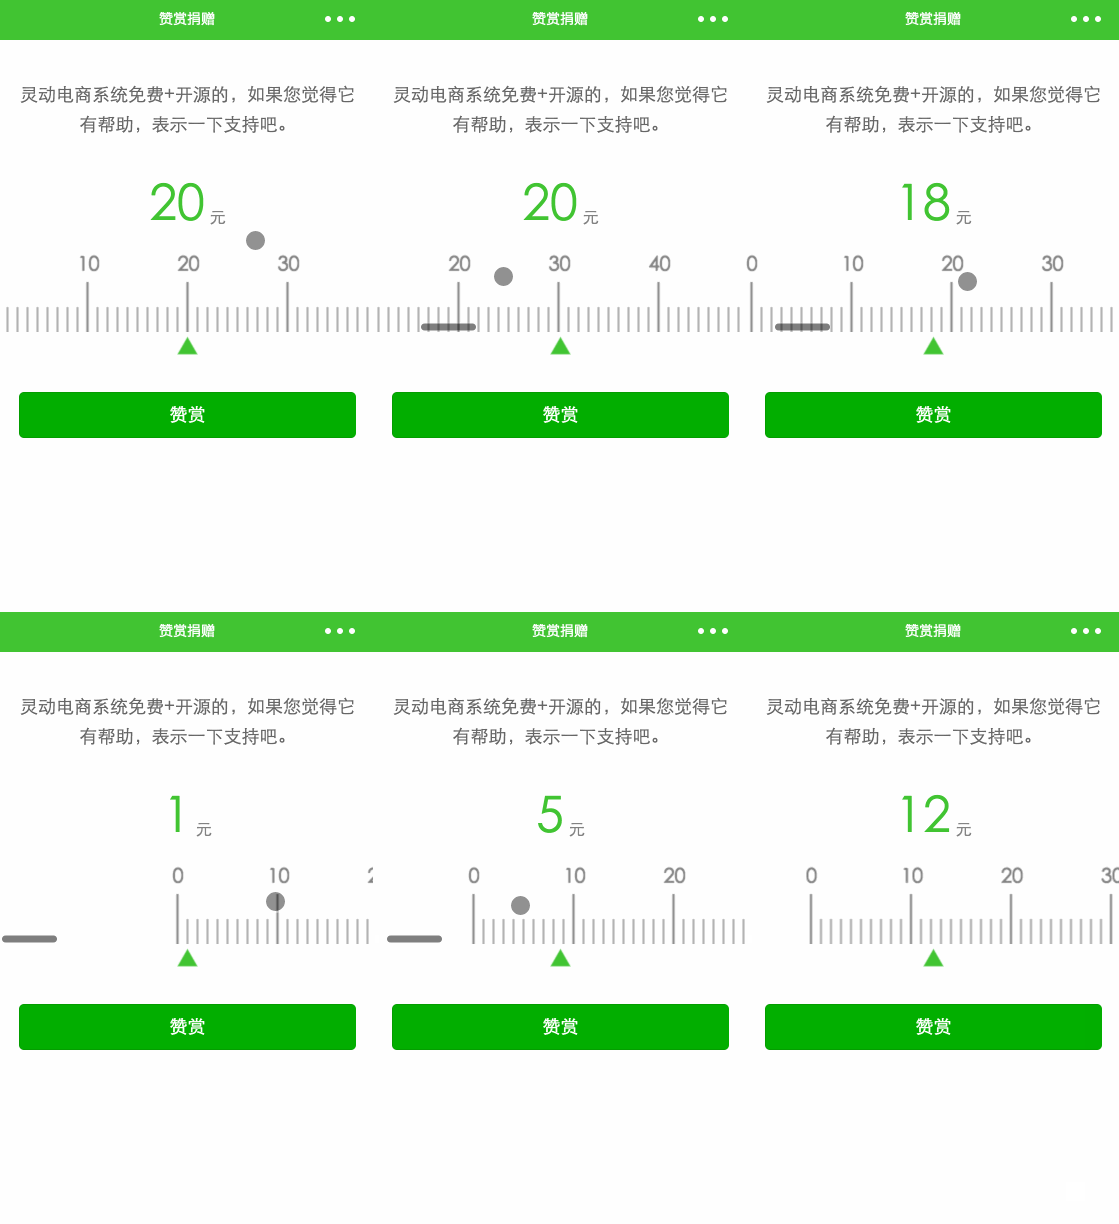
適用場景
當一屏容納不下、需要大區間選擇時(例如年齡、體重、金額選擇等),相比自帶的 picker,這種標尺式選擇器會更加直觀。
實現思路
先構建一個 scrollView,在其中裝入 canvas;用 lineTo 繪製刻度線段,用 lineTo + fill 畫出三角形游標,用 fillText 描繪文本標籤;再透過 bindscroll 監聽標尺的觸摸事件,最後將取值渲染到頁面。
基本布局
<scroll-view scroll-x="true" bindscroll="bindscroll"> <canvas canvas-id="canvas" id="canvas"></canvas> </scroll-view>
實現 bindscroll 方法
bindscroll: function (e) { // deltaX 水平位置偏移位,每次滑動一次觸發一次,所以需要記錄從第一次觸發滑動起,一共滑動了多少距離 deltaX += e.detail.deltaX; console.log(deltaX) }
描繪刻度
const context = wx.createCanvasContext('canvas-ruler'); // 移動到原點 context.moveTo(origion.x, origion.y); // 畫線到刻度高度 context.lineTo(origion.x, origion.y - heightDecimal); // 設置屬性 context.setLineWidth(1); // 描線 context.stroke(); // 描繪文本標簽 context.setFontSize(fontSize); context.fillText('0', origion.x - fontSize / 2, fontSize); context.draw();
遍歷刻度
for (var i = 0; i <= maxValue; i++) { // 開始一個路徑,這條非常重要,否則會重復繪制之前的刻度n次,效果表現為頁面加載很卡,lineWidth得到的線很粗 context.beginPath(); // 繪制同上,不再贅述 ... // 關閉一個路徑,它是可選的,調用過了beginPath,不關閉也沒有影響,保險起見,加上它 context.closePath(); }
切記要調用 context.beginPath();,否則會導致刻度重複繪製、頁面卡頓、線條變粗等問題。
描繪游標
drawCursor: function () { /* 定義變量 */ // 定義三角形頂點 TODO x var center = {x: app.screenWidth / 2, y: 5}; // 定義三角形邊長 var length = 20; // 左端點 var left = {x: center.x - length / 2, y: center.y + length / 2 * Math.sqrt(3)}; // 右端點 var right = {x: center.x + length / 2, y: center.y + length / 2 * Math.sqrt(3)}; // 初始化context const context = wx.createCanvasContext('canvas-cursor'); context.moveTo(center.x, center.y); context.lineTo(left.x, left.y); context.lineTo(right.x, right.y); // fill()填充而不是stroke()描邊,於是省去手動回歸原點,context.lineTo(center.x, center.y); context.setFillStyle('#48c23d'); context.fill(); context.draw(); }
這裡畫了一個綠色的正三角形作為游標。由於游標是懸浮不動的,因此另起一個 canvas 來裝它。當然這並非必須——偷個懶用一張 PNG 三角形代替也無妨,甚至刻度也可以用 view 加絕對定位來生成。
定義刻度默認初值
that.setData({ scrollLeft: (currentValue - minValue) * ratio }); <scroll-view scroll-x="true" bindscroll="bindscroll" scroll-left="{{scrollLeft}}">
綁定 scroll-left 參數,相當於 iOS 裡 UIScrollView 的 contentOffset,讓它手動偏移到默認初值對應的坐標位置。
適配最小值
當業務場景需要做數據驗證(例如金額要 > 0、年齡要大於 18 歲等),就得適配極值:
that.setData({ amount: Math.floor(- deltaX / 10 + minValue) });
同時要修正刻度線的 x 軸坐標:
// 2.2 畫刻度線 context.moveTo(origion.x + (i - minValue) * ratio, origion.y); // 畫線到刻度高度,10的位數就加高 context.lineTo(origion.x + (i - minValue) * ratio, origion.y - (i % ratio == 0 ? heightDecimal : heightDigit)); // 2.3 描繪文本標簽 context.fillText(i == 0 ? ' ' + i : i, origion.x + (i - minValue) * ratio - fontSize / 2, fontSize);
最終 JS 代碼
var that; var deltaX = 0; var minValue = 1; var app = getApp(); Page({ data: { value: 0, canvasHeight: 80 }, onLoad: function (options) { that = this; // 繪制標尺 that.drawRuler(); // 繪制三角形游標 that.drawCursor(); }, drawRuler: function() { /* 1.定義變量 */ // 1.1 定義原點與終點,x軸方向起點與終點各留半屏空白 var origion = {x: app.screenWidth / 2, y: that.data.canvasHeight}; var end = {x: app.screenWidth / 2, y: that.data.canvasHeight}; // 1.2 定義刻度線高度 var heightDecimal = 50; var heightDigit = 25; // 1.3 定義文本標簽字體大小 var fontSize = 20; // 1.4 最小刻度值 // 已經定義在全局,便於bindscroll訪問 // 1.5 總刻度值 var maxValue = 200; // 1.6 當前刻度值 var currentValue = 20; // 1.7 每個刻度所占位的px var ratio = 10; // 1.8 畫布寬度 var canvasWidth = maxValue * ratio + app.screenWidth - minValue * ratio; // 設定scroll-view初始偏移 that.setData({ canvasWidth: canvasWidth, scrollLeft: (currentValue - minValue) * ratio }); /* 2.繪制 */ // 2.1初始化context const context = wx.createCanvasContext('canvas-ruler'); // 遍歷maxValue for (var i = 0; i <= maxValue; i++) { context.beginPath(); // 2.2 畫刻度線 context.moveTo(origion.x + (i - minValue) * ratio, origion.y); // 畫線到刻度高度,10的位數就加高 context.lineTo(origion.x + (i - minValue) * ratio, origion.y - (i % ratio == 0 ? heightDecimal : heightDigit)); // 設置屬性 context.setLineWidth(2); // 10的位數就加深 context.setStrokeStyle(i % ratio == 0 ? 'gray' : 'darkgray'); // 描線 context.stroke(); // 2.3 描繪文本標簽 context.setFillStyle('gray'); if (i % ratio == 0) { context.setFontSize(fontSize); // 為零補一個空格,讓它看起來2位數,頁面更整齊 context.fillText(i == 0 ? ' ' + i : i, origion.x + (i - minValue) * ratio - fontSize / 2, fontSize); } context.closePath(); } // 2.4 繪制到context context.draw(); }, drawCursor: function () { /* 定義變量 */ // 定義三角形頂點 TODO x var center = {x: app.screenWidth / 2, y: 5}; // 定義三角形邊長 var length = 20; // 左端點 var left = {x: center.x - length / 2, y: center.y + length / 2 * Math.sqrt(3)}; // 右端點 var right = {x: center.x + length / 2, y: center.y + length / 2 * Math.sqrt(3)}; // 初始化context const context = wx.createCanvasContext('canvas-cursor'); context.moveTo(center.x, center.y); context.lineTo(left.x, left.y); context.lineTo(right.x, right.y); // fill()填充而不是stroke()描邊,於是省去手動回歸原點,context.lineTo(center.x, center.y); context.setFillStyle('#48c23d'); context.fill(); context.draw(); }, bindscroll: function (e) { // deltaX 水平位置偏移位,每次滑動一次觸發一次,所以需要記錄從第一次觸發滑動起,一共滑動了多少距離 deltaX += e.detail.deltaX; // 數據綁定 that.setData({ value: Math.floor(- deltaX / 10 + minValue) }); console.log(deltaX) } });
以上就是微信小程序實現帶刻度尺滑塊功能的完整記錄,希望對大家有所幫助。如有疑問歡迎留言交流。