Bootstrap 打造可編輯的表格
編輯:JQuery入門技巧
一、基礎:把資料顯示出來
先在頁面裡定義表格骨架與欄位名稱,再把資料庫查到的結果逐列輸出。示範用的是 PHP,若換成 Java,把這段語法對應改成 JSP 即可。
<div class="containe"> <table class="table table-striped table-bordered table-hover"> <thead> <tr class="success"> <th>序號</th> <th style="display: none">ActionID</th> <th>Category</th> <th>SubProcess Name</th> <th>Description</th> <th>Do Action</th> </tr> </thead> <tbody> <?php //遍歷傳遞過來的變量$subprocess_info $i=1; foreach($subprocess_info as $_v){ ?> <tr id=""> <td><?php echo $i; ?></td> <td style="display: none"><?php echo $_v->ActionID; ?></td> <td><?php echo $_v->Category; ?></td> <td><a href="#"><?php echo $_v->ActionName; ?></a></td> <td><?php echo $_v -> Description; ?></td> <td> <a href="./index.php?r=subprocess/update&id=<?php echo $_v->ActionID; ?>">修改</a> <a href="./index.php?r=subprocess/del&id=<?php echo $_v->ActionID; ?>">刪除</a> </td> </tr> <?php $i++; }?> </tbody> </table> </div>
Bootstrap 的 table 系列類別在這裡提供了斑馬紋、邊框與滑鼠移入高亮,几乎不必額外寫 CSS。ActionID 欄刻意隱藏,只是為了在修改與刪除連結中帶值。
二、進階:表格內直接編輯
要支援列內編輯,可以引入 bootstrap-table 這個第三方外掛(官方文件:https://bootstrap-table.wenzhixin.net.cn/zh-cn/)。以下示範在原始碼基礎上做過少量調整的版本,實際套用時請依自身需求微調。
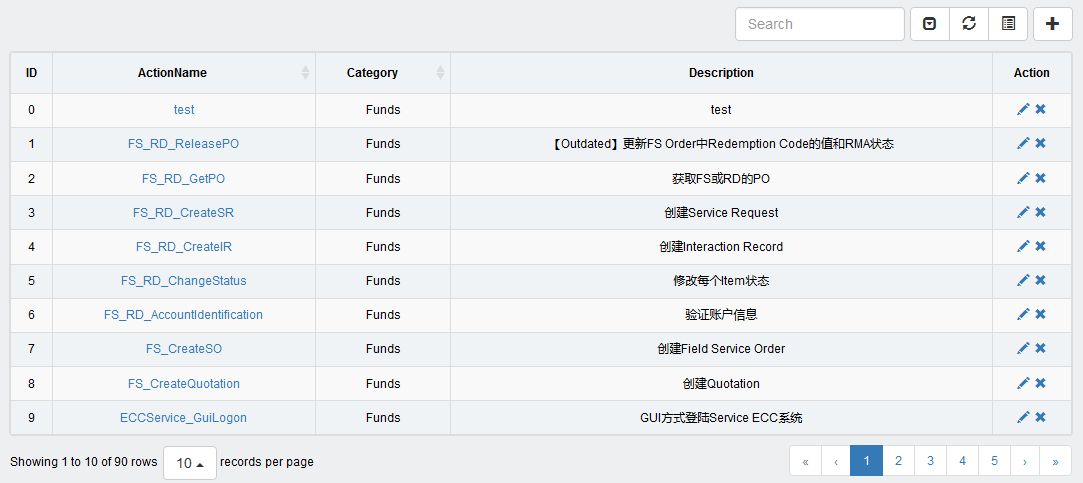
初始化後的樣子:
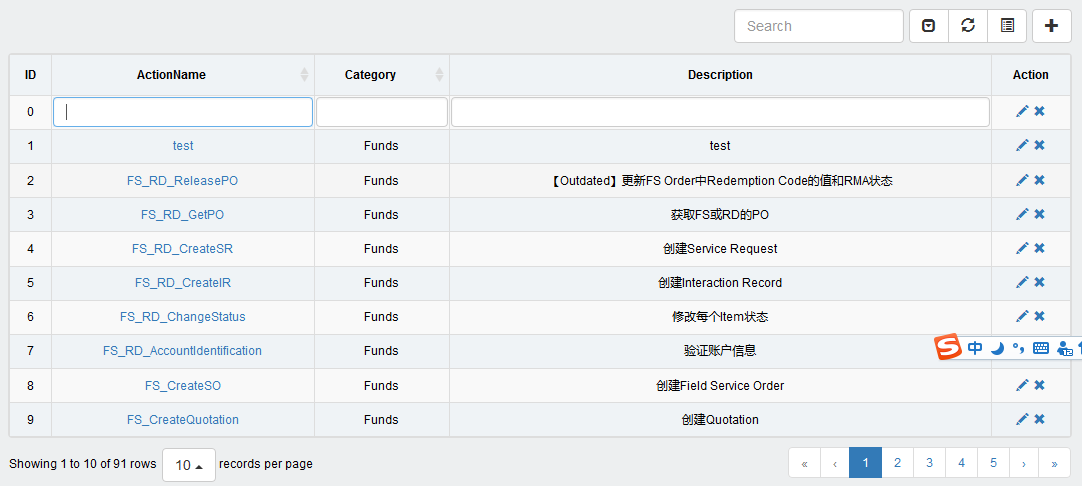
新增一列後:
1. 引入資源,示範中統一放在入口檔:
<!--表格編輯--> <link href="./assets/tableEdit/css/bootstrap-table.min.css" rel="stylesheet" /> <script src="./assets/tableEdit/js/bootstrap-table.js"></script> <script src="./assets/tableEdit/js/bootstrap-table-edit.js"></script> <script src="./assets/tableEdit/js/bootstrap-select.js"></script> <script src="./assets/tableEdit/js/bootstrap-datetimepicker.min.js"></script> <link href="./assets/tableEdit/css/bootstrap-datetimepicker.min.css" rel="stylesheet" />
2. 在頁面預留表格容器,右上方可自訂工具按鈕:
<script src="./js/subprocess/subprocess.js"></script> <div class="col-md-12"> <div style="float:right;margin:10px 0px 10px 5px"> <a title="Add" href="./index.php?r=subprocess/add"> <button type="button" class="btn btn-default" id="addData"<span style="color:#008000;background-color:#efefef;font-weight:bold;"></span>> <span class="glyphicon glyphicon-plus"></span> </button> </a> </div> <table class="table table-striped table-bordered table-hover" id="subprocessTable"></table> </div>
3. 以 JS 完成初始化:
$(function(){ //初始化表格 $('#subprocessTable').bootstrapTable({ method: 'get', url:"./index.php?r=subprocess/subprocessInfo", editable:true,//開啟編輯模式 clickToSelect: true, cache: false, showToggle:true, //顯示切換按鈕來切換表/卡片視圖。 showPaginationSwitch:true, //顯示分頁切換按鈕 pagination: true, pageList: [10,25,50,100], pageSize:10, pageNumber:1, uniqueId: 'index', //將index列設為唯一索引 striped: true, search: true, showRefresh: true, minimumCountColumns: 2, smartDisplay:true, columns: [ [ {field:"index",title:"ID",align:"center",edit:false,formatter:function(value, row, index){ return row.index=index ; //返回行號 }}, {field:"actionName",title:"ActionName",align:"center",order:"asc",sortable:"true",formatter:function(value,row,index){ var strHtml ='<a href="./index.php?r=subprocess/modify&id='+ row.actionId +'">'+ row.actionName +'</a>'; return strHtml; }}, {field:"category",title:"Category",align:"center",sortable:"true"}, {field:"description",title:"Description",align:"center"}, {field:"action",title:"Action",align:"center",formatter:function(value,row,index){ var strHtml ='<a href="./index.php?r=subprocess/modify&id='+ row.actionId +'"><li class="glyphicon glyphicon-pencil"></li></a>'+ '<a href="javascript:void(0);" onclick="removeData('+ index +')" style="margin-left:5px;"><li class="glyphicon glyphicon-remove"></li></a>'; return strHtml; },edit:false}, {field:"actionId",title:"ActionID",align:"center",edit:false,visible:false,searchable:false} ] ] }); /** * add a new row */ $('#addData').click(function(){ $('#subprocessTable').bootstrapTable('selectPage', 1); //Jump to the first page var data = {actionId: '', actionName: '',category:'', description: ''}; //define a new row data,certainly it's empty $('#subprocessTable').bootstrapTable('prepend', data); //the method of prepend must defined all fields,but append needn't //$('#dataTable').bootstrapTable('append',data); $("#dataTable tr:eq(1) td:eq(0)").trigger("dblclick"); $("#dataTable input")[0].focus(); }); });
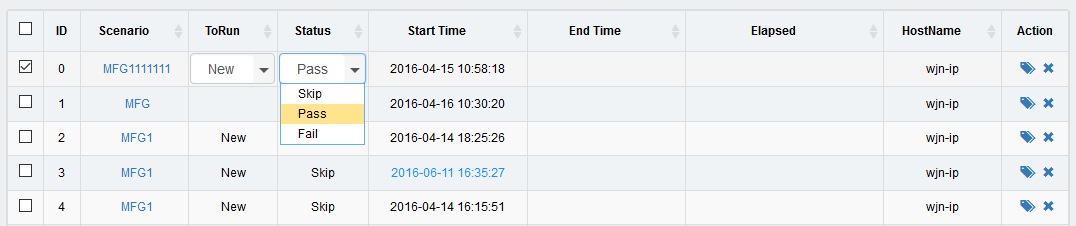
需要下拉選單欄位時,在欄位定義裡加上 edit 設定,選項可以寫死在 data 中,也可以用 url 從後端撈:
{field:"toRun",title:"Run Flag",align:"center",edit:{ type:'select',//下拉框 url:'./index.php?r=dictionary/dictionaryInfo&type='+"run", //data:[{id:1,text:'hello'},{id:2,text:'hi'}], valueField:'id', textField:'text', editable : false, onSelect:function(val,rec){ //console.log(val,rec); } },sortable:true}
呈現效果:
其餘 API 可直接翻閱外掛官網文件或原始碼。
三、動態表頭
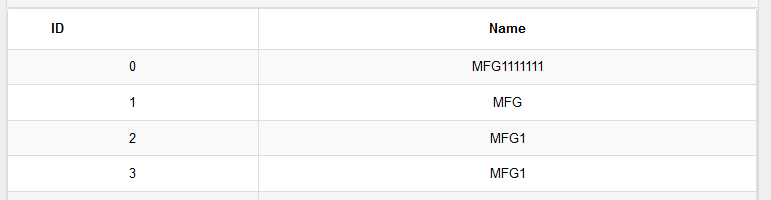
所謂動態表頭,就是欄位不固定,得先依條件查詢資料庫,再依結果決定要顯示哪些欄。有了前面的基礎,只要把 columns 換成自己組出的陣列就行:
$(function(){ var columnsAll = new Array(); //定義一個新的列集合,用來保存返回的數據 //把列數據封裝到一個對象中 var col = {}; col["field"] = "index"; col["title"] = "ID"; col["align"] = 'center'; col["formatter"] = function(value, row, index){ return row.index=index ; //返回行號 }; col["edit"] = false; columnsAll.push(col); //把這個對象添加到列集合中 var col2 = {}; col2["field"] = "scenarioId"; col2["title"] = "haha"; col2["align"] = 'center'; col2["edit"] = false; columnsAll.push(col2); //把這個對象添加到列集合中 //表格數據 $('#detailTable').bootstrapTable({ method: 'get', url:"./index.php?r=session/sessionInfo", editable:true,//開啟編輯模式 clickToSelect: true, cache: false, uniqueId: 'index', //將index列設為唯一索引 striped: true, minimumCountColumns: 2, smartDisplay:true, columns: [ columnsAll ] }); });
結果如下:
實作時有兩點值得注意:uniqueId 務必指定為真正的唯一鍵,否則編輯與刪除會認錯列;而 formatter 裡拼接 HTML 時,欄位值最好經過轉義處理,避免資料中的特殊字元破壞結構或形成 XSS 風險。
- 上一篇文章: Bootstrap 3 打造多層級下拉選單
- 下一篇文章: jQuery 實作表格與核取方塊的全選、反選
相關文章
-
jQuery 實作可編輯表格並即時產生 JSON 資料 用 bootstrap-table 實作表格的查詢、分頁與排序 bootstrap-table 表格客戶端分頁實例 bootstrap-table 插件入門 Demo 實作 Bootstrap Fileinput 搭配 Bootstrap Table 實作 Excel 匯入全流程 bootstrap-table 進階:借助 x-editable 實現單擊單元格就地編輯 打造可編輯並匯出 Excel 的 Table 表格插件 jQuery 學習筆記(二):打造可隨點隨編的表格 基於 PHP + jQuery 實現可編輯表格的完整代碼 用 jQuery(非 HTML5)實作可編輯表格
熱門推薦
easyui 表單關閉即時驗證,改為送出時統一檢查
FusionWidgets 的 Bulb 燈泡圖:單一數值與目標值的對比呈現
用 jQuery 實現多選下拉列表(可回顯、可多選)
jQuery EasyUI Treegrid 加載 checkbox 並實現父子聯動
從零學會寫 jQuery 插件:三種類型、七條規範與完整示例
用 jQuery 為 <li> 每隔幾行插入間隔或虛線
jQuery + CSS 手寫一個簡潔的圖片輪播
用 jQuery UI autocomplete 做出百度式搜索提示(支援動態增刪輸入框)
用原生 JavaScript 取代 jQuery ready() 的幾種寫法