基於 jQuery EasyUI 打造一個登入框界面
編輯:JQuery入門技巧
本文用 EasyUI 的 panel 與 textbox 組件,做一個浮在背景圖上的登入面板,包含帳號、密碼、驗證碼三個欄位,以及登入與註冊按鈕。整個頁面只需要 jQuery 加上 easyui.min.js 就能跑起來。
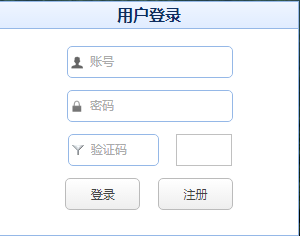
一、CSS
a { text-decoration: none; }
body { margin: 0px; }
#header {
  width: 100%;
  height: 30px;
  background-color: #E0EFFF;
  padding-top: 5px;
  padding-bottom: 10px;
}
#header .logo {
  margin-left: 50px;
  font-size: 24px;
  font-family: 微軟雅黑;
}
#picture { width: 100%; height: 750px; }
.panel-title { text-align: center; font-size: 16px; }
#bootom {
  padding-top: 50px;
  width: 100%;
  height: 100px;
  background: #eaf2ff;
}
#bootom_content {
  margin-left: 100px;
  width: 80%;
  text-align: center;
  font-size: 0.8em;
}
p { line-height: 20px; }
二、HTML 結構
<!DOCTYPE html PUBLIC "-//W3C//DTD XHTML 1.0 Transitional//EN" "https://www.w3.org/TR/xhtml1/DTD/xhtml1-transitional.dtd">
<html xmlns="https://www.w3.org/1999/xhtml" xml:lang="en">
<head>
<meta http-equiv="Content-Type" content="text/html;charset=UTF-8">
<link rel="stylesheet" type="text/css" href="themes/default/easyui.css">
<link rel="stylesheet" type="text/css" href="themes/default/panel.css">
<link rel="stylesheet" type="text/css" href="themes/icon.css">
<link rel="stylesheet" type="text/css" href="css/index.css">
<script type="text/javascript" src="js/jquery.min.js"></script>
<script type="text/javascript" src="js/jquery.easyui.min.js"></script>
<title>系統首頁</title>
</head>
<body>
<!-- 頁首 -->
<div id="header">
<div class="logo" onclick="window.location.href='index.html'">
<strong>信息系統</strong>
</div>
</div>
<!-- 背景大圖 + 浮動登入面板 -->
<div id="picture" style="background:url(images/index.jpg) no-repeat; background-size: cover;">
<div class="easyui-panel" title="用戶登錄"
data-options="region:'east',split:true,style:{position:'absolute',right:50,top:150}"
style="width:300px;text-align:center;">
<div style="padding:10px 60px 20px 60px">
<form id="ff" class="easyui-form" method="post" data-options="novalidate:true">
<table cellpadding="5">
<tr>
<td>
<input class="easyui-textbox"
data-options="prompt:'賬號',validType:'name'"
iconCls="icon-man" iconAlign="left"
style="width:100%;height:32px"/>
</td>
</tr>
<tr>
<td>
<input class="easyui-textbox"
data-options="prompt:'密碼',validType:'password'"
iconCls="icon-lock" iconAlign="left"
style="width:100%;height:32px"></input>
</td>
</tr>
<tr>
<td>
<input class="easyui-textbox"
data-options="prompt:'驗證碼',validType:'validate'"
iconCls="icon-filter" iconAlign="left"
style="width:55%;height:32px" />
<img src="" alt="" width="56" height="32" align="absMiddle" />
</td>
</tr>
</table>
</form>
<div style="text-align:center;padding:5px;">
<a href="#" class="easyui-linkbutton" style="width:45%;height:32px">登錄</a>
<a href="#" class="easyui-linkbutton" style="width:45%;height:32px">注冊</a>
</div>
</div>
</div>
</div>
<!-- 頁尾 -->
<div id="bootom">
<div id="bootom_content">
<p><strong>關於我們 法律聲明 服務條款 聯系我們</strong></p>
<p>地址:江西省南昌市經濟開發區天祥大道 郵箱:330000 Copyright © 2017 - 2018 版權所有</p>
<p>建議使用 IE8 以上版本瀏覽器</p>
</div>
</div>
<script>
function submitForm(){
$('#ff').form('submit', {
onSubmit: function(){
// 先啟用驗證再檢查,不通過就不送出
return $(this).form('enableValidation').form('validate');
}
});
}
function clearForm(){
$('#ff').form('clear');
}
</script>
</body>
</html>
三、幾個實作重點
面板定位。data-options 裡用 style 直接指定 position:absolute 加上 right/top,讓登入框浮在背景圖的右側;若想用程式動態調整位置,可以呼叫 $('#p').panel('move', {left:100, top:100})。
背景自適應。background-size: cover 讓大圖在不同解析度下都能填滿容器,比寫死 750px 高度的做法更穩健,實務上建議再搭配 media query 處理行動裝置。
驗證與安全。這只是界面示範。真正的登入流程必須在後端驗證帳密,前端密碼欄位應改用 type="password"(或 EasyUI 的 password 驗證型別)避免明文顯示,並加上 HTTPS、登入失敗次數限制與 CSRF 防護。驗證碼圖片也需要後端產生並與 session 比對。
以上就是用 jQuery EasyUI 實作登入框界面的完整程式碼與說明,供大家參考。
- 上一篇文章: 純前端實現漢字轉拼音:借鑑 QQ 空間的查表思路
- 下一篇文章: EasyUI 中 checkbox 的幾個常見操作整理